Microsoft Endpoint Protection for Windows Azure Customer Technology Preview is now available for free download
Today we released the customer technology preview of Microsoft Endpoint Protection (MEP) for Windows Azure, a plugin that allows Windows Azure developers and administrators to include antimalware protection in their Windows Azure VMs. The package is installed as an extension on top of Windows Azure SDK. After installing the MEP for Windows Azure CTP, you can enable antimalware protection on your Windows Azure VMs by simply importing the MEP antimalware module into your roles' definition:
The MEP for Windows Azure can be downloaded and installed from https://www.microsoft.com/download/en/details.aspx?id=29209. Windows Azure SDK 1.6 or later is required before install.
Functionality recap
When you deploy the antimalware solution as part of your Windows Azure service, the following core functionality is enabled:
- Real-time protection monitors activity on the system to detect and block malware from executing.
- Scheduled scanning periodically performs targeted scanning to detect malware on the system,
including actively running malicious programs. - Malware remediation takes action on detected malware resources, such as deleting or quarantining
malicious files and cleaning up malicious registry entries. - Signature updates installs the latest protection signatures (aka “virus definitions”) to
ensure protection is up-to-date. - Active protection reports metadata about detected threats and suspicious resources to
Microsoft to ensure rapid response to the evolving threat landscape, as well as
enabling real-time signature delivery through the Dynamic Signature Service
(DSS).
Microsoft’s antimalware endpoint solutions are designed to run quietly in the background without human intervention required. Even if malware is detected, the endpoint protection agent will automatically take action to remove the detected threat. Refer to the document “Monitoring Microsoft Endpoint Protection for Windows Azure” for information on monitoring for malware-related events or VMs that get into a “bad state.”
Providing feedback
The goal of this technology preview version of Microsoft Endpoint Protection for Windows Azure is to give you a chance to evaluate this approach to providing antimalware protection to Windows Azure VMs and provide feedback. We want to hear from you! Please send any feedback to eppazurefb@microsoft.com.
How it works
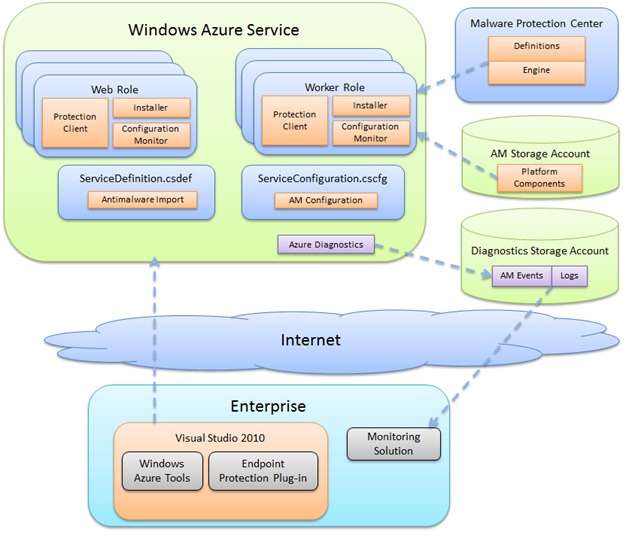
Microsoft Endpoint Protection for Windows Azure includes SDK extensions to the Windows Azure Tools for Visual Studio which provides the means to configure your Windows Azure service to include endpoint protection in the specified roles. When you deploy your service, an endpoint protection installer startup task is included that runs as part of spinning up the virtual machine for a given instance. The startup task pulls down the full endpoint protection package platform components from Windows Azure Storage for the geographical region specified in the Service Configuration (.cscfg) file and installs it, applying the other configuration options specified.
Once up and running, the endpoint protection client downloads the latest protection engine and signatures from the Internet and loads them. At this point the virtual machine is up and running with antimalware protection enabled. Diagnostic information such as logs and antimalware events can be configured for persistence in Windows Azure storage for monitoring. The following diagram shows the “big pictures” of how all the pieces fit together:
Prerequisites
Before you get started, you should already have a Windows Azure account configured and have an understanding of how to deploy your service in the Windows Azure environment. You will also need Microsoft Visual Studio 2010. If you have Visual Studio 2010, the Windows Azure Tools for Visual Studio, and have written and deployed Windows Azure services, you’re ready to go.
If not, do the following:
- Sign up for a Windows Azure account https://windows.azure.com
- Install Visual Studio 2010 https://www.microsoft.com/visualstudio
- Install Windows Azure Tools for Visual Studio https://msdn.microsoft.com/en-us/library/windowsazure/ff687127.aspx
Deployment
Once you have Visual Studio 2010 and the Windows Azure Tools installed, you’re ready to get antimalware protection up and running in your Azure VMs. To do so, follow these steps:
- Install Microsoft Endpoint Protection for Windows Azure
- Enable your Windows Azure service for antimalware
- Optionally customize antimalware configuration options
- Configure Azure Diagnostics to capture antimalware related information
- Publish your service to Windows Azure
Install Microsoft Endpoint Protection for Windows Azure
Run the Microsoft Endpoint Protection for Windows Azure setup package. The package can be downloaded from the Web at https://go.microsoft.com/fwlink/?LinkID=244362.
Follow the steps in the setup wizard to install the endpoint protection components. The required files are installed in the Windows Azure SDK plugins folder. For example:
C:\Program Files\Windows Azure SDK\v1.6\bin\plugins\Antimalware
Once the components are installed, you’re ready to enable antimalware in your Windows Azure roles.
Enable your Windows Azure service for antimalware
To enable your service to include endpoint protection in
your role VMs, simply add the “Antimalware” plugin when defining the role.
- In Visual Studio 2010, open the service definition file for your service (ServiceDefinition.csdef).
- For each role defined in the service definition (e.g. your worker roles and web roles), update the
<imports> section to import the “Antimalware” plugin by adding the following line:
<Import moduleName="Antimalware" />
The following image shows an example of adding antimalware for the worker role “WorkerRole1” but not for the project’s Web role.
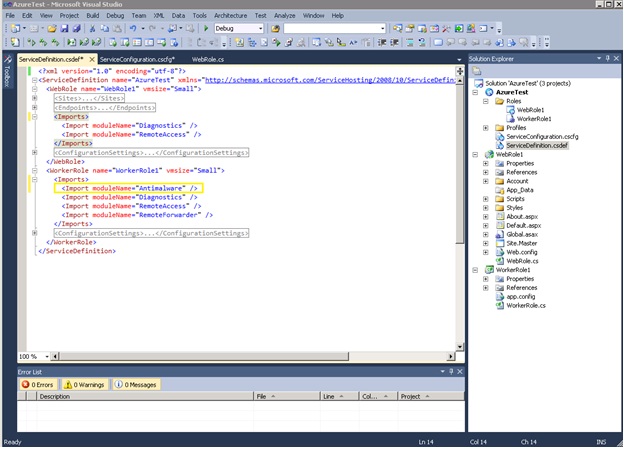
3. Save the service definition file.
In this example, the worker role instances for the project will now include endpoint protection running in each virtual machine. However the web role instances will not include antimalware protection, because the antimalware import was only specified for the worker role. The next time the service is deployed to Windows Azure, the endpoint protection startup task will run in the worker role instances and install the full endpoint protection client from Windows Azure Storage, which will then install the protection engine and signatures from the Internet. At this point the virtual machine will have active protection up and running.
Optionally customize antimalware configuration options
When you enable a role for antimalware protection, the configuration settings for the antimalware plugin are automatically added to your service configuration file (ServiceConfiguration.cscfg). The configuration settings have been pre-optimized for running in the Windows Azure environment. You do not need to change any of these settings. However, you can customize these settings if required for your particular deployment.
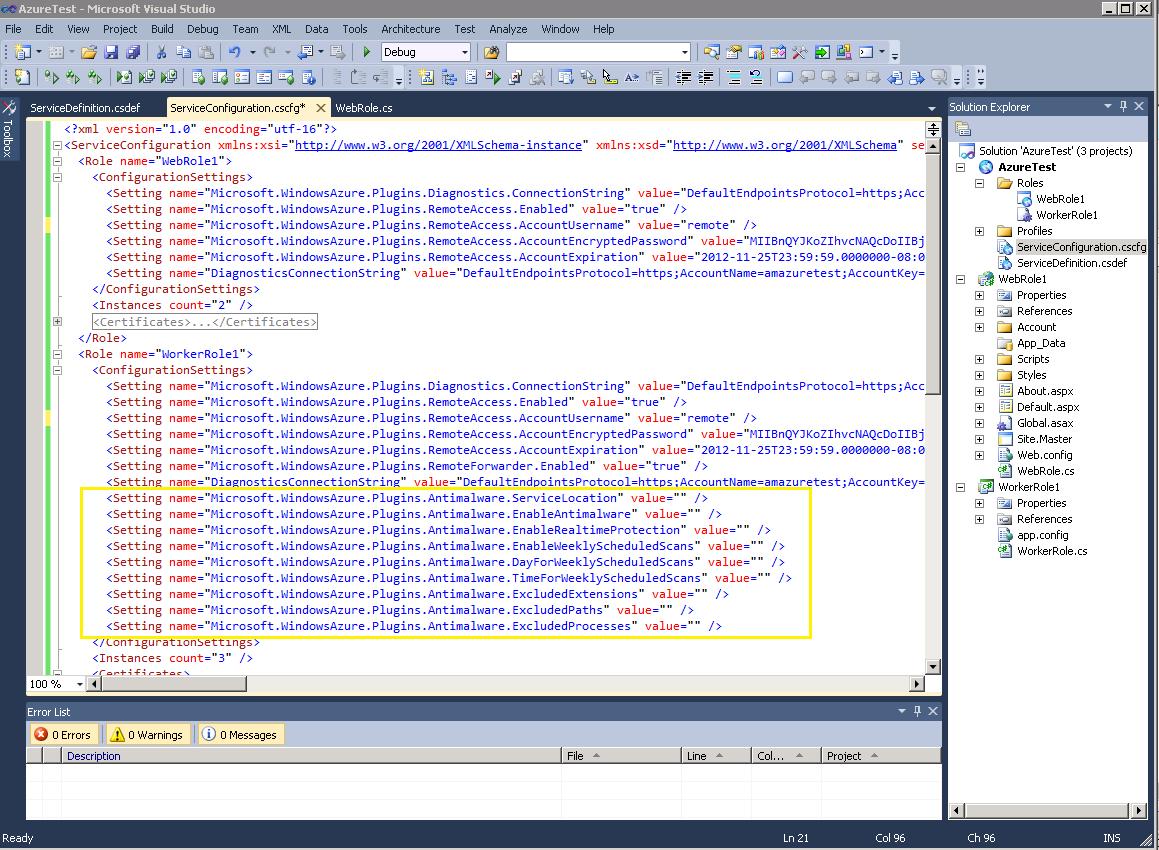
Default antimalware configuration added to service configuration
The following table summarizes the settings available to configure as part of the service configuration:
Setting |
Options |
Default |
Description |
ServiceLocation |
East Asia North Central US North Europe South Central US Southeast Asia West Europe |
South Central US |
Specifies the region to download the antimalware client components from. Using the same region as your service can improve deployment time and decrease costs |
EnableAntimalware |
true false
|
true |
Enables or disables endpoint protection |
EnableRealtimeProtection |
true false |
true |
Enables or disables real-time scanning, such as on-access disk scanning |
EnableWeeklyScheduledScans |
true false |
true |
Enables or disables a periodic “quick scan” for active malware on the system |
DayForWeeklyScheduledScans |
0 - 7 |
7 |
0 – scan daily 1 – Sunday 2 – Monday … 7 – Saturday |
TimeForWeeklyScheduledScans |
0 - 1440 |
120 |
Hour at which to begin the scheduled scan. Measured in 60 minute increments corresponding to the desired hour. 60 – 1:00 AM 120 – 2:00 AM … 1380 – 11:00 PM |
ExcludedExtensions |
extension1|extension2 |
None |
Pipe-delimited list of file extensions to exclude from scanning. Example: gif|log|txt would exclude files with the .gif, .log, or .txt extension from being scanned. |
ExcludedPaths |
path1|path2 |
None |
Pipe-delimited list of paths to files or folders to exclude from scanning. Example: e:\approot\worker.dll|e:\approot\temp would exclude the file worker.dll in the e:\approot folder and anything under the folder e:\approot\temp from being scanned. |
ExcludedProcesses |
process1|process2 |
None |
Pipe-delimited list of process exclusions. Any file opened by an excluded process will not be scanned (the process itself will still be scanned – to exclude the process itself, use the ExcludedPaths configuration). Example: D:\Program Files\MyApp.exe would exclude any files opened by MyApp.exe from being scanned. |
Updating configuration for deployed services
Windows Azure provides the ability to update a service configuration “on the fly” to a service that is already running in Windows Azure. For example on the Windows Azure Portal you can select the “Configure” option to upload a new configuration file or manually edit configuration settings for an existing deployment.

Microsoft Endpoint Protection for Windows Azure supports applying changes to a deployed service. If you change the antimalware settings in the service configuration file, you can deploy the new configuration to your running service and the antimalware related settings will update automatically.
Microsoft Endpoint Protection for Windows Azure must have already been deployed as part of service deployment. You cannot deploy or remove endpoint protection through a configuration update.
Configure Azure Diagnostics to capture antimalware related information
In order to monitor the health of your antimalware deployment, you’ll need to configure Windows Azure to pull the antimalware useful events and logs into Windows Azure storage. From there, any number of Windows Azure monitoring solutions can be used for antimalware monitoring and alerting.
Refer to the MSDN documentation for Windows Azure Diagnostics for general information:
https://msdn.microsoft.com/en-us/library/windowsazure/gg433048.aspx
Antimalware events
For antimalware events, you need to configure diagnostics to pull events from the System event log where the source is “Microsoft Antimalware.” In general you’ll want to pull Error and Warning events. See the “Monitoring Microsoft Endpoint Protection for Windows Azure” document for more
information on which events to monitor.
Here’s an example of the code you might add to the entry point for your service:
//add antimalware diagnostics
var config = DiagnosticMonitor.GetDefaultInitialConfiguration();
//exclude informational and verbose event log entries
config.WindowsEventLog.DataSources.Add("System!*[System[Provider[@Name='Microsoft Antimalware'] and (Level=1 or Level=2 or Level=3)]]");
//write to persisted storage every 1 minute
config.WindowsEventLog.ScheduledTransferPeriod = System.TimeSpan.FromMinutes(1.0);
DiagnosticMonitor.Start("Microsoft.WindowsAzure.Plugins.Diagnostics.ConnectionString", config);
In this case, any antimalware errors or warnings from the System event log will be written to Windows Azure Storage every 1 minute. Use an interval that makes sense for your monitoring requirements.
You can view the raw events by looking at the WADWindowsEventLogsTable table in the storage account you configured to use with Windows Azure Diagnostics. This can be useful to validate that antimalware event collection is working. For example start with including informational events (Level=4) to validate your configuration end-to-end, then turn them off via configuration update.
Antimalware logs
In addition, the following locations include logs that may be useful if you are encountering problems getting the antimalware components up and running in your Windows Azure VMs:
- %programdata%\Microsoft Endpoint Protection
includes logs for the startup task that is deployed with your Windows Azure service - %programdata%\Microsoft\Microsoft Security Client
includes logs for the installation of the endpoint protection platform components
You can configure Windows Azure diagnostics to pull these logs as well by implementing custom logging to move these logs to blob storage.
See the following documentation on MSDN for more information:
https://msdn.microsoft.com/en-us/library/windowsazure/hh411528.aspx
Publish your service to Windows Azure
The final step once you have everything configured in Visual Studio 2010 is to publish your service to Windows Azure. The roles that have antimalware configured will include the additional startup task to install and start the endpoint protection client as part of service deployment. As with any
Windows Azure service, you can package your service for deployment through the Windows Azure portal, or you can publish from within Visual Studio 2010. Either option will work with Microsoft Endpoint Protection for Windows Azure.
Once you publish your service, any roles with antimalware enabled will have the Microsoft Endpoint Protection client running within the VM.