Custom CUD Walkthrough for LINQ to SQL to Entity Framework Metadata Conversion Template
Introduction
After completing the WidgetFactory walkthrough, you may be wondering how to convert stored procedures and customized insert, update and delete functions. This walkthrough will show you how to convert an application with a stored procedure and customized insert, update and delete stored procedures to Entity Framework using the conversion template. (For more information on the Conversion Template please see the original blog post.)
Background
The CUD example contains a database of Professors and Courses with a relationship between the two. The database has a stored procedure called ResetData which makes sure that certain important professors and courses are present in the database, and inserts them if they are not. There are also Insert, Update, and Delete functions for both Professors and Courses. Notably, the delete function for a Professor deletes all of the Courses that are taught by that professor.
Before Starting
1. Download the CUD sample project CustomCUD.zip.
2. Construct the CUD database. CUD.sql can be run directly in Server Management studio to create the sample database.
3. If you do not already have the conversion template, you can download it from the original blog post.
Exploring the Original Project
1. Unzip the example directory and open the CustomCUD.sln solution file.
2. Open CustomCUD.dbml by double-clicking on it in the solution explorer. (If a warning about the OutputPath property appears, ignore it). Notice the relationship between professors and courses, and the stored procedures.

3. Right-click on the Course class, and choose Configure Behavior.
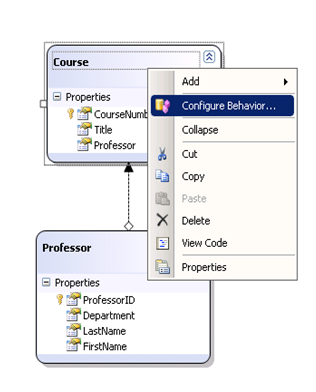
4. Notice that the Insert, Update and Delete Behaviors are each mapped to the stored procedures listed. Also notice that the insert functions for both Course and Professor are mapped to L2SInsert* rather than EFXInsert*
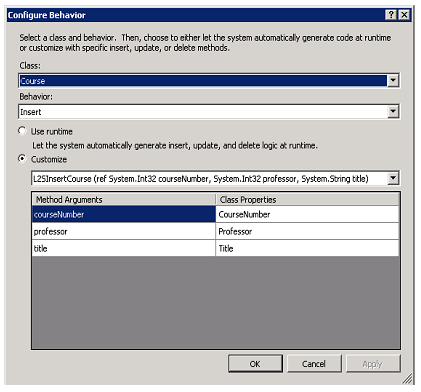
5. Also notice the 'ref' parameter in the insert functions. The two primary keys (ProfessorID and CourseNumber) are both Identities in the database. The store-generated values are passed back through the output parameter. Click "Cancel" to close the dialog.
6. Open the test file TestCUD.cs. Run all of the tests (with the line "#define USEEFX" commented out) by pressing Ctrl + R, A. All of the tests should pass.
Converting the Metadata
1. Add a new Class Library project called "CustomCUDEFX" by right-clicking on the solution in the solution explorer and choosing Add-> New Project.
2. Delete the file Class1.cs from the new project by right-clicking on it in the solution explorer and choosing Delete. Add a new ConversionTemplate to the new project named "CustomCUD.tt" by right-clicking on the project in the solution explorer and choosing Add-> New Item.
3. If a security warning dialog appears, click “Trust” to trust this template. The template and two ttinclude files, EDMXT4.ttinclude and L2ST4.ttinclude should now appear in your solution.
4. Right-click on the template in the solution explorer and choose "Run Custom Tool". An error may appear:
Running transformation: System.Exception: DBML file 'WidgetFactory.dbml' could not be found.
If the error appears, open the template, and modify the filename to match the path for your dbml file. The absolute file-path is required. (Do not copy the dbml file into the new project, as this will cause a conflict between the code generated from the dbml file and the code generated from the edmx file.)
var options = new {
DbmlFileName = @"YourFilePath", // Which DBML file to operate on
...
};
If this error does not appear, continue to the next step.
5. Right-click on CustomCUD.tt and choose, "Run Custom Tool".
6. Two warnings and two errors should be raised:

The warnings refer to the fact that the original LINQ to SQL insert functions use output parameters, which is not permitted in Entity Framework. Entity Framework uses ResultBindings to map the server-generated values. The errors refer to the way in which the EFX insert functions have mapped their results. To fix the problem with the insert functions, the stored procedure used to insert must be modified.
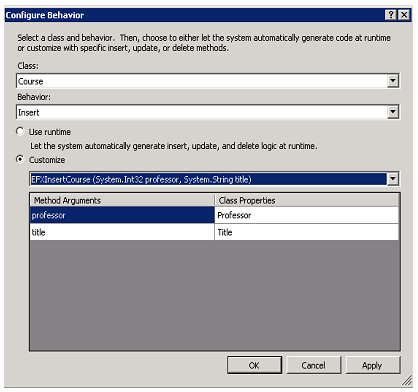
7. In the dbml file, right-click on Course and choose "Configure Behavior" again.
8. Change the insert stored proc to point to EFXInsertCourse. Click "Apply". Change the in the Class drop-down menu, choose Professor, and change the Insert behavior to EFXInsertProfessor the same way you did for Course. Notice that the EFXInsert* functions have one fewer parameter than their L2SInsert* counterparts and have no "ref" parameters. Click "OK" to close the dialog.
9. Save the dbml file.
10. Clean the solution by right-clicking on the solution in the solution explorer and choosing Clean Solution. Run all of the unit tests again by pressing Ctrl+R, A. Notice that the two tests for insert fail. This is because the output parameter is no longer mapped.
11. Right-click on the template in the solution explorer and run the custom tool again, there should be no errors and no warnings.
12. Expand the template (by clicking the + on the right) and double-click on the CustomCUD.edmx sub-file in the solution explorer to open it with the designer. Notice that the relationship has been preserved, but that the foreign-key now appears as a Navigation Property.

13. Right-click on Course and choose "Stored Procedure Mapping"
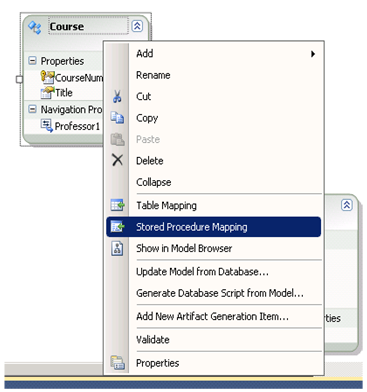
14. Notice the mapping between the stored procedures and Insert, Update and Delete functionality is preserved. Also notice that the direction of the parameters are all "In"

15. Add the new project as a reference to the test file by right-clicking on "References" in the test project and choosing Add Reference. In the Projects tab, choose CustomCUDEFX and click "Ok".
16. Uncomment the line "#define USEEFX," at the top of TestCUD.cs. Clean the solution and run the tests again by pressing Ctrl+R, A.
17. Notice that all of the tests except "TestInsertCourse" and "TestInsertProfessor" pass. Examine the code that caused the failure. In both cases, the test was checking to see that the database-generated identity value for the primary key had been refreshed. In both cases this fails, because the output parameter has not yet been mapped.
18. In order to return server-generated values, a ResultBinding must be added.
19. In the edmx file, right-click again on Course and choose Stored Procedure Mapping.
20. Under "Insert Using EFXInsertCourse", click on <Add Result Binding> underneath "Result Column Bindings", and type in "CourseNumber". The Property will auto-complete to "CourseNumber : Int32". The Mapping Details should now look like this:

21. Right-click on Professor in the designer and choose Stored Procedure Mapping.
22. Under "Insert Using EFXInsertProfessor", click on <Add Result Binding> again, and type in "ProfessorID", the property will auto-complete to "ProfessorID : Int32".
23. The Mapping Details should now look like this:

24. Save the file. (If an error dialog appears, click "OK". In the next dialog that pops up, click "Cancel". Don't worry, the edmx has been saved at this point.)
25. Clean the solution, and run the tests again.
26. All of the tests should now pass.
27. Now let's take a look at the differences between the stored procedures and the way that the outputs are mapped in the edmx.
28. Open the CUD.sql file (in the Solution Items), and find the definitions for the functions EFXInsert* and L2SInsert*. (The definitions are included below for reference).
-- -------------------------------------------------- -- InsertCourse -- Linq to SQL -- -------------------------------------------------- CREATE PROCEDURE [dbo].[L2SInsertCourse] @courseNumber int output, @professor int, @title varchar(50) AS
INSERT INTO [CUD].[dbo].[Course] ([Professor] ,[Title])
VALUES (@professor ,@title) SET @courseNumber = CAST (SCOPE_IDENTITY() as Int) GO -- -------------------------------------------------- -- InsertProfessor -- Linq to SQL -- -------------------------------------------------- CREATE PROCEDURE [dbo].[L2SInsertProfessor] @professorID int output, @department varchar(50), @lastName varchar(50), @firstName varchar(50) AS
INSERT INTO [CUD].[dbo].[Professor] ([Department] ,[LastName] ,[FirstName])
VALUES (@department ,@lastName ,@firstName) SET @professorID = CAST (SCOPE_IDENTITY() as Int) GO -- -------------------------------------------------- -- InsertCourse -- Entity Framework -- -------------------------------------------------- CREATE PROCEDURE [dbo].[EFXInsertCourse] @professor int, @title varchar(50) AS
INSERT INTO [CUD].[dbo].[Course] ([Professor] ,[Title])
VALUES (@professor ,@title) SELECT CourseNumber from [CUD].[dbo].[Course] where CourseNumber = scope_identity() GO -- -------------------------------------------------- -- InsertProfessor -- Entity Framework -- -------------------------------------------------- CREATE PROCEDURE [dbo].[EFXInsertProfessor] @department varchar(50), @lastName varchar(50), @firstName varchar(50) AS
INSERT INTO [CUD].[dbo].[Professor] ([Department] ,[LastName] ,[FirstName])
VALUES (@department ,@lastName ,@firstName) SELECT ProfessorID from [CUD].[dbo].[Professor] where ProfessorID = scope_identity() GO |
29. The major differences in the stored procedures are:
1) The function signature: the EFXInsert* functions have one fewer parameter and no output parameters
2) The return value: the EFXInsert* procedures use a SELECT, whereas the L2SInsert* procedures use a SET statement.
30. To look at the differences in the metadata, open the edmx file with a text/xml editor by closing the file, and right-clicking on it in the solution explorer and choosing Open With. In the dialog box that appears choose XML Editor.
31. In the MSL (Mapping) section of the metadata, find the ModificationFunctionMapping element within the EntityTypeMapping Element for Course.
32. Look at the InsertFunction element and find the result binding:
<ModificationFunctionMapping> <InsertFunction FunctionName="CUDModel.Store.EFXInsertCourse"> <AssociationEnd AssociationSet="Professor_Course" From="Course" To="Professor"> <ScalarProperty Name="ProfessorID" ParameterName="professor" Version="Current"/> </AssociationEnd> <ScalarProperty Name="Title" ParameterName="title" Version="Current"/> <ResultBinding Name="CourseNumber" ColumnName="CourseNumber" /> </InsertFunction> <UpdateFunction FunctionName="CUDModel.Store.UpdateCourse"> <ScalarProperty Name="CourseNumber" ParameterName="courseNumber" Version="Current"/> <AssociationEnd AssociationSet="Professor_Course" From="Course" To="Professor"> <ScalarProperty Name="ProfessorID" ParameterName="professor" Version="Current"/> </AssociationEnd> </UpdateFunction> <DeleteFunction FunctionName="CUDModel.Store.DeleteCourse"> <ScalarProperty Name="CourseNumber" ParameterName="courseNumber" Version="Original"/> <AssociationEnd AssociationSet="Professor_Course" From="Course" To="Professor"> <ScalarProperty Name="ProfessorID" ParameterName="professor" Version="Original"/> </AssociationEnd> </DeleteFunction> </ModificationFunctionMapping> |
33. Now do the same for the InsertFunction element in Professor, instead finding:
<ResultBinding Name="ProfessorID" ColumnName="ProfessorID" />
A note on ResultBinding elements: these elements map a scalar property on the entity (ProfessorID) to the name of the column in the database in which the result will be stored. The value for the column ProfessorID is generated in the database, so to return it, a ResultBinding is used. Though in LINQ To SQL, an output parameter would have been used, the end functionality is the same.