Introduction to Web Development; Popfly Input Blocks
 In this the last in a series of five articles on Microsoft Web Development we look at creating an input block to allow your web service to be used in Popfly.
Building our block
For the purpose of this tutorial we will implement a block that will take XML data (in the form of an RSS feed), process and display that data. This will demonstrate the principles of building an input block in Popfly using JavaScript. In this tutorial we will build out put functionality into our block so we can display our data formatted with html, it is very easy to tweak the output so it can be transformed and displayed using further blocks.
Firstly, head over to https://www.popfly.com and login with your Windows Live ID. Then using the toolbar at the top, select Create Stuff > Block. Now we can start building our data input block...
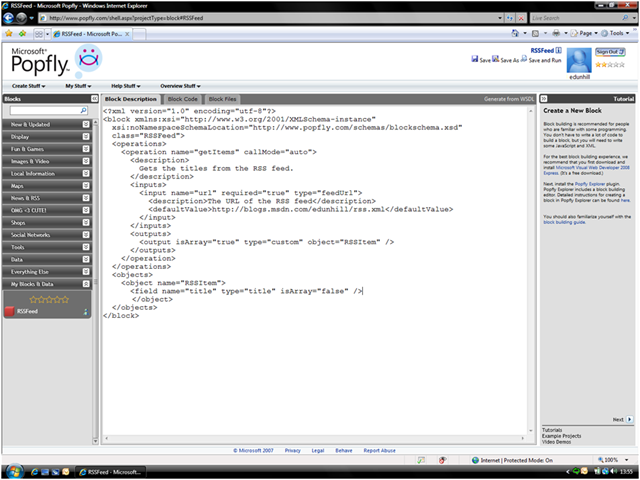
When you first view the ‘create block’ screen, you’ll see a bunch of XML – this is the definition of the block so that you can provide customisation through Popfly’s user interface. Seeing as we’re creating an RSS-reader block, we’ll call ours “RSSFeed”.
1. Where it says class=“HelloWorldClass”, change it to read class=“RSSFeed”.
2. You’ll notice below there is a group tagged ‘operations’. This is where you can build different behaviours for your block to have. For this block, we’ll implement one operation: getItems. This will simply return all the titles from our RSS feed.
3. Rename the default operation from “hello” to “getItems”.
4. Inside the description tags, change the description, to something such as “Gets the titles from the RSS feed.”
5. Above the <outputs> group of tags, create another group called inputs.
6. Create an input tag with the name=“url”, required=“true” and type=“feedURL”.
7. Give this new input tag a new description, such as “The URL of the RSS feed.”
8. If you like, you can give this a <defaultValue> property, I’ve set mine to my blog: https://blogs.msdn.com/edunhill/rss.xml.
9. Under the <outputs> group, change the isArray property to “true”, change the type to “custom” and add object=“RSSItem” – this will show we’re outputting a list of RSSItems.
10. After the <operations> group, add a new group called <objects>, so we can quickly define what an RSSItem is.
11. Create a new <object> tag, with name=“RSSItem”, then give it another tag called <field> with the properties name=“title”, type=“title” and isArray=“false”.
12. That’s it! The block is now defined so Popfly can understand it. Hopefully you should have something that looks like the below:
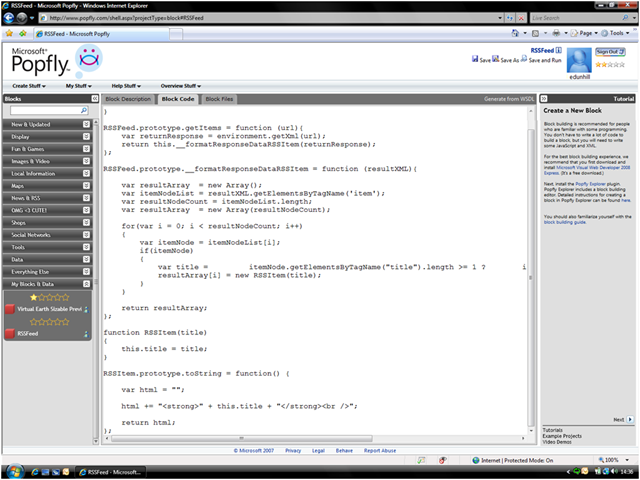
Now, we have to head on over to the “Block Code” tab, to write the code that will actually make the block do it’s thing.
1. Change the HelloWorldClass text to read RSSFeed.
2. Rename the first “hello” function to “getItems”, and add url in the brackets after the word “function”.
3. Then inside the function, type the following:
var returnResponse = environment.getXml(url);
return this.__formatResponseDataRSSItem(returnResponse);
These lines download the RSS feed into a readable format for use with our block.
4. Create another RSSFeed.prototype. called “__formatResponseDataRSSItem” – this will return the article titles as an array of strings (lines of text) for use with our block.
5. Inside the new function, add the following code:
var resultArray = new Array();
var itemNodeList = resultXML.getElementsByTagName('item');
var resultNodeCount = itemNodeList.length;
var resultArray = new Array(resultNodeCount);
for(var i = 0; i < resultNodeCount; i++)
{
var itemNode = itemNodeList[i];
if(itemNode)
{
var title = itemNode.getElementsByTagName("title").length >= 1 ? itemNode.getElementsByTagName("title")[0].text : "";
resultArray[i] = new RSSItem(title);
}
}
return resultArray;
This code iterates through each of the titles in the RSS XML document and adds them to our resultArray, which is in turn, returned to the block for output.
6. The two final things to do are define (in code) an RSSItem, and then define how our block will pass it’s data to another block (or optionally, how it will output the data).
7. Define another function called “RSSItem” with “title” as a parameter, then insert the code: this.title = title;
This code defines RSSItem as ‘having a title’.
8. Finally, we need to output some sort of data. Create another RSSItem.prototype. called “toString” and insert the following code:
var html = "";
html += "<strong>" + this.title + "</strong><br />";
return html;
This code simply outputs all the titles in bold as html to be read either by the user, or another block.
And that’s it! Now our block is totally built and configured, hopefully you’ll be looking at something like this:
Now we can quickly test the block, by clicking the “Save and Run” option to the top-right of your screen. Give the block a name, like RSSFeed, and Popfly will create a new Mashup with your block. If you want to see what it looks like, you can hit preview and should be able to see a list of article titles.
You can change the code in step 8 above to output variables instead of html so you can hook this block up with a display or transform block.
I hope you've enjoyed the series, if you have any questions about any aspect of Microsoft Web Dev don't hesitate to drop me a line.
Technorati Tags: Popfly,JavaScript,Silverlight,Studentzine