Getting started with XNA
I was recently asked to write a guide to getting started with XNA to be published in a guide we will be distributing this year. As I was writing it I was thinking this would be great for the blog so now its finished here it is!
NB: If you don't know what XNA is and would like to find out more then check out creators.xna.com
Getting started with XNA Game Studio
Before you can develop games for XNA you need to download and install Microsoft Visual C# 2005 Express Edition and XNA Game Studio Express. This will give you the IDE and allow you to code the game and then build and deploy it.
- First download and install Microsoft Visual C# 2005 Express Edition from https://msdn2.microsoft.com/en-us/express/aa975050.aspx.
- Next download and install Microsoft Visual Studio 2005 Express Editions Service Pack 1 from https://www.microsoft.com/downloads/details.aspx?FamilyId=7B0B0339-613A-46E6-AB4D-080D4D4A8C4E&displaylang=en.
- Finally download and install Microsoft XNA™ Game Studio Express from https://msdn2.microsoft.com/en-us/XNA™/aa937795.
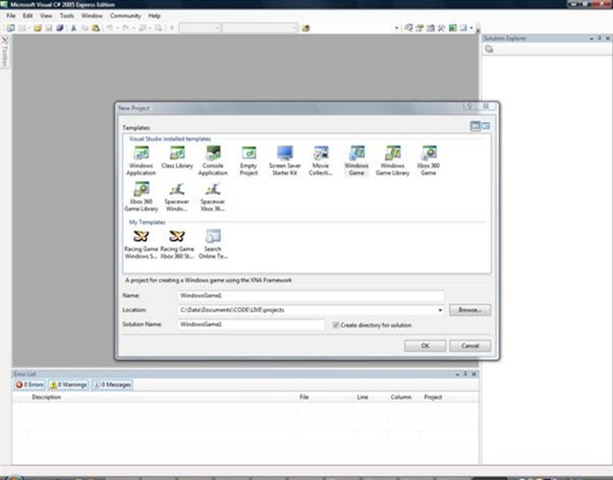
Once you have installed the above you can navigate to XNA Game Studio on your start menu and fire up the application:
XNA on the Xbox 360
The XNA platform can not only run on Windows but also the Xbox 360, below is a guide to setting up the Xbox 360 for XNA and deploying games onto the console.
For the purpose of this part of the guide we will assume you already have XNA Game Studio fully set up and working on your PC (if not please see the above ‘Getting started with XNA Game Studio’ guide).
- To deploy games onto the Xbox 360 your console must be connected to both the Internet and your PC. You can do this with the Ethernet port on the back of your console or using the optional Wi-Fi module. It is also essential that you have the optional Xbox hard drive unit attached to your Xbox; this is where the games will be stored once deployed.
- You also need to ensure you have an Xbox Live account setup and registered on your Xbox 360. If you do not have an Xbox Live account visit xbox.com/live to create one and learn more. Either Gold or Silver Xbox Live memberships are sufficient.
- To deploy games onto the Xbox you need to have a creator’s club membership and have the XNA™ Game Launcher installed.
- To subscribe to Creators Club:
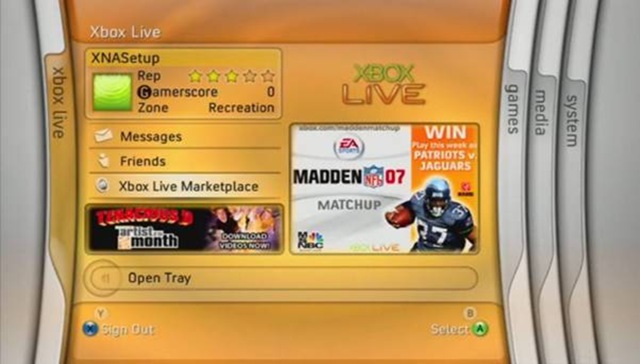
- To get a creators club membership go to the ‘Xbox Live’ Blade on the 360 dashboard and select ‘Xbox Live Marketplace’:
-
- Next select ‘Games’>’Game Downloads’>’XNA Creators Club’>’Memberships’
- At this stage either complete the purchase of a subscription package or press ‘Y’ to redeem a prepaid code.
To Install the XNA™ Game Launcher:
- Within the ‘Xbox Live’ blade select ‘Xbox Live Marketplace’ (see Fig.2)
- Next select ‘Games’>’Game Download’>’XNA Creators Club’>’XNA Game Launcher’
- Proceed to download the Game Launcher
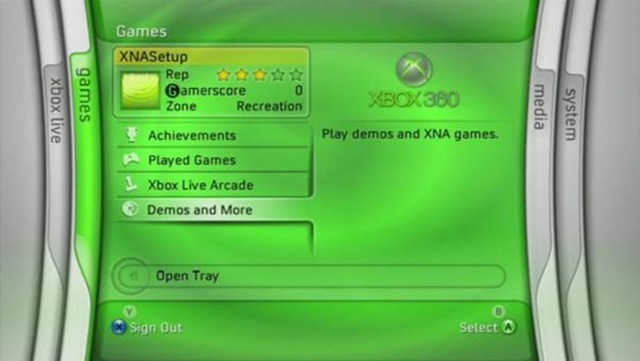
- Once the Games Launcher is downloaded and installed go to the ‘Games’ blade on the Xbox dashboard and select ‘Demos and More’:
-
- Now select and launch ‘XNA Games Launcher’
- To deploy games to the Xbox you have to set up a secure channel of communication with your PC using a connection key. To do this select ‘Settings’ in the main XNA Game Launcher window and then ‘Generate Connection Key’. You will be presented with a hexadecimal key which you must now enter in XNA Game Studio on your PC.
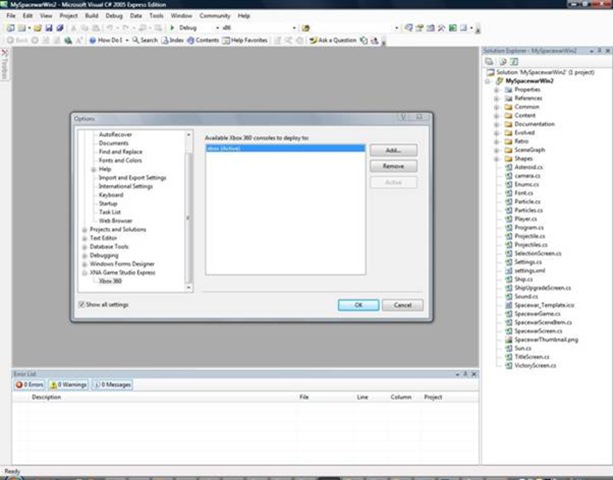
- Launch Games Studio, go to the menu and select ‘Tools’>’Options’
- Make sure the ‘Show all settings’ box is ticked to the bottom left of the options dialogue:
-
- Now go to the ‘XNA Game Studio Express’ tab and select ‘Xbox 360’ (See Fig.4)
- Click the ‘Add’ button and enter a name for your console in the ‘Name’ field and the connection key in the ‘Connection Key’ field.
- Click ‘Test Connection’ and if you have entered your key correctly the test should complete successfully and the ‘OK’ button will become active.
- Now return to your Xbox and select ‘Accept new key’
- You are now ready to deploy games to your console.
To deploy a game to your Xbox 360:
- On your Xbox launch the XNA Games Launcher and select ‘Connect to computer’
- Now on your PC load the game you wish to deploy into XNA Game Studio and press F5 to start debugging. XNA Game Studio will deploy and launch the game on your Xbox 360.
- This game will then be permanently stored on the Xbox and can be launched without the PC through the XNA Games Launcher.
Building your first game
XNA Game Studio Express comes with a game project pre-installed. The project is called Spacewars and is a complete XNA game ready to be compiled. However because you have the source code for the game it is an excellent way to start getting used to XNA Games Studio and to write your own code by implementing some new features. The below guide explains how to get started with the Spacewars project and demonstrates how to implement a new feature in the game.
- Firstly we will open the Spacewars project for Windows. In XNA Game Studio select the ‘File’ menu and ‘New Project’ (Ctrl+N).
- In the ‘Visual Studio installed templates’ section select ‘Spacewar Windows Starter Kit’:

- The project will load and you can press F5 immediately to build and deploy the game.
- As an example of how easy it is to make a change to the game or implement a new feature we will change saucer ship in the 3D game into an asteroid (so that player 1 can play as a ship which looks like an asteroid).
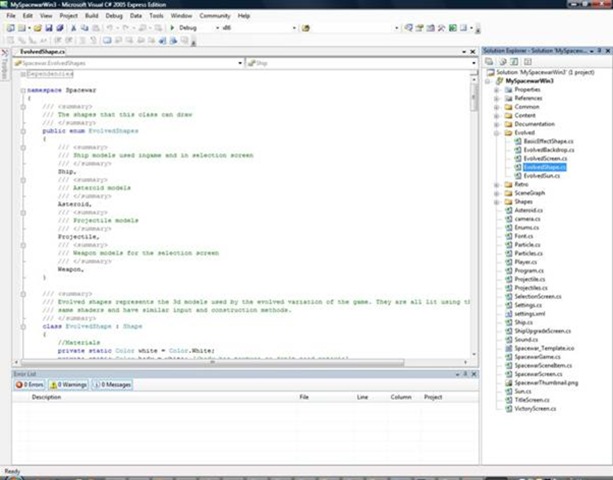
- First open the ‘EvolvedShape.cs’ file from the ‘Evolved’ directory in the ‘Solution Explorer’:
- Change the p1_saucer ship mesh to the asteroid2 mesh:
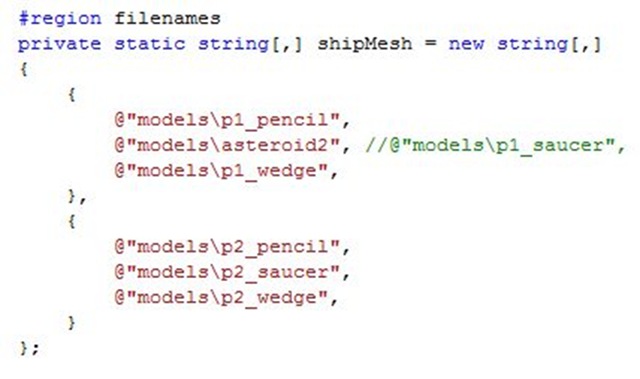
This changes the mesh for player one’s second ship option to the DirectX resource located in /Content/Models/astoroid2.x
- Next we will change the texture for player one’s second ship option to match the mesh:
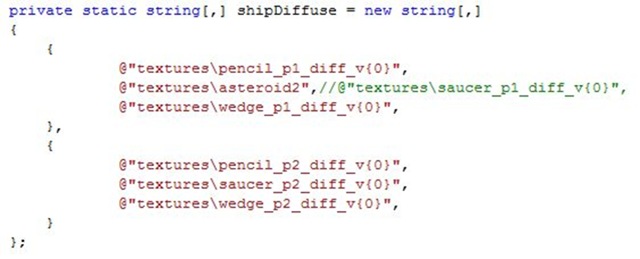
This changes the texture to the resource located here: /Content/Textures/astoroid2.tga
- You can now recompile (F5) and see the changes you’ve just made in the game. This should give you an idea of just how easy it is to make changes to existing games. For other projects and tutorials on XNA™ visit creators.xna.com or see the Resources section below.
Resources
- XNA™ Creators Club: https://creators.xna.com/
- XNA™ Developer Centre: https://msdn.com/xna
- XNA™ Game Studio Express Forums: https://msdn.com/xna/forums
- XNA™ Game Studio Express Blog: https://blogs.msdn.com/xna
Technorati Tags: XNA, Games Development, How to, Getting started, Imagine Cup, Games Development Invitational