Building a real world extranet application with MOSS 2007 (Part 2 of 3)
Introduction
In the first installment of this blog series, we introduced the project and its requirements and started creating the basic site and content structure. In this installment, we’ll cover the customization and branding choices that we made, venture into the slightly gray areas that needed some additional thinking, and discuss some of our “off the beaten path” customization tactics.
Site and content customization (i.e. branding)
The new file management system was to replace an existing model, which users were already familiar with. This coupled with the fact that an already well established corporate brand existed meant that creating a consistent and familiar experience would be very important towards encouraging speedy user adoption of and efficient transition to the new system.
Once the UI was established visually, we began the process of matching best practices with both customer requirements and the new MOSS 2007 design and development experience.
The customization process was divided into two major sections in an attempt to offer maximum scalability while separating the majority of presentation from the content and code base.
- Master Page Customization
- Cascading Style Sheet Customization
The art of creating a custom Master Page in MOSS 2007
MOSS 2007 adopted the ASP.NET 2.0 master pages model, a model which allows you to separate the chrome (UI elements) from the content. The second major benefit of using master pages in MOSS 2007 is that you can control the UI of a site or entire site collection with a single page, the master page.
Before creating our custom Master Page, it was important for us to fully understand the following concepts:
- Content Place Holders and Content Controls, and how they are used in MOSS 2007
- There are several pages behind a rendered page that you would see in SharePoint. The Master Page which holds the UI chrome as well as content place holders where content can later be “plugged in” from other pages. These other pages, known as Content Pages have Content Controls with IDs matching those on the placeholders in the master page.
- When requested, the content from the Content Control is merged into the Content Place Holder of the Master Page, finally presenting you with a single rendered page. Understanding this concept is very important when customizing a Master Page because removal of a content place holder that is later called on will result in an error. It’s important the content place holders exist on the page – even if not visible. For a list of content place holders, which reside in the default Master Page of a SharePoint site, see https://msdn2.microsoft.com/en-us/library/ms467402.aspx.
- Creating a minimal Master Page
- Unlike standard design, there is no blank slate from which to start a site in SharePoint. There is no magic “File New” button in SharePoint Designer 2007 that will allow you to just begin coding your UI and have the SharePoint functionality just work. Instead, you will need to understand how to work with SharePoint’s default Master Page and to minimize it by leaving only the placeholders that are required for SharePoint to function. Luckily for us, MSDN has been kind enough to post a minimal Master Page complete with comments, which you can use as a starting point for your own sites: https://msdn2.microsoft.com/en-us/library/aa660698.aspx.
Armed with information on the preceding topics and the tool of choice, SharePoint Designer 2007, we set out to create our custom branded application. SharePoint Designer 2007 allows you to connect to and work with your SharePoint sites, so the first thing we did was fire up SharePoint Designer 2007 and connected to our site via the File, Open Site menu.
MOSS 2007 introduces a new concept of “publishing features”. Publishing features represent the CMS 2002 integration into SharePoint, now known as Web Content Management or WCM. When enabled, publishing features allow you to do things like enable content approval workflow or change the Master Page and style sheet on the fly, both of which we utilized and proved useful in creating a custom branded application.
After combining our custom UI (graphics and code) with the minimal Master Page from MSDN, we uploaded our custom Master Page to the _catalogs/masterpage folder. This is a good time to point out that with a blank starting Master Page (and page layouts), we were able to vastly reduce the number of tables, and take advantage of our CSS based UI.
After uploading our custom Master Page, we added some final tweaks such as adding the company logo to the Master Page. While there is an out of the box method for adding a logo (Site Settings > Title, Description and Icon), doing this does not automatically carry the logo down to new sub-sites as they are created; instead, you would need to re-specify the logo on each site. This is by design just in case you want to specify a different logo on the subsites, which normally makes perfect sense, but in our project, a requirement was that all sites are to be created using the parent company’s corporate logo unless otherwise specified. To accomplish this, we created a custom picture library labeled “site images” and uploaded the corporate logo (named companylogo.gif) to the library. Next we replaced the default mechanism for switching the logo in the Master Page:
<SharePoint:SiteLogoImage id="onetidHeadbnnr0" LogoImageUrl="/_layouts/images/titlegraphic.gif" runat="server"/>
replacing it with some key new functionality in SharePoint 2007:
<asp:Image runat="server" id="Logo" ImageUrl="<% $SPUrl: ~site/site images/companylogo.gif %>"/>
What this change does is tell the image control to check in the site’s site images library for companylogo.gif. Because this is specified in the Master Page, the change is seen on subsites, which inherit this Master Page. Also, because we have specified the “site” site images library in SPURL, changing the company logo on a sub site is simply a matter of over writing the default companylogo.gif image in the specific site's site images library. We mimicked this approach when adding a header image to the page, allowing even further customization on a site by site basis.
To apply our custom Master Page, we went to the root site's Site Settings, Master Page section where we were able to select and apply it to the site and subsites right from the browser, completely transforming the UI into an intuitive and branded application.
Separating the presentation
To separate the content, mark-up, and presentation as much as possible, we opted to use the alternate style sheet approach. By default, the core style sheet, appropriately named CORE.CSS controls the majority of the sites, colors, fonts, and positioning.
To over-ride these default values, we took advantage of the “AlternateCSS”, an option which can be specified from the browser under Site Settings, Master Page, Specify “AlternateCSS” URL.
We started by creating a blank style sheet and saving it to the style library, a library created by default with all publishing portals. After adding our style sheet and specifying it using the method described above, any styles/properties we add which exist in the default (CORE.CSS) will be overwritten because our alternate style sheet is read last.
To figure out what classes we needed to override, we took advantage of a free tool from Microsoft’s Internet Explorer Team, the Internet Explorer Developer Toolbar. Download the beta here.
Using the “Select Element by Click” option in the IE Developer Toolbar, we were able to click on any element of our screen and instantly see what class should be changed in our alternate style sheet. In the example below, we clicked on the Recycle Bin link.
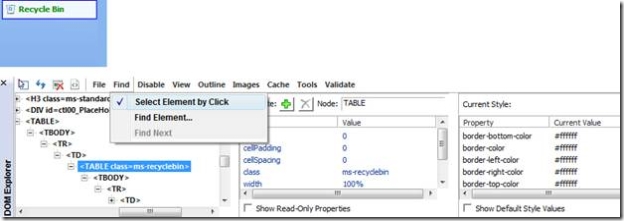
In the example above, we could add .ms-recyclebin to the alternate style sheet to change its properties. Tip: Make sure you copy all properties specified in the CORE.CSS; otherwise, they will not be overwritten.
Using “AlternateCSS”, we were able to isolate the presentation to a single style sheet, overriding the default styles when applied.
Because subsites can be set to inherit the Master Page and alternate style sheets of their parent, this method also allows for sweeping brand changes by editing a single file. Just as it can be set to inherit, you can also choose not to in which case subsites are free to use a completely different Master Page or style sheet.
In this installment, we covered the key customization methods which allowed us to brand our sites as well as keep a familiar and intuitive UI for our application. In the next and final installment, we will take a look at Search as well as how we overcame multilingual obstacles before wrapping up with a look at our template system and our finished product. We'll also provide a summary of the MOSS 2007 specific features that were utilized for our project.
Shane Perran – User Experience Lead, SharePoint MVP
Jared Rypkema – Lead Software Architect
Infotech Canada | Information Worker Solutions