Using the Minimal Master Page
Hey, my name is Lincoln DeMaris and I’m a Program Manager working on Web Content Management features in Microsoft Office SharePoint Server 2007. Today I’m going to write a little about building master pages that work in a MOSS 2007 Publishing site.
Building a master page is one of the most critical steps of building a highly customized, branded site. The master page is a crucial component in defining how your site looks and how your users will interact with it. Typically, master pages contain all the elements that are shared across most (if not all) the pages in your site collection, like search controls, navigation controls, logos, and CSS references. Every impressive MOSS portal out there is backed by an impressive master page (or set of master pages). The goal of this blog post, therefore, is to get you on the right track towards building a master page that not only fits your needs, but is maintainable and not overly complex.
There are essentially three options available to you regarding how to build your site master page:
- Use an out of the box master page. This is certainly the easiest option, and hey, we’ll be flattered if you choose to fly our colors on your external portal. However, nothing says “I’m a MOSS 2007 site!” louder than the blue hues of BlueBand.master, so I’m willing to bet that most of you will want to craft a master page with little more individuality.
- Customize one of the out of the box master pages. This is probably the best place to start if you aren’t very familiar with MOSS, or master pages in general. Pick one of our master pages that resembles what you want your site to look like, open up a copy in SharePoint Designer, and go to town. For example, you might like the multi-level vertical navigation scheme of BlueVertical.master, but not necessarily the color scheme or the drop shadows along the side – so you’d start by cracking open a copy of BlueVertical.master, swapping in some custom CSS, and removing the shadowLeft and shadowRight table cells. Once you get the hang of it, it’s pretty easy to start with something out of the box and massage it into something a little more personal.
- Roll your own master page. Believe me, I know how frustrating it is to work with somebody else’s code. There’s always the impulse to start from scratch, and that is certainly an option you have. The problem is that it’s rather difficult to start with a totally blank master page and get something that actually will work in a Publishing site. For example, if you go File -> New -> Master Page in SharePoint designer, add some basic design, save, and set your creation as your Site Master page, you’ll probably be greeted by a nasty error message when you refresh your site.
The reason most home-grown master pages will fail is because they are missing the required content placeholders that allow them to work with our out of the box page layouts. If you look at one of these page layouts (like ArticleLeft.aspx), you will see a bunch of <asp:Content> tags similar to the following:
     <asp:Content ContentPlaceholder ID="PlaceHolderPageTitle" runat="server">
        <SharePointWebControls:FieldValue id="PageTitle" FieldName="Title" runat="server"/>
    </asp:Content>
Tags like this match up with content placeholders in the master page. Every <asp:Content> tag you see in a page layout or other content page must have a corresponding <asp:ContentPlaceholder> with the same ID present in the master page. You’ll find the following content placeholder in all of our master pages to match up with the PlaceHolderPageTitle tag shown above:
<asp:ContentPlaceHolder id=PlaceHolderPageTitle runat="server" />
If the rendering engine comes across a <asp:Content> tag in a page layout, and there is no corresponding content placeholder in the master page, it doesn’t know where to put the content inside the <asp:Content> block. It will then throw an error, and your page will not render. However, the reverse is not true; If you have a <asp:ContentPlaceholder> with no corresponding <asp:Content> tag, there are no ill effects. Therefore, when building a master page, it’s generally a good idea to include ContentPlaceholders for all the the <asp:Content> tags you might come across, just to cover your bases, and ensure compatibility with as many page layouts as possible.
Good news: we’ve done this for you! Specifically, we have created what we call the Minimal Master Page, which is as about as bare-bones as a master page can get while maintaining compatibility with our page layouts. Think of it as a good substitute for the almost totally blank file you get from File -> New -> Master Page in SharePoint Designer. To get the markup for this master page, as well as some additional explanation around its contents, visit the following SDK article:
How to: Create a Minimal Master Page
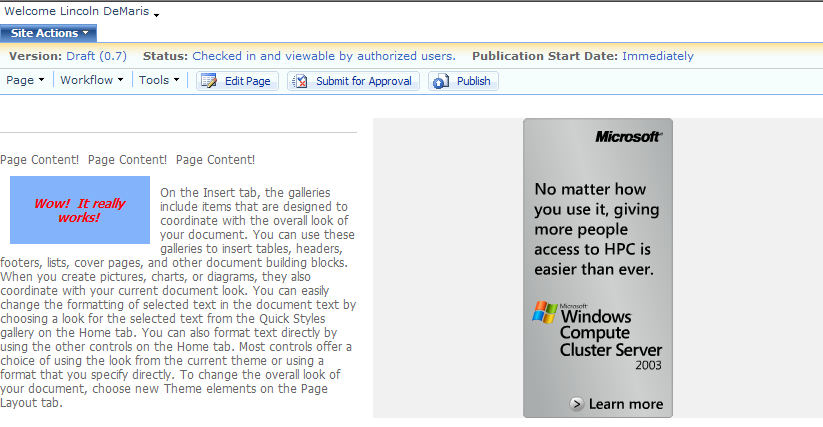
Alright. Once you’ve copied that markup into a new .master file, saved it to your Master Page gallery (as per the instructions in the article), and set it as your Site Master page, you’ll get a site that looks something like this:
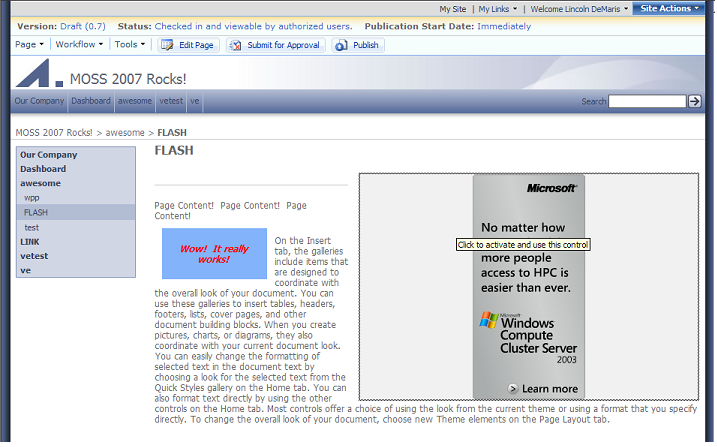
For reference, here is how the same site looked with BlueBand.master applied:
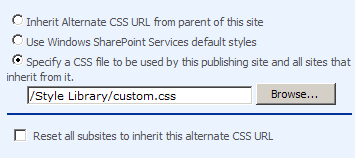
Note that all the content is still there (including our Flash file playing happily on the right in a custom field control), but we’re missing several things: the chrome, the top and left navigations, the page title, and the search control. You’ll notice that there’s still some evidence of CSS styling on the page (the red text with a blue background) – this is because I have an “alternate CSS URL” specified in my Site Master Page settings (Site Actions -> Site Settings -> Modify All Site Settings -> Master Page).
These classes are inherited regardless of the master page you use, and take precedence over any CSS classes files defined in files in the <head> section of your master page. You’ll also note that the console and site actions menu are there, but only because we specifically put controls in there for them (PublishingSiteAction:Console and PublishingSiteAction:SiteActionMenu, respectively). You can delete these controls without breaking the master page, but you might find it difficult to interact with your site afterwards.
Another field control worth mentioning is <asp:ContentPlaceHolder id=PlaceHolderMain runat="server"></asp>. This content placeholder defines where the main content of your page goes – in the first screenshot, everything you see rendered below the console is inside PlaceHolderMain. But really, PlaceHolderMain is just another ContentPlaceholder that makes room for the content defined in the page layout – this just happens to be where we put the field controls for the core page content. You can adopt this scheme, or modify it to fit your needs.
So now that you have a site running with our minimal master page, where do you go from here? Anywhere, really; you can start inserting your own markup, CSS, and controls to build your site the way you want it to look. Let me provide an example of how you might proceed: say you want to show the navigation breadcrumb above the page content similar to the way we do in BlueBand.master. The contentPlaceholder for this is:
<asp:ContentPlaceHolder id="PlaceHolderTitleBreadcrumb" runat="server">
So, find this in the list of ContentPlaceholders within the <asp:Panel> included in the minimal master page, cut it, and paste it above the PlaceHolderMain tag. Save the master page, and your site will now render with a breadcrumb, as long as the page layout you’re using has a block overriding this placeholder. If this is not the case, you can define “default” behavior in the master page that defines what the ContentPlaceHolder will contain if is it not overridden in the page layout. For example, you could replace the empty ContentPlaceHolder tag with this markup:
     <asp:ContentPlaceHolder id="PlaceHolderTitleBreadcrumb" runat="server">
        <div class="breadcrumb">
            <asp:SiteMapPath ID="siteMapPath" Runat="server"
              SiteMapProvider="CurrentNavSiteMapProviderNoEncode"
              RenderCurrentNodeAsLink="false"
              CurrentNodeStyle-CssClass="breadcrumbCurrent"
              NodeStyle-CssClass="ms-sitemapdirectional"/>
        </div>
    </asp:ContentPlaceHolder>
Your site will now render with this specified “default” breadcrumb if your page layout doesn’t specify otherwise. Note that this markup was taken directly from BlueBand.master – even if you’re starting from scratch with a minimal master page, there’s nothing wrong with borrowing markup from the pros :)
Most of you will probably want to add some CSS references to your master page. Yet again, peering inside BlueBand.master, we see a bunch of markup in the that looks like the following:
<SharePoint:CssRegistration name="<% $SPUrl:~SiteCollection/Style Library/~language/Core Styles/Band.css%>" runat="server"/>
You can substitute markup like this for a standard <link rel=StyleSheet href="blah/foo/yuk.css"> tag, but the cool thing about doing it our way is that your master page will continue to work if you copy it (along with the referenced CSS file) to another site collection, or the URL for your existing site collection changes. Feel free to reference our stylesheets (like Band.css, Controls.css, and the like) in your master page, or upload your own CSS files to the Style Library and refer to those.
Hopefully this will give some of the more adventurous web developers out there a head start towards building the perfect master page. I’ll be following up with more entries containing tips, tricks and guidelines for the intrepid MOSS 2007 developer – so shoot me feedback if you want me to talk about something specific!
- Lincoln DeMaris, Program Manager