Moving from design to reality - building HedKandi.com in Microsoft Office SharePoint Server 2007
As mentioned in my blog entry from a few weeks ago, cScape Ltd, a Microsoft Gold Partner, recently launched www.hedkandi.com for Ministry of Sound using Microsoft Office SharePoint Server 2007. I asked Ben Robb, Technical Lead on the project, to write the following guest blog entry, which outlines how they took the out of the box functionality in MOSS and produced a radically fresh design for hedkandi.com in a very short period of time.
The Brief
In the past, most SharePoint developers would have run a mile when faced with an initial design brief like this:
While it had been difficult in the past to brand a SharePoint-based website with the kind of flexibility that marketing departments demand for their publicly facing websites, SharePoint developers can stop running right about now. This limitation simply disappears in the 2007 version of SharePoint with the support for ASP.NET 2.0 Master Pages technology.
So, how did we go about creating a site with SharePoint that looks nothing like a typical SharePoint site? Surprisingly, it didn’t involve lots of C# code or editing files we really weren’t supposed to be. We actually made use of a lot of out of the box controls, and in the main used XHTML, CSS and XSLT to achieve the output that our client required.
Project Management
Building a MOSS-based website is very similar to any other website project. You can use any of the formal process driven methodologies such as the Microsoft Solutions Framework or one of the Agile methodologies. Due to the fairly tight timescales and a very close working relationship with the client, we used an iterative Agile methodology to ensure that what we delivered met expectations. We managed risks, issues and general documentation via an extranet team site running on WSS 3.0.
Below is a step-by-step guide for how we ran the project:
Step 1 – Define your basic site map and designs
As in many web projects, the basic site map and designs informed the development teams of the basic functional requirements. The site map provided us a list of all of the different types of pages on the website, and the designs told us what features we were going to need to use. These both changed as the project progressed, but provided us with a useful baseline to start with.
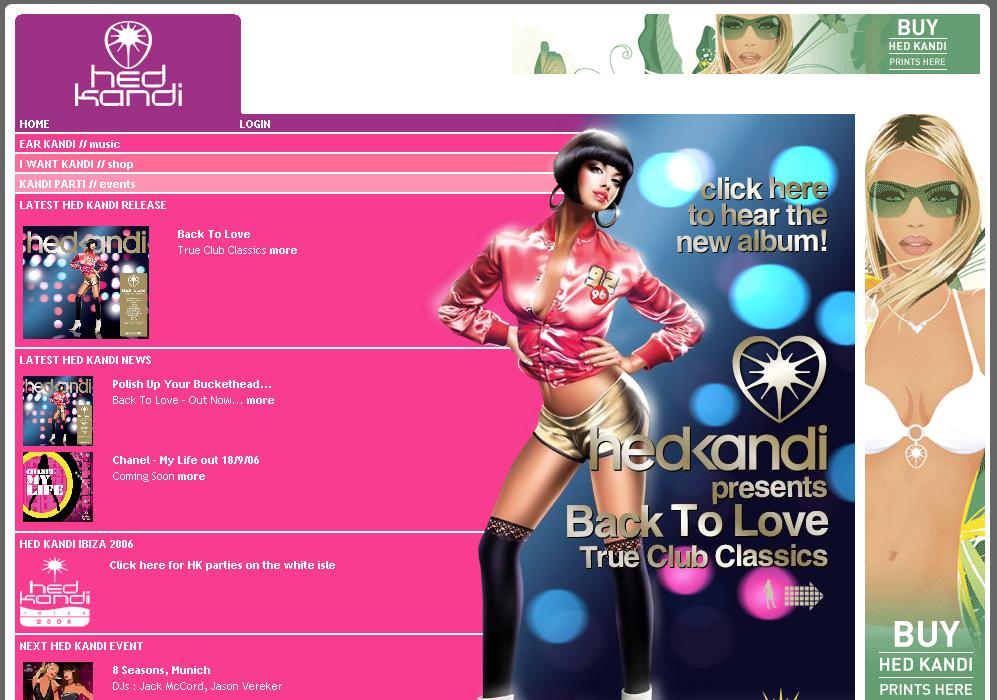
HedKandi’s distinct designs were delivered to us already converted into flat XHTML and CSS, and this saved us time later in the project.
Step 2 – Define your Content Columns and Content Types
Content Types are a great feature of SharePoint and provide the underlying structure to the whole site. Time spent at the start of the project to properly define the content types you require on your page layouts and your lists is always well spent. You don’t have to be exhaustive in your definition, but the more you do at the start, the less you have to rework later.
For better manageability, we created two new Content Type groups – “HedKandi Page Layout Content Types” and “HedKandi Custom List Content Types”. This allows for a better user experience when end users are creating views, and also allows us to easily distinguish between out of the box content types and ones we have created.
Step 3 – Define your Custom Lists
Lists are the backbone of the HedKandi site; rather than free-text content blocks, we invested in a number of Site Collection level lists to ensure consistency and content reuse. An example of this is the Venue list, which is used by the HedKandi Events pages to provide information about the location of a HedKandi event. Since many of the HedKandi events will use the same venues, we wanted to improve the user experience for content authors when adding a new event to the system. By creating a custom list, and adding a field to the Page Layout, we allowed content authors to select from a drop down list of available venues. When the page is then viewed by the end user, information from the selected venue was pulled through from the custom list and formatted appropriately.
Step 4 – Create the basic Site Hierarchy
The basic site hierarchy in HedKandi is fairly small, so we created this via the user interface under Site Actions. In larger scale sites, where a full site hierarchy has been worked out in advance by an Information Architect, we would recommend using the stsadm -o createsite command, or writing a simple application to automate the initial structure creation via the API.
Step 5 – Add your images and CSS files
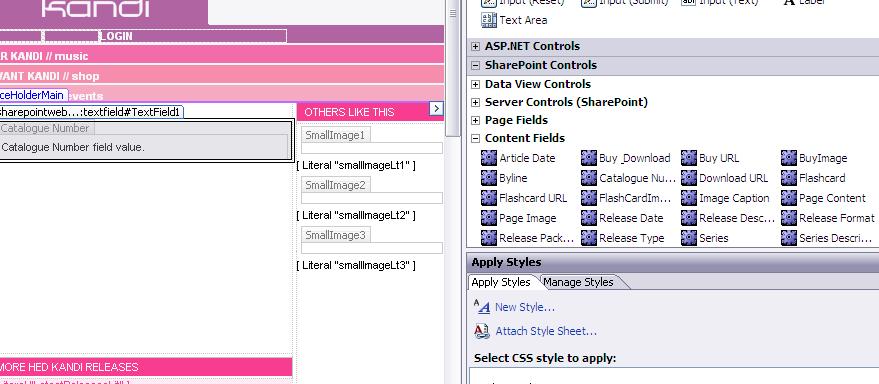
So, once you have your basic site hierarchy, your custom content types and your lists, it is time to start building the site to make it look like your design. This is the point where we fire up Office SharePoint Designer (SPD) for the first time. Using SPD, we were able to add our custom CSS files very easily. As with the Content Types, we wanted to ensure that we knew which files were “out of the box”, and which were added during the project, so we created a new folder in the Style Library list – called HedKandi, and within this created folders called CSS and Images. We placed our images and CSS files within these folders.
Step 6 – Build your Master Pages
We had a number of pages which demanded quite different layouts, and since they were in different locations in the site, we chose to use multiple Master Pages. Having done the groundwork with the flat XHMTL we were able to quickly create new Master Pages. Since we also wanted to make use of existing page layouts in our site, we made sure that we maintained the same naming convention for our <asp:ContentPlaceHolder> controls.
Step 7 – Build your Page Layouts
This is where we really saw the benefits of pre-defining our Page Layout Content Types and having our XHTML mockups to hand. Building a flat page layout is remarkably quick to do when you have done the groundwork – mainly because of the integration that SPD’s toolbox has with SharePoint. Adding a content field into your page is a matter of picking it up from the toolbox, and dragging it into your page – whether in Design mode or in Code mode. This is a great timesaver on your project – if you have defined your content types well, and described them properly, your developers do not have to keep referring to documentation to know what field controls are for, and what format those controls should be.
At this point, we had a working site, which looked fairly close to the designs, and allowed our authors to start the process of entering content into lists and creating new pages based on our Page Layouts. This streamlined our testing processes, since it meant that we were able to catch missing fields or functionality early in the project.
Step 8 – Customize your Content Query webpart views
Content Query web parts were the one of the most commonly used webpart on the website. We used them all over the place to aggregate content from lists, and we found very quickly that we had to move away from the standard set of views given by the web part in order to meet the designs we had been supplied. We were able to create custom XSLT templates to cater for these views, by modifying the itemstyle.xsl file, which is found in /Style Library/XSL Style Sheets in your Site Collection’s root site.
A really great feature of this is that simply by adding a new XSLT template to the itemstyle.xsl file automatically adds it to the dropdown list in the Web Part Properties screen and is therefore instantly available to authors on the site. This is a great timesaver, but be warned that syntax errors in this file can cause all instances of Content Query webparts in your Site Collection to break.
Additional Work: Page Comments
One of the key requirements for Ministry Of Sound was to allow page level comments on certain types of web content page. To resolve this requirement we turned to the design pattern shown by the Comments functionality in the Blog site template.
In the blog comments example, there are two lists – a Posts list, containing the blog posts themselves, and the Comments list, containing the comments. The Comments list has a column of type “Lookup”, which is configured to use the Posts list as its source. When viewing a blog post, a ListView and ListForm webparts are used to provide a view of the comments and a form to allow users to post new comments. This form automatically populates the lookup column with the correct Post.
We used exactly the same mechanism to provide comments for pages in the HedKandi site, except we used the Pages list instead of the Posts list.

Conclusions
While there was a fairly large learning curve to overcome during this project, the fact that our developers were experienced in both SharePoint and MCMS technologies did reduce the curve dramatically. Working closely with our clients meant that we were able to rapidly develop and deliver the project – in a timescale of weeks rather than months.
We found MOSS itself to be generally stable -- even at Beta 2 -- with only a few quirks here and there. Site creation and configuration were simple (although the menus weren't always intuitive -- we see some training issues ahead for our clients). The integration with wider .NET concepts, such as Windows Workflow Foundation, forms-based authentication, membership and navigation were all very good and very powerful and ultimately proved to be real time-savers. One particular point for this project is that we used ASP.NET's membership provider and migrated all of the existing Hed Kandi registration details into the ASPNET database, and we configured it all to integrate with MOSS in less than a day.
Ben Robb
Lead Technical Consultant
<Lawrence />