Silverlight .NET introduction for JavaScript Developers (Updated)
To begin our .NET Silverlight learning we will start off with an overview of .NET. For those are used to developing Silverlight applications with JavaScript, we will be concentrating on the differences between using JavaScript and .NET. If you haven't written a Silverlight application before this will also be a good introduction to using .NET. If .NET is old hat for you by now then most of this will be review, but there are still some important differences with regard to how Silverlight works compared to WPF (Windows Presentation Foundation).
Why .NET?
A question that often comes up when we talk about .NET and Silverlight is why do we need .NET when JavaScript has already proven it's self as a great way to develop web applications. Four reasons spring to mind right way.
Consistency is the first reason compared to JavaScript, not in the core EcmaScript it's self, but more on the DOM side or how we access the page elements. For each browser the DOM is different and only an experienced web developer knows how to write code that works well in all browsers. With Silverlight we bypass most of this problem as we are targeting XAML and the Silverlight object model instead of the browsers object model. The other part of this problem is that when you are using JavaScript you are relying on each browser's implementation of the JavaScript execution engine. This is where .NET differs. When we write a .NET application it is the Silverlight plugin which handles the execution of our code so there are no differences from one browser to the next. It is the same on Mac, Windows, Firefox, Safari and IE!
Performance is a great reason to use .NET over JavaScript. Scott Guthrie had a great demonstration in his MIX keynote which showed off a chess game which implemented chess algorithms. Once in JavaScript and once with .NET. The performance comparison between the two was staggering.
Type Safety is one that rings home with me. I love the fact that when I compile I get feedback that my code is wrong and I have a chance to fix my mistakes before running the application. While Type Safety is great there are a lot of features in JavaScript which I have grown to enjoy. C# 3.0 has some new language features such as local type inferencing, anonymous types, extension methods and type intializers which allow for quick development similar to JavaScript while maintaining Type Safety. We will get to some of those features a bit later.
.NET Framework is the most compelling reason to use .NET. The framework is a collection of libraries for a variety of tasks, from UI development to security and networking. While the Silverlight version of the .NET framework is much smaller then the full .NET Framework it can still be a lot to learn. I remember when I first started with .NET back in 2000 I would write some code to do x and then later I would discover that there was already a class which did x. Since then a lot has been written so we can search to see what libraries we can use, but there is still no replacement for discovering all that the .NET Framework has to offer.
There are a bunch of other reasons to use .NET like the support for multiple language 37 at last count including, IronPython, IronRuby, JavaScript, Cobal, PHP, C#, VB, C++\CLI, Ada, Boo, Chrome, Eiffel, Forth, FORTRAN, Haskell and many more. Here is a a more complete list.
Desktop .NET vs. Silveright .NET
There are a few differences between the full .NET Framework and the version that ships with Silverlight 1.1 Alpha.
Cross Platform, Cross Browser is very important to Silverlight and so just like the rest of Silverlight the .NET components will work on Mac and Windows. They will also run in FireFox, IE and Safari. There is no difference between the framework when running on different platforms.
Size of the Silverlight .NET version is about 4 MBs in the 1.1 Alpha. This is significantly smaller then the full framework which is around 50 MBs. In order to maximize user experience the size and install time were greatly reduced so that users with out Silverlight can still be targeted by Silverlight web sites.
Sandbox model is a way to provide full .NET applications in Silverlight without having to prompt users for install. It provides a safe way to run applications, but has a few restrictions. There is limited file access, so that you can't just start enumerating the files on a users machine. Networking support, no socket support. No elevation prompts and no ability to escape the sandbox.
Getting Started
The first place to start is to define what is required to create a .NET Silverlight application. There are four basic ingredients in any Silverlight 1.1 program:
- An html file to hose our Silverlight plugin with.
- JavaScript files which load the plugin with the appropriate settings such as Height, Width and Windowless.
- A XAML file which defines the look of our root page and more importantly points at our .NET code to run.
- .NET Assembly (dll) which houses all of the logic from our .NET code.
What you need to Install
- Silverlight 1.1 Alpha
- Visual Studio "Orcas" Beta 1
- Silverlight Tools for Visual Studio "Orcas" Beta 1
Creating a New Silverlight .NET project in Visual Studio
Now that you have everything installed lets start by having visual studio create a project for us.
Open Visual Studio "Orcas".
NOTE: If this is the first time you have opened Visual Studio you will be prompted to choose which setup you want, C#, VB, C++, etc. This simple configures menus, and toolbar layout, it doesn't restrict you from creating projects with the other languages.
- From the menu choose File->New->Project (CRTL+SHIFT+N)
- In the Dialog that pops up expand the Visual C# node and choose the Silverlight node.
- Make sure the Silverlight Project is highlighted.
- In the name field at the bottom of the dialog write "ManagedSilverlight101"
- Click OK
Visual Studio will create a project containing a number of files for us. On the right in Visual Studio our Solution Explorer should look like the image below:
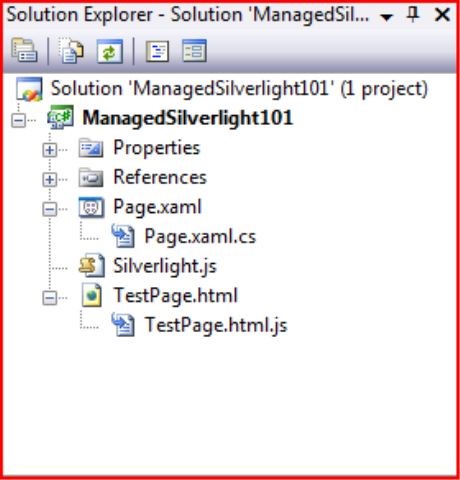
We will start exploring each of the files to see what our Silverlight project is made of. We will begin with TestPage.htm. Double click it in the solution explorer and it will open in Visual Studio.
TestPage.htm
Here are the contents of our html file:
<html xmlns="https://www.w3.org/1999/xhtml">
<!-- saved from url=(0014)about:internet -->
<head>
<title>Silverlight Project Test Page </title>
<script type="text/javascript" src="Silverlight.js" mce_src="Silverlight.js"></script>
<script type="text/javascript" src="TestPage.html.js" mce_src="TestPage.html.js"></script>
</head>
<!-- Give the keyboard focus to the Silverlight control by default -->
<body onload="document.getElementById('SilverlightControl').focus()">
<div id="SilverlightControlHost" >
<script type="text/javascript">
createSilverlight();
</script>
</div>
</body>
</html>
This is a very simple test page and there are only a few tags which we care about on this page. The first is the two script tags which point to Silverlight.js and TestPage.html.js. The first is a file we will include in every Silverlight application we write. It contains functions to detect if Silverlight is installed and give us information about version. It also contains two functions createObject() and createObjectEx() which we will call create the Silverlight plugin on our page.
The other part of this page which is important to note is the call createSilverlight(); which is calling a method in TestPage.html.js.
Silverlight.js and TestPage.html.js
Now open TestPage.html.js from the Solution Explorer. You might have to expand the TestPage.html file by clicking on the plus symbol. Below is the code listing from TestPage.html.js:
function createSilverlight()
{
Sys.Silverlight.createObjectEx({
source: "Page.xaml",
parentElement: document.getElementById("SilverlightControlHost"),
id: "SilverlightControl",
properties: {
width: "100%",
height: "100%",
version: "0.95",
enableHtmlAccess: true
},
events: {}
});
}
As you can see the only function in the JavaScript file is createSilverlight(). This function is just calling a function Sys.Silverlight.createobjectEx() which is found in the Silverlight.js file. The two important items to note for now are the source paramter which is set to Page.xaml and the parentElement parameter which is being set to the result of document.getElementById("SilverlightControlHost"). It is important to make sure that the name passed into getElementById here matches the id of our div in our html file. Both are highlighted in green above.
The Page.xaml file is the name of the file where all our XAML exists. This is the first page which the Silverlight plugin will load after the call to createObjectEx.
XAML
Xaml (extensible Application Markup Language) is an XML language which describes our user interface. Open the Page.xaml file by double clicking on it in the Solution Explorer. Below is the Xaml in Page.xaml:
<Canvas x:Name="parentCanvas"
xmlns="https://schemas.microsoft.com/client/2007"
xmlns:x="https://schemas.microsoft.com/winfx/2006/xaml"
Loaded="Page_Loaded"
x:Class="ManagedSilverlight101.Page;assembly=ClientBin/ManagedSilverlight101.dll"
Width="640"
Height="480"
Background="White"
>
</Canvas>
We have a single element a Canvas which has a width of 640 and a height of 480. There are two important attributes to observer in the Xaml. The first is the Loaded attribute which simply sets the Loaded event to a method called Page_Loaded.
The second attribute and the one that says we are using .NET vs. JavaScript is the x:Class attribute. Let's break apart the the statement that is being assigned to x:Class.
ManagedSilverlight101.Page specifies that the class we want to load is called Page which is in the ManagedSilverlight101 namespace. We will look at the code in a minute.
assembly=ClientBin/ManagedSilverlight101.dll says that the Page class in the namespace ManagedSilverlight101 is stored in the ManagedSilverlight101.dll which is located in a relative directory called ClientBin.
As a review a dll is just a file which stores code. However instead of storing it as text the compiler has transformed the code into an intermediate language called MSIL (Microsoft Intermediate Language). The reason we compile the code is so that we can guarantee the programmer didn't make any typing mistakes while writing the program. In .NET we call the dll files assemblies.
For those familiar with WPF a big difference between Silverlight and WPF is that Xaml is never compiled, only our .NET code gets compiled. However we may still store the Xaml as an embedded resource in the dll.
.NET Code
Now open the Page.xaml.cs file from the solution explorer. You might have to expand Page.xaml by clicking on the plus sign to find the Page.xaml.cs file below it. Here is the code from the Page.xaml.cs file:
using System;
using System.Windows;
using System.Windows.Controls;
using System.Windows.Documents;
using System.Windows.Ink;
using System.Windows.Input;
using System.Windows.Media;
using System.Windows.Media.Animation;
using System.Windows.Shapes;
namespace ManagedSilverlight101
{
public partial class Page : Canvas
{
public void Page_Loaded(object o, EventArgs e)
{
// Required to initialize variables
InitializeComponent();
}
}
}
All of the code above is written in the language C# which has very similar syntax to JavaScript. I am not going to go into the details of C# here, but I will cover enough to explain what is happening in our small program. I have intentionally left out details to make understanding simpler. I would suggest picking up a good C# book if you are interested in learning more about the language or pickup a book on your favorite .NET language. There is a new JavaScript implementation that the DLR (Dynamic Language Runtime) team is working on which can also be used to write .NET programs.
At the top of the code we have nine lines which all start with the word "using" followed by something like System.Windows.Ink. These statements are just saying that we want to use the classes in those namespaces. Namespaces allow us to scope classes, methods and variables. It is very similar to using a script tag to import other JavaScript files that you are using, except that we don't have to import everything defined in the file, only the parts we care about.
Then we have lines of code like this:
namespace ManagedSilverlight101
{
This simple says that we want to create all the code contained in the curly braces in the ManagedSilverlight101 namespace.
Next we have the lines:
public partial class Page : Canvas
{
Here we are creating a new class named Page which derives from the class Canvas. This means our Page class will take on all the properties, methods, fields and events of the Canvas class and then we can add new behavior and data to the Page class to make it do what we want. Classes are similar to JavaScript prototypes.
Now we have the lines:
public void Page_Loaded(object o, EventArgs e)
{
With this line we are defining a function called Page_Loaded that takes two parameters. C# requires parameters to be typed. The first parameter is called o and is of Type object. object is the base type of every other type in .NET so any type could be passed into the Page_loaded function. The second parameter is called e and is of type EventArgs.
The Page_Loaded function is actually an event handler. If you remember that in our Xaml we defined an event handler for the Loaded event to be "Page_Loaded".
The final part of our small program is:
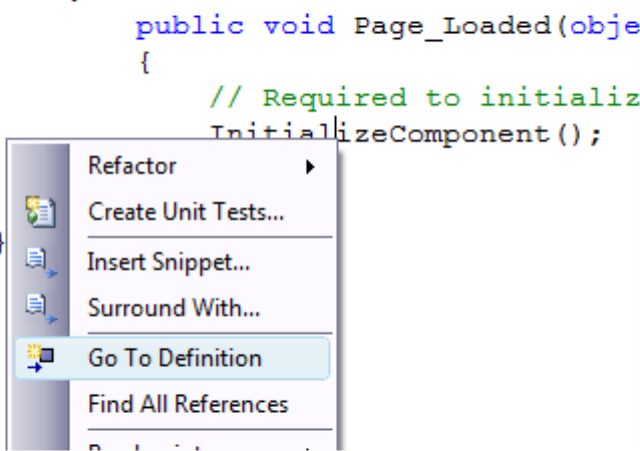
InitializeComponent();
This is just a call to the function InitalizeComponents(). Currently this method doesn't do anything, but if you put the cursor on the method and right click you will get a context menu. Then choose "Go To Definition" and Visual Studio will open a new file.
The file is called Page.g.cs and is generated by Visual Studio on our behalf. Here are the contents of the file:
using System;
using System.Windows;
using System.Windows.Controls;
using System.Windows.Documents;
using System.Windows.Ink;
using System.Windows.Input;
using System.Windows.Media;
using System.Windows.Media.Animation;
using System.Windows.Shapes;
namespace ManagedSilverlight101
{
public partial class Page
{
// variable declarations
private void InitializeComponent()
{
}
}
}
As you can see this looks very similar to our class defined in Page.xaml.cs. In fact it has the same namespace and class name. This is because it is actually the same class we were defining in the Page.xaml.cs file, except that there is an additional function declared called InitializeComponent(). The partial keyword before the class keyword tells the compiler that we want to extend the other class we are defining in another file, not create a new class. Partial classes are owned by the designer (which we don't yet have with Silverlight) and by the compiler when we update our xaml file. It is a place where generated code can be put without messing up code written by programmers. Most of the time we aren't going to need to look at this file and we will almost never have to edit it, so close that tab by clicking on the X at the top, right of the tab page.
Creating Visual Elements with Code
Now that we have a grasp of what Visual Studio created for us we can start writing code. So switch or open the file Page.xaml.cs.
Xaml to .NET
After the Page_Loaded function definition we are going to add a property to hold the root element of our Xaml file. Start by typing in lowercase:
prop
And then hit TAB twice. The first time closes the intellesense that popped up when we typed prop and the second time will create a code snippet for us. Notice that the work int is highlighted with a blue background:
Now type the word Canvas with the uppercase C. C# like JavaScript is a type sensitive language.
Press the TAB key twice again and myVar will become highlighted in blue. Notice that when you hit TAB that Canvas changed not only where you typed it but also before the work MyProperty. Now we will finish off the property by naming it:
Type: parentCanvas
Press TAB once:
Type: ParentCanvas
Press: Enter
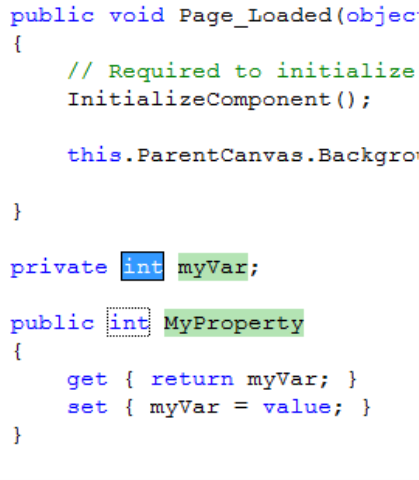
When you hit Enter your cursor will be placed after the property we just created. It should be defined like this:
private Canvas parentCanvas;
public Canvas ParentCanvas
{
get { return parentCanvas; }
set { parentCanvas = value; }
}
Now that we have a property to hold our root Xaml element we need to pull the element out of the Xaml and assign it to our new property.
NOTE: In WPF the compiler generates properties for any element you name in Xaml. Currently you must create and wire up the properties yourself.
In the Page_Loaded function after the InitializeComponent function call add the line:
parentCanvas = (Canvas)FindName("parentCanvas");
This line of code calls the FindName method passing the name of the root element in the xaml file. In this case we named our property the same as what we named the root element. This is not required but is a good practice. Then it assigns the result to the parentCanvas field we created when we defined the ParentCanvas property.
Because .NET is typesafe we need to add (Canvas) just before the FindName function. This bit of code casts what is returned from FindName to the type Canvas. FindName is defined in the class DependencyObject to return the type DependencyObject. DependencyObject is the base type for most everything in Silverlight including the Canvas we declared in our Xaml file, so we are able to cast back to Canvas.
This
Now that we know how to use FindName I am going to introduce a great shortcut. We don't actually need to call FindName most of the time. The compiler and framework will take care of creating the properties for us. Remove the lines:
private Canvas parentCanvas;
public Canvas ParentCanvas
{
get { return parentCanvas; }
set { parentCanvas = value; }
}
and
parentCanvas = (Canvas)FindName("parentCanvas");
We instead are going to access the parentCanvas through the keywork this. By placing the x:Class tag in our xaml page we told the compiler that we wanted it to link that xaml snippet to our class. "this" meaning the current object we are dealing with. In this case the Canvas that is our root element on our xaml file. So this is evaluates to true:
this == (Canvas)FindName("parentCanvas");
Now we can start manipulating the parentCanvas by changing it's properties and adding children.
Manipulating Properties
The first place to start exploring is to play with the properties of our parentCanvas. We will start by changing the background brush. Where we had:
parentCanvas = (Canvas)FindName("parentCanvas");
Put this line:
this.Background = new SolidColorBrush(Color.FromRgb(255, 0, 0));
The line of code above sets the Background of our Canvas to the SolidColor Red. We start by creating a new SolidColorBrush and pass the color we want to assign in the constructor. To pass the color we are using the Color classes static method FromRgb. Which takes three arguments of red, green and blue values which range from 0 to 255. In this case we are getting the red color.
We also can access the colors through named colors like this:
this.Background = new SolidColorBrush(Colors.Red));
Now that we have added that we should run our project to see our result.
Press: CRTL+F5
The project will build and then open the default browser to display our Silverlight application. If something was mistyped you will get build errors. While errors can be frustrating to fix they are a lot more convenient then discovering the issues at runtime.
Adding Children
For the finaly we will add children to our parentCanvas programmatically. We are going to add an Ellipse that has a gradient brush that fades from Blue to Green. We are going to put this on the line after:
this.Background = new SolidColorBrush(Color.FromRgb(255, 0, 0));
Here is the code listing:
Ellipse childShape = new Ellipse();
childShape.Width = 100;
childShape.Height = 100;
LinearGradientBrush lgb = new LinearGradientBrush();
GradientStop gs1 = new GradientStop();
gs1.Color = Color.FromRgb(0, 0, 255);
lgb.GradientStops.Add(gs1);
GradientStop gs2 = new GradientStop();
gs2.Color = Color.FromRgb(0, 255, 0);
gs2.Offset = 1;
lgb.GradientStops.Add(gs2);
childShape.Fill = lgb;
this.Children.Add(childShape);
Let's breakdown what is happening here as it is a lot of code. To start we are creating an Ellipse called childShape. Then we are setting withe Width and Height to 100. Next we create the LinearGradientBrush called lgb that we are going to paint our Ellipse with. We great two GradientStop objects and set there Color and Offset properties. This should look very similar to what we did above except that we aren't using a SolidColorBrush.
We have a line after each of our GradientStop declarations that looks like this:
lgb.GradientStops.Add(gs1);
Here we are adding the gradient stop to the linear gradient brush we defined as lgb.
Then we assign the ChildShape's Fill property our linear gradient brush we just created.
Lastly we call:
this.parentCanvas.Children.Add(childShape);
Which adds our ellipse to the Children collection of the parentCanvas.
Conclusions
We have covered a lot of information in this post, but it is a great foundation for writing future applications. In my next post I will show how the new features of C# 3.0 can make this code a lot simpler.