How To: Custom designs for business docs
Microsoft Dynamics 365 for Operations now offers an expanded set of tools to support custom solutions. This article focuses on the steps involved in crafting a custom report design for an existing application business document using a 'pure' extension model. Follow the steps below to associate a custom report design with an application document instance. Once complete, end-users can configure Print Management settings to select the custom design where appropriate based on transaction details.
Microsoft Dynamics 365 for Operations (Platform Update3)
____________________________________________
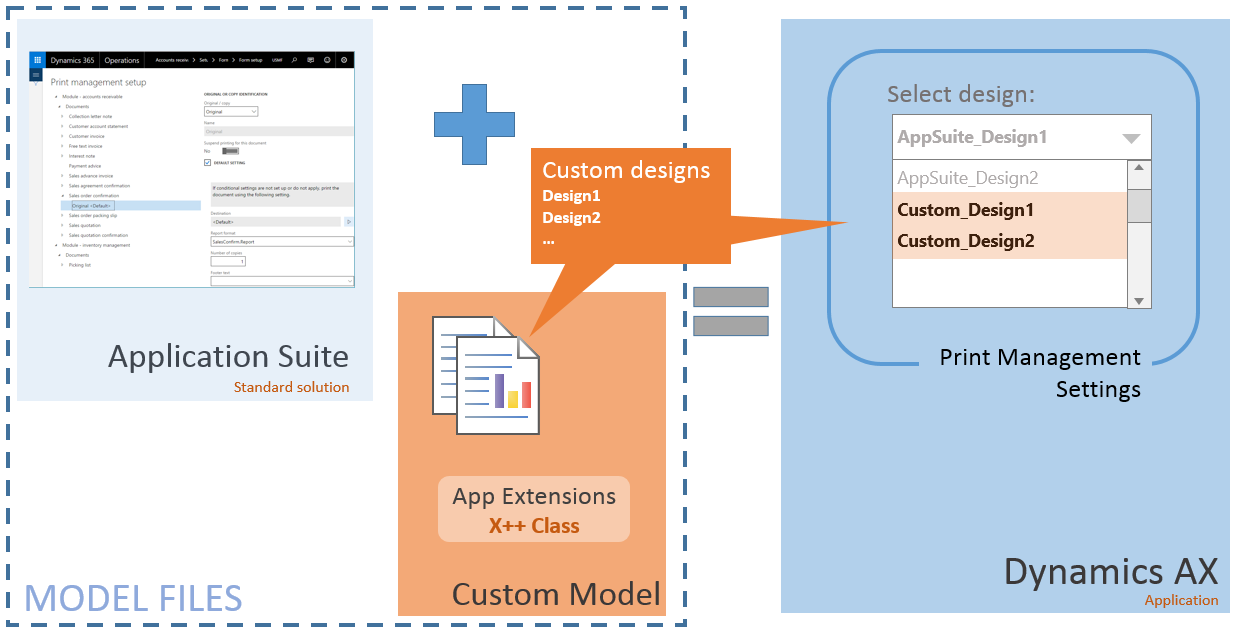
The following diagram illustrates a common application customization.
WHAT'S IMPORTANT TO KNOW?
Here are some important insights to be aware of before applying this solution.
- Print management settings are scoped to the active legal entity. Custom designs can be associated with 1 or more print management settings.
- Standard report designs continue to be available along-side custom solutions. Use Print Management settings to choose the appropriate design based on transaction details.
- Introducing a business document for a custom business process requires more. Review the Print Management Integration Guide for more details on creating a custom business document solution.
Customizing Business Documents
The following walk-thru demonstrates the process of introducing a custom report design for an existing application business document and then using Print Management to select the new design.
Scenario - My solution includes a custom design definition for the Sales Confirmation report provided in the standard application as part of the Application Suite model. The application customizations will be defined in an extension model.
------------------------------------------------------------------------
Step 1) Create a new model for you application customizations. For more information on Extension models review the article Customization: Overlayering and extensions. For this example, I'm adding introducing a model named Application Suite Extensions that references the Application Suite, Application Platform, and Application Foundation packages.
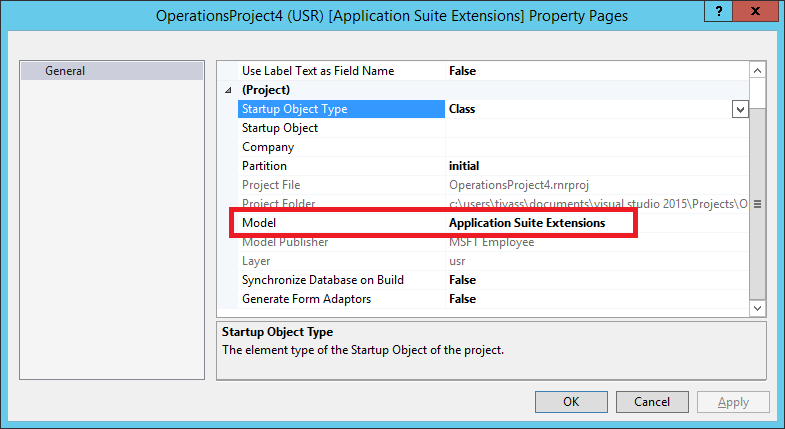
Step 2) Create a new project in Visual Studio. Make sure that the project is associated with your extension model. Here is a screen shot of my project settings…
Step 3) Create a custom report design for the business document. It's important to ensure that your custom solution consumes the proper report data contract. Locate the existing Application Suite report in the AOT named SalesConfirm, right click the item , and then select Duplicate in project to create the custom solution.
Step 4) Rename the report to something meaningful. For this example, I've named my custom report SalesConfirmExt to distinguish it from the standard solution . Compile the project and deploy the report to verify the changes are free of errors.
Step 5) Use the free-form designer to customize the report design. Select the report design named Report, right + click, and open the Precision Designer. Craft the design to satisfy the organization's business requirements. Here's a screen shot of a custom design definition for the Sales Confirmation report….

Step 6) Add a new X++ class that 'extends' the standard report controller. Give the class a name that appropriately describes it as a handler for an existing application report. For this example, I've renamed the class to SalesConfirmControllerExt to distinguish it from other report controllers.
Step 7) Use the extended class to load the custom design. Add a 'main' method that refers to the custom report design. I simply copied the main method from standard solution and added references to the new Controller class. Here's the sample code that extends the standard solution…
class SalesConfirmControllerExt extends SalesConfirmController { public static SalesConfirmControllerExt construct() { return new SalesConfirmControllerExt(); }public static void main(Args _args){SrsReportRunController formLetterController = SalesConfirmControllerExt::construct();SalesConfirmControllerExt controller = formLetterController;controller.initArgs(_args, ssrsReportStr(SalesConfirmExt, Report));if (classIdGet(_args.caller()) == classNum(SalesConfirmJournalPrint)){formLetterController.renderingCompleted += eventhandler(SalesConfirmJournalPrint::renderingCompleted);}formLetterController.startOperation();}} |
Step 8) Add a new report handler (X++) class to the project. Give the class a name that appropriately describes it as a handler for Print Management based documents. For this example, I've renamed the class to PrintMgtDocTypeHandlerExt to distinguish it from other object handlers.
Step 9) Add a delegate handler method to begin using your custom report. In this example, we'll extend the getDefaultReportFormatDelegate method in the PrintMgtDocTypeHandlerExt class using the following X++ code…
class PrintMgtDocTypeHandlersExt { [SubscribesTo(classstr(PrintMgmtDocType), delegatestr(PrintMgmtDocType, getDefaultReportFormatDelegate))]public static void getDefaultReportFormatDelegate(PrintMgmtDocumentType _docType, EventHandlerResult _result){switch (_docType){case PrintMgmtDocumentType::SalesOrderConfirmation:_result.result(ssrsReportStr(SalesConfirmExt, Report));break;}}} |
Step 10) Extend the Menu Item for the application report. Locate the existing Application Suite Menu Item in the AOT named SalesConfirmation, right + click, and then select Create extension. Open the new extension object in the designer and then set the value for the Object property to SalesConfirmControllerExt to re-direct user navigations to the extended solution.
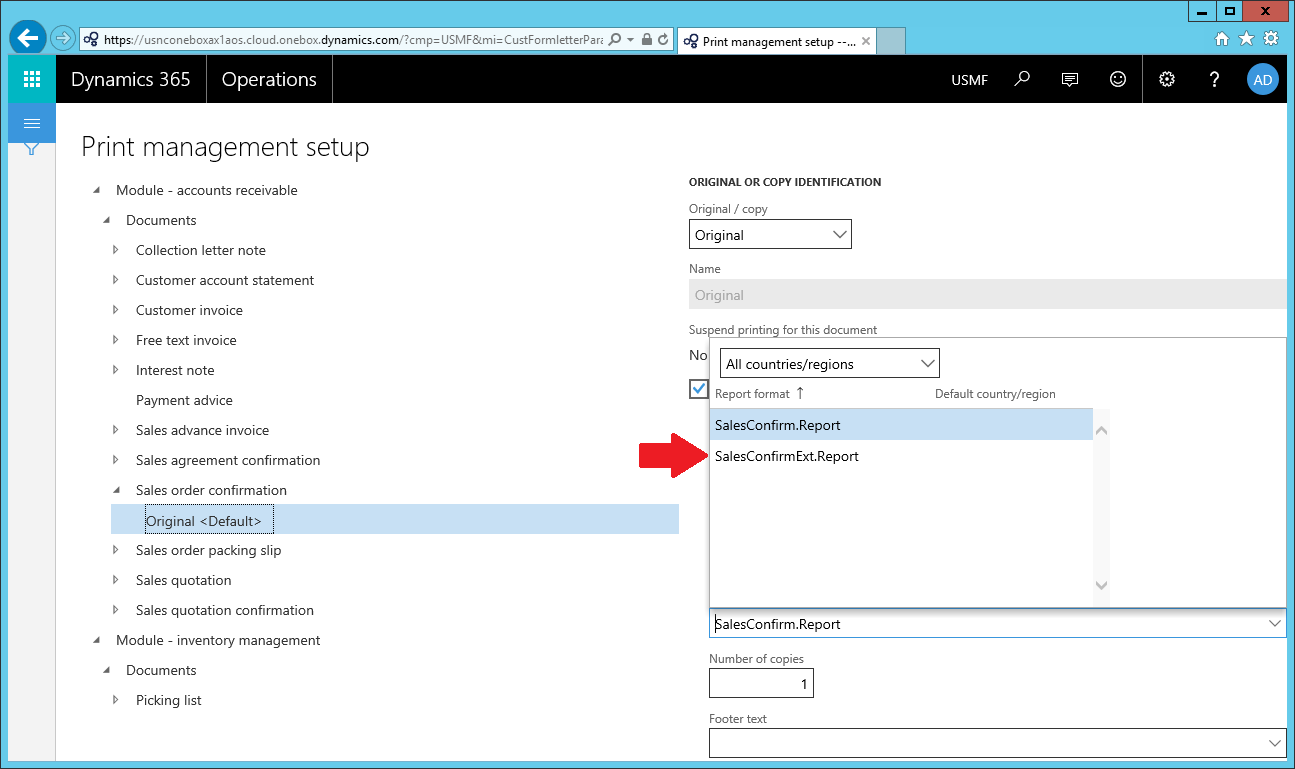
Step 11) Update the Print Management settings to use the custom business document. For this example, navigate to Accounts Receivables > Setup > Forms > Form setup, click on the Print Management button, locate the document configuration settings, and select the custom design. Here's a screen shot of the settings dialog after compiling the changes…
You're done. End-users will be presented with the custom report design for the business document when processing transactions in the application.