Microsoft Forecaster: Allocations
It’s September, and we all know that for many of us that means budget season. As your budgets are being completed, you need to think about how you allocate those costs across your business using Microsoft Forecaster.
There are two ways to utilize Forecaster for allocations:
- Use the Allocations Wizard and create a fixed or variable allocation and run it as a task.
- Use calculation sets and the various calculation functions to obtain the results.
In working with customers, I have implemented both ways. For variable allocations I always used the Allocations Wizard, since it’s more difficult to replicate variable allocations with a calculation. For fixed allocations, I have used both, depending on the complexity. If the allocation is simple, you can use a combination of the @LOOKUP calculation function and a calculation set. If it’s a bit more complex or you have calculations that must run in order, its best to use the Fixed Allocation method in the wizard.
Did you know you can open the allocations wizard two ways?
- Setup > Budgets > Allocations
- Tools > Wizards > Allocations
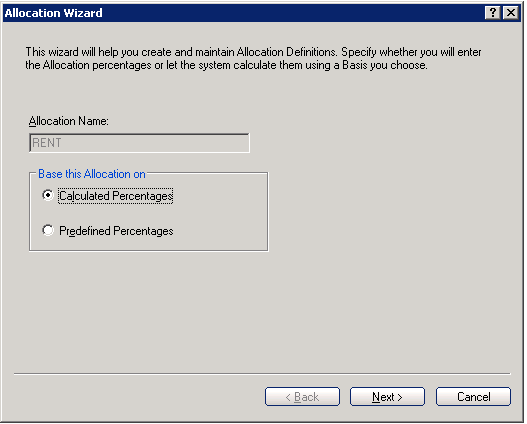
If you prefer the worksheet method, you can use the worksheet, but the wizard is a more intuitive step by step approach. You can choose between Calculated Percentages or Predefined Percentages. Calculated is for variable allocations, such as those that are based on headcount or any other variable driver in your business. Predefined is for fixed allocations, such as always allocating 25% of the total utilities cost to the Customer Service department, as they occupy an entire building.

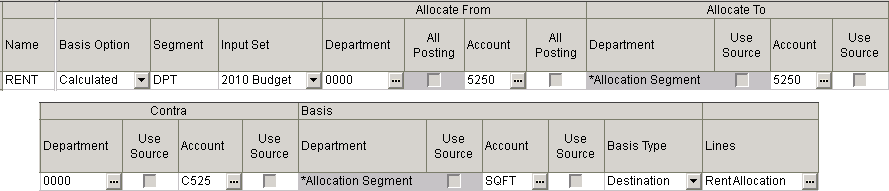
The following steps of the wizard walk you through the sections you see on the following view of a Rent allocation in the Allocations Worksheet.
The sections are as follows:
- Allocate from – this is the source of the allocation. For example, Rent allocation is pulled from the Administration Department 0000 and account 5250.
- Allocate to – this is the destination information. In this example, account 5250 will receive the amount, for the departments determined later in the allocation.
- Contra – this is the account that gets the offset amount so that the entry is balanced.
- Basis – this section is important as it defines the criteria for the allocation. One is the segment that receives the amounts. In this case, a list of departments is defined using the Lines. All departments defined in the Lines titled “RentAllocation” will receive the appropriate amount. The other important area is Account. This is the account that is used to calculate the variable amount. In this example Square Footage is used. So all destination department’s square footage is aggregated and then calculated to create a percent. That percent is then used to calculate Rent.
The Microsoft Forecaster Supplemental guide contains an entire chapter on Allocations with examples of calculations and detailed explanations. I encourage you to start using Microsoft Forecaster to its full potential by taking advantage of this great feature.