How to configure an Outlook profile using MFCMAPI for Exchange 2013
I had another case involving creating a profile to an Exchange 2013 server. However, this time it was for Outlook’s MAPI, not Exchange’s MAPI as previously documented. After discussing this with the Outlook product team they agreed to document the minimum number of properties to create a profile using MFCMAPI. Here are the steps. For the non-developers this is not the recommended way to create profiles. It is recommended that you use Outlook to create the profile as the logic for this is all built-in. However, you can use these steps for troubleshooting purposes.
- Make sure Exchange 2013 is properly configured.
- Open up MFCMAPI, go to Profile > Show Profiles
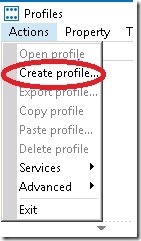
- Click Actions > Create Profile
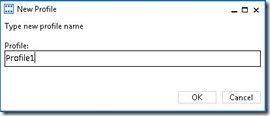
- Give the new profile a name and click OK.
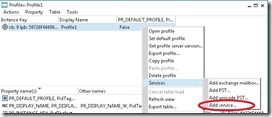
- Select the new profile
- Right-Click the newly created profile and choose Services > Add Service…
- Enter MSEMS for the service name
- Uncheck the box which says ‘Display Service UI’
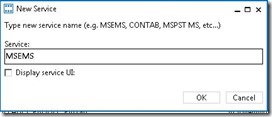
- Click OK
- Double-Click the newly created profile.
- Single-Click the MSEMS service.
- Find the Exchange Profile section. This is a little difficult in Outlook’s MAPI since in 2010 and above we no longer have the global profile section. To find the Exchange Profile Section find the property PR_EMSMDB_SECTION_UID (0x3D150102) in the properties for the service. The value will be the GUID of the profile section persisted in binary form which will be used in the subsequent steps. You will need to remember this value.

- Double-Click the MSEMS service.
- Find the Exchange profile section by using the UID gathered from Step 12 and single-click it to select the row.
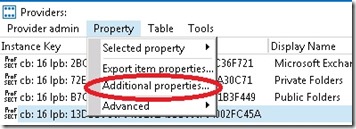
- Go to Property > Additional Properties
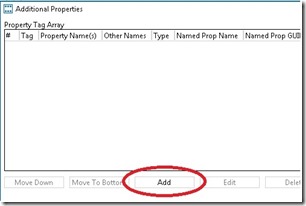
- Click Add and add the following properties PR_PROFILE_UNRESOLVED_NAME, PR_PROFILE_UNRESOLVED_SERVER, PR_ROH_PROXY_SERVER, PR_ROH_FLAGS, PR_ROH_PROXY_AUTH_SCHEME, and PR_PROFILE_AUTH_PACKAGE
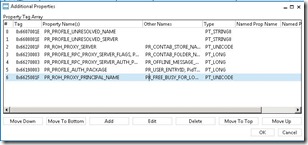
- Click OK.
- Configure each property using the guidance below.
Property: PR_PROFILE_UNRESOLVED_NAME 1 Value: mailbox alias The alias for the target mailbox. For example, Administrator Autodiscover Node: N/A Property: PR_PROFILE_UNRESOLVED_SERVER 1 Value: The personalized server id This is the value retrieved from Autodiscover. It will be in the format guid@domain. For example, F5FA2827-5978-43cd-8FA8-E07BC3BB5591@contoso.com Autodiscover Node: Response/Account/Protocol/Server (EXCH) Property: PR_ROH_PROXY_SERVER Value: FQDN of your Client Access Server. You don't need to specify or https://. For example, e2013cas.contoso.com Autodiscover Node: Response/Account/Protocol/Server (EXPR) 2 Property: PR_ROH_FLAGS Value: ROHFLAGS_USE_ROH (0x1) | ROHFLAGS_HTTP_FIRST_ON_FAST (0x8) | ROHFLAGS_HTTP_FIRST_ON_SLOW (0x20) Contains the settings in a profile used by Microsoft Office Outlook to connect to Microsoft Exchange Server by using a remote procedure call (RPC) over Hypertext Transfer Protocol (HTTP). Autodiscover Node: Response/Account/Protocol/SSL (EXPR) 2 Property: PR_ROH_PROXY_AUTH_SCHEME Value: RPC_C_HTTP_AUTHN_SCHEME_NTLM (0x2) Represents the authentication protocol to be used for this profile. Autodiscover Node: Response/Account/Protocol/AuthPackage (EXPR) 2 Property: PR_PROFILE_AUTH_PACKAGE Value: RPC_C_AUTHN_WINNT (0xA) Describes the authentication scheme to use for RPC Autodiscover Node: Response/Account/Protocol/AuthPackage (EXCH) 3 - Select Session > Logon and display store, and select the profile if it is not already selected.
More Information
- 1 You must use the Unicode versions rather than the ANSI version.
- You must use the Plain Old XML (POX) based autodiscover. This is the only supported autodiscover for configuring Outlook profiles.
- You can use Outlook to make an Autodiscover request on your behalf by right clicking the Outlook icon in the System Tray while holding down the CTRL button and choosing 'Test E-Mail Autoconfiguration'. Of course you must have created a profile before doing this.
- For PR_ROH_FLAGS your environment may require the flag ROHFLAGS_SSL_ONLY (0x2) to tell MAPI to only use SSL. Additionally, if your environment requires mutual authentication you will need to set that flag as well (ROHFLAGS_MUTUAL_AUTH (0x4)). Setting ROHFLAGS_MUTUAL_AUTH (0x4) will require that you also set the property PR_ROH_PROXY_PRINCIPAL_NAME. This should be set to the principal name of the server.
- 2 For Outlook 2010 you will need to use the EXPR protocol. Outlook 2013 will use the EXHTTP protocol.
- 3 This value may not be in the Autodiscover response. If not specified the client should use Kerberos or NTLM.
- Knowledge Base Article 898835 describes some of these properties support.microsoft.com/kb/898835
Please bear in mind that the property values above may vary for your particular organization. That is why I included the location in the Autodiscover response where you can find the setting for a particular profile. The settings above worked in my environment but may not work in yours. If you are having trouble, the best thing to do is to review the Autodiscover response for the target mailbox to ensure that it matches the values I specify above. If it doesn’t, you should change the values accordingly.
Notes for Developers
In the canonical example of creating a profile, Microsoft shows how to create the service then call IMsgServiceAdmin::ConfigureMsgService() to set the PR_PROFILE_UNRESOLVED_NAME and PR_PROFILE_UNRESOLVED_SERVER properties. However, since Outlook 2010 no longer uses the Global Profile Section this didn’t work for me. What I had to do was to call IMAPIProp::SetProps() on the Exchange Profile Section with the properties above to get the profile to properly connect.
Setting the properties on the profile SHOULD be done before calling MAPILogonEx()
You can avoid being authenticated as well as querying the directory server by not using the “unresolved” properties (e.g. PR_PROFILE_UNRESOLVED_NAME). You can get the information from Autodiscover yourself and populate the values for the following properties.
| Property: PR_DISPLAY_NAME |
| Value: The display name of the mailbox |
| Autodiscover Node: Response/User/DisplayName |
| Property: PR_PROFILE_HOME_SERVER |
| Value: The server name for the mailbox |
| Autodiscover Node: Response/Account/Protocol/Server (EXCH) |
| Property: PR_PROFILE_USER |
| Value: The Legacy Distinguished Name (DN) of the user |
| Autodiscover Node: Response/User/LegacyDN |
If you have questions, just add a comment and I will approve them and respond as time permits.
[Edit: 7/8/2014 Added screenshots]