Using Visual Studio 2010 to remotely debug ASP.Net crashes.
Suppose you have an ASP.NET page that is giving users some vague error message like "An error has occured" when they do certian actions. You might very much like to get a debugger on the web server in question and diagnose the issue. In some cases this may be problematic. You may not want to put VS2010 on your web server, and you may not be able to reproduce the issue in a test environment.
Visual Studio 2010 has some very nice tools for dealing with just this problem. Visual Studio Application Lifecycle Management has all detailed documentation on all the ways you can use the new tools. This blog post boils down the instructions to the minimum set you need to debug a crashing ASP.Net application on a web server that doesn't have Visual Studio installed. You will still have to install a test agent.
Pre-Requisites:
A version of Visual Studio that comes with the test controller and test agent. I used Ultimate.
Source files and symbols from the build you want to debug.
A machine in the same network as your web server for the test controller.
A machine in the same network as your test controller for Visual Studio (Same machine is fine)
Admin access to the web server.
A visual studio automated test that provokes the crash. Coded UI or webtest both work fine.
Assumptions:
- Windows 2008 Server R2
- IIS 7
- .Net 4.0
This setup will probably work on other setups, but you may have to make adjustments.
Install the test controller
These instructions recomend using a synchronized machine account for the controller and agents. This allows you to work cross domain if you must. You can also use a service account if all the machines are in the same domain or you have two way trust. Using a user account is not recomended. These instructions are also compatible with later adding a TFS server and using this test controller from there. The TFS server can even be in another domain without a trust relationship, as long as IP connectivity and ports are open. Part 2 of this series will address upgrading this setup to a fully automated TFS solution.
On the test controller machine create a machine account called testControl. (Right click computer, pick manage, Configuration -> Local users and groups.)
- Create a secure password and remember it.
- Uncheck "User must change password"
- Check "password never expires"
Add the account to the Administrators group of the machine.
Install the test controller on the machine.
If you don't desire the default port, cancel the setup wizard and edit <drive letter:>\Program Files (x86)\Microsoft Visual Studio 10.0\Common7\IDE\QTCcontroller.exe.config file. Change <add key="ControllerServicePort" value="6901"/> to the desired port.
Run the configuration wizard (...\Microsoft Visual Studio 10.0\Common7\IDE\TestControllerConfigUI.exe)
Specify the MACHINENAME\testControl account.
Click "Apply Settings"
Add the testControll account to the TeamTest* groups.
Install the Test Agents
- Add a local admin user to the machine.
- Right click Computer and pick Manage
- Open Configuration -> Local Users and Groups -> Users
- Create an account called testControl with the password from the test controller step. It's important the passwords match.
- Uncheck "Password Must be reset..."
- Check "Password Never Expires"
- Add the account as a machine admin.
- Run the test agent installer from the CD.
- Run as a server.
- Once setup is done, configuration will come up automatically.
- Enter the account information MACHINENAME\testControl and password.
- Enter the test controller:port you want to use from the step above.
- Finish the wizard.
- Wait for configuration to end.
- Restart the machine if prompted.
Get ready to test
Set up test machine attributes
Open Visual Studio
Open Test->Manage Test Controllers
Enter the MACHINE:PORT for your test controller.
Confirm the machines you added as test agents show up in the list.
Select properties for each ASP.NET server you want to collect data on.
- Create an attribute called "MachineType" for each machine and set the type to "Web Server", "App Server" or similar. Record the exact settings you use for later. (modal dialogs will keep you from easily refering to this screen.)
Close the dialog.
Create the test settings
- In Solution Explorer, right click the solution and "Add -> New Item..."
- Select "Test Settings"
- Name the new settings something like "Remote"
- Click Add.
- The Test Settings page comes up.
- (optional) Edit the description
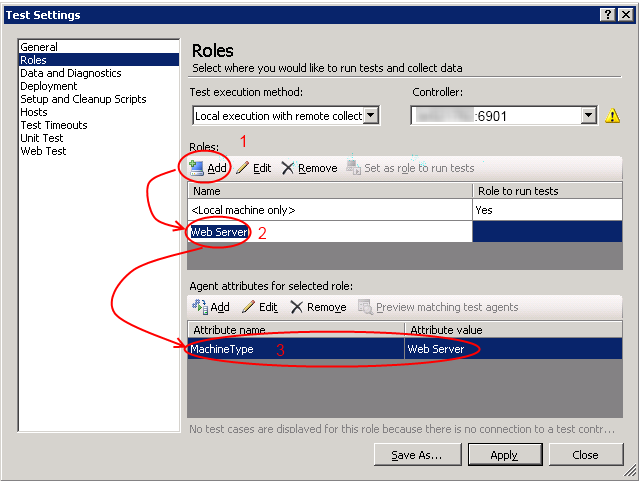
- On the "roles" page.
-
- Set the controller to br021782:6901
- Select "Local Execution with remote collection" or "Remote Execution" depending on how your tests will need to run.
- Click the "Add" button and create a role for each MachineType you added above. ("Web Server", "App Server", etc)
- Highlight each role and add an attribute that matches what you created above. E.G. "MachineType", "Web Server". These attributes are how the test knows the test machines.
- On the "Data and Diagnostics" page
- Select each role and check off the data collection you want. See msdn.microsoft.com/en-us/library/dd286579.aspx for details.
- If you select Video Recorder, Windows Media 9 encoder (32 bit) needs to be installed on the machine.
- Intellitrace, Event Log and System information are recomended for web servers.
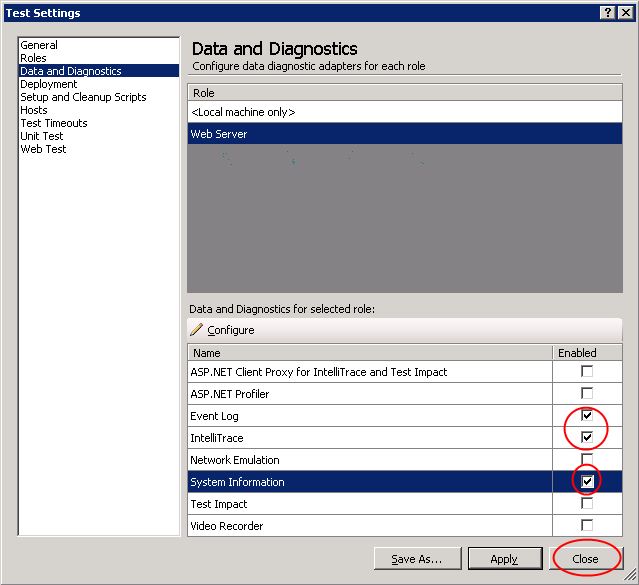
- Click "Apply" and "Close".
Run the tests
- Select "Test -> Select Active Test Settings" and pick the settings you just created.
- Run the test(s) you want to gather infromation from.
If you used a coded UI test and it's running locally, don't touch the mouse! :)
Examine the Data
- If you have any failing tests, rigght click -> view test results to get a view of the recorded details.
- Scroll down to "Collected Files"
- Find the files named *.Itrace and click one.
- You can now pick a thread, or exception data to debug.
- Double click a row to begin debugging.
- You may have to browse to find the source code. If "Browse to find source" isn't an active link, your symbols aren't setup.
- Enjoy Debugging!
Stay Tuned for Part 2
In which we will see a TFS server outside the test domain and used to run automated tests and ship intellitrace debugging back to our bugs.