Creating URL configurable Visual Studio Web Tests
Creating URL configurable Visual Studio Web Tests
I recently joined a project with a lot of web based APIs. This is pretty typical and Visual Studio 2008 let me start creating load tests literally within hours of being accepted onto the project. I quickly created a library of about one hundred web tests. Everything was going well until the day I realized I needed to point all my tests to a new server. The prospect of changing one hundred URLs on a regular basis made me stop and think about how to do it better. As I have developed these tests, I have come up with a set of best practices for VSTS load tests for my team. I have also create a method for adding on-the-fly URI and other data to the visual studio load tests without converting them to code.
Since my team has several test environments, I need to change my tests to be able to point to different systems easily. With this system I can change the URL in an arbitrary number of test as fast as I can edit one XML file and hit “F5” to run the tests. I also am no longer troubled by a bug where I had to remove and re-add web tests to load tests if I changed the URL.
You can use this system for any test URL. If your tests have a lot of different base URLs, your settings file will need an entry for each of them.
Best practices for web tests that will be use for load testing
· Keep your functional tests separate from the load tests. Fancy functional tests are cool, but they are hard to debug in load scenarios. K.I.S.S. principle applies to load tests.
· Avoid converting web tests to code. Keeping them in the simple “native” test format keeps management easy.
· Use the plug in architecture whenever you need to customize web tests.
· Use a global settings file for settings that need to change for different environments.
· Load tests should not perform complicated scenarios. If possible they should contain just one call to the application under test.
· In order to use this URL configuration as is all the tests need to hit the exact same URL. E.G. <myserver/app/api.apsx>? However, you can easily add as many URLs as you like to the config file.
Creating your settings file
Since your web tests are effectively running as a plug-in or DLL to the test system you can’t easily use an app.config file like you might for your own executables. This isn’t much of a problem; it’s really easy in .Net to create a configuration class. If you are following along at home, fire up your Visual Studio and create a new project. Pick test project. Then right click the solution and add a class library project named “WebTestSettings”. Rename class1 to be “WebTestSettings” as well. Mark the class [Serializable] and add the parameters you require as public properties. You will also need to add internal Save and Load methods. Here is my class that provides a SQL connection string to a web plug-in and sets the test API URI. For this application save is optional. I don’t use it in this project. I briefly hooked up some throw away code to write out the first config file.
Settings Class
[Serializable]
public class WebTestSettings
{
public string SqlConnectionString { get; set; }
public string ApiURI { get; set; }
internal void SaveConfig(string ConfigFilePath)
{
StreamWriter writer = new StreamWriter(ConfigFilePath);
XmlSerializer serializer = new XmlSerializer(typeof(WebTestSettings));
serializer.Serialize(writer, this);
writer.Close();
}
internal void ReadConfig(string ConfigFilePath)
{
StreamReader reader = new StreamReader(ConfigFilePath);
XmlSerializer serializer = new XmlSerializer(typeof(WebTestSettings));
WebTestSettings readSettings = (WebTestSettings)serializer.Deserialize(reader);
this.SqlConnectionString = readSettings.SqlConnectionString;
this.ApiURI = readSettings.ApiURI;
reader.Close();
}
}
Now you will need to create your settings file. For this code my settings file came out like this. You can use the SaveConfig method to write out your config file. I didn’t use it for anything else, but I kept it in the class in class for completeness.
Settings.xml
<?xml version="1.0" encoding="utf-8"?>
<WebTestSettings xmlns:xsi="www.w3.org/2001/XMLSchema-instance" xmlns:xsd="WebTestSettings.xsd">
<SqlConnectionString>Data Source=(local);Integrated Security=true;Initial Catalog=MyDatabase</SqlConnectionString>
<ApiURI>myServer/application/api</ApiURI>
</WebTestSettings>
WebTestPlugin to pass parameters into your tests
Add a reference to Microsoft.VisualStudio.QualityTools.WebTestFramework to the project. Create a new class called “SettingsPlugIn”. Add “using Microsoft.VisualStudio.TestTools.WebTesting;”. Derive your new class from WebTestPlugin.
We are going to hard-code the name of the settings file into this class. (In theory this violates best practices, but since the web tests run in a particular environment, we can get away with this.) Next, override the PreWebTest function of the base class. Add your new parameters and set them from the settings file.
SettingsPlugin class
public class SettingsPlugIn : WebTestPlugin
{
private WebTestSettings settings = new WebTestSettings();
private const string settingsFile = "WebTestSettings.xml";
public override void PreWebTest(object sender, PreWebTestEventArgs e)
{
settings.ReadConfig(settingsFile);
e.WebTest.Context.Add("SqlConnectionString", settings.SqlConnectionString);
e.WebTest.Context.Add("ApiURI", settings.ApiURI);
base.PreWebTest(sender, e);
}
}
Getting your web tests to use the new settings file
There are several steps you have to complete to get the settings file where the web tests can locate them.
Add the WebTestSettings project as a reference to the test project
Right click references and find it on the project tab. Hit F6 to build everything.
Add the settings file to the test project
Save your config file to the file name you hard-coded into the plug-in class, "WebTestSettings.xml" in this case. Add the file to the TestProject you created earlier. (You can optionally add an XSD file to quell Visual Studio warnings. I used the XSD.EXE tool to create my XSD.) Set the “Copy to output directory” property on the xml file to “Copy if newer”.
Adding the config to a web test
Create a new web test to access your application. You can just make a recording as usual.
Add the settings file as a deployment item to the test
This is a little harder than it should be. Hopefully the next version of VSTS will make this easier.
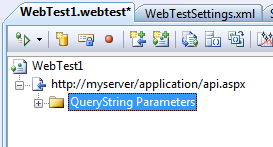
1. One the menu select Test->Windows->TestView
2. Highlight your web test in the list. (You might need the column chooser to tell web tests apart from other items if you have a lot of tests.)
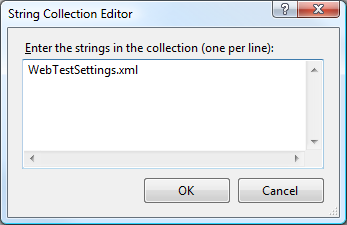
3. In Properties click “Deployment Items” and an ellipsis […] will appear next to “String[] Array”. Click it.
4. In the Dialog Box type in the name of the settings file. “WebTestSettings.xml”
Add the plug in and change the url to use the settings file value
1. On the web test right click the base node and select “Add web test plug-in…”. Select the SettingsPlugIn.
2. Click the URL and in the properties window set it to {{ApiURI}}
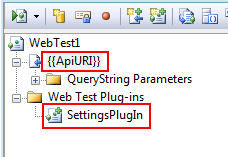
Now when you run the test the results will start off showing the URL as {{ApiURI}} and then change it to the URL as soon as the plug-in runs and the name is resolved. Now you can point to a new system to test for all your tests in one quick change to the settings XML file.
Caveats
· Visual Studio seems to have some issues with the plug-ins. If you have to change the plug in code, you will need to delete all the OBJ, BIN and TESTRESULTS directories in the solution, otherwise the new code won’t get picked up.
· Visual Studio seems to cache web tests. If you update a web test that is already part of a load test, you will need to remove and re-add the web test when you change the URL. Once you get this plug-in running you can just update the XML file in the root of the webtest directory instead.
· This example doesn’t show you the plug-in I use to get additional data from a database, which is what the connection string is for. Built in data sources are nice, but when you need to share tests with other team members, you might not want to share datasources.