ADAL: Secure Web API with ADFS 3.0 for Desktop Client
I came across one of the requirements, where my customer requested me to create a sample ASP.NET WEB API application, and later be consumed by a rich desktop client like WPF. It had one OAuth 2.0 protocol authorization rider before accessing the WEB API resource. And, the OAuth 2.0 access token must be retrieved from an On-Premise ADFS authorization server.
OAuth 2.0 authorization protocol is supported from ADFS 2012 and beyond.
Create Web API application
- Launch Visual Studio 2015 as an administrator
- File -> New -> Project
- Pick Visual C# -> Web -> ASP.NET Web Application template
- Name your application as MyWebAPIsample
- Hit OK
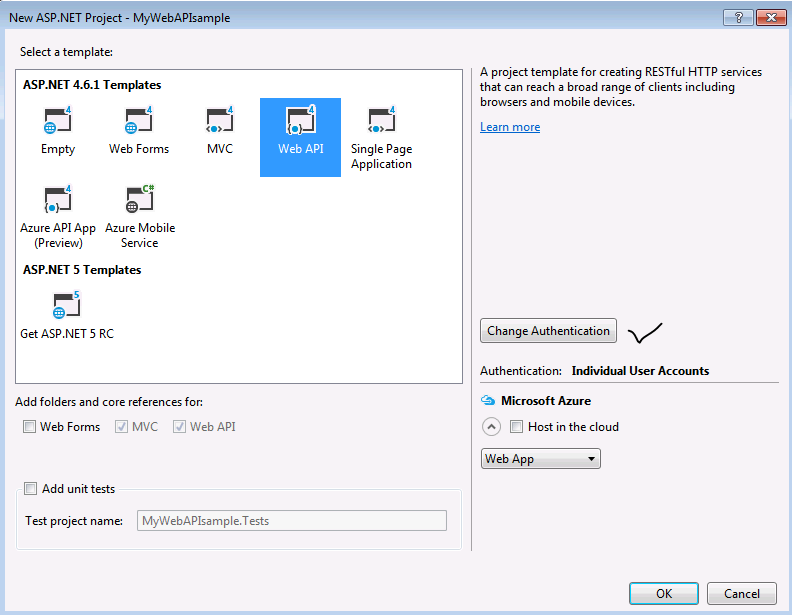
- Select Web API template and click on Change Authentication
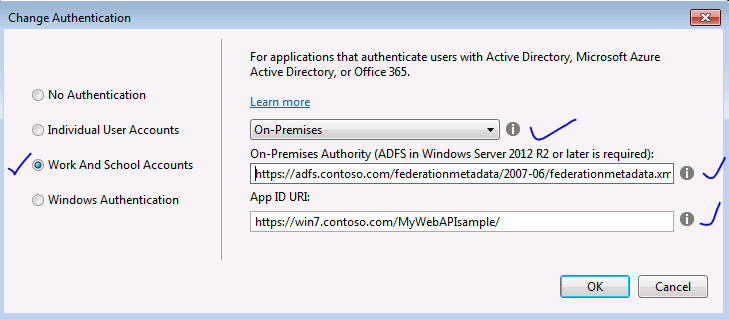
- Select Work And School Accounts, pick On-Premises value from the drop down list
- On-Premises Authority will have value of https://adfs.contoso.com/federationmetadata/2007-06/federationmetadata.xml
- App ID URI will have value of https://win7.contoso.com/MyWebAPIsample/
- Say OK
- OK again
- Now, ASP.NET Web API application project will be ready
- This utilized the OWIN modules, which helped generating the authenticating modules internally - developer won't have to write any explicit for authentication on this
- Web.config will look like:
    <appSettings>
       <add key="webpages:Version" value="3.0.0.0" />
       <add key="webpages:Enabled" value="false" />
       <add key="ClientValidationEnabled" value="true" />
       <add key="UnobtrusiveJavaScriptEnabled" value="true" />
        <add key="ida:AdfsMetadataEndpoint" value="https://adfs.contoso.com/federationmetadata/2007-06/federationmetadata.xml" />
        <add key="ida:Audience" value="https://win7.contoso.com/MyWebAPIsample/" />
   </appSettings>
- Startup.cs will have:
 using Owin;

namespace MyWebAPIsample
{
    public partial class Startup
    {
         public void Configuration(IAppBuilder app)
         {
              ConfigureAuth(app);
         }
    }
}
- App_Start\Startup.Auth.cs will have:
 using System;
using System.Collections.Generic;
using System.Configuration;
using System.IdentityModel.Tokens;
using System.Linq;
using Microsoft.Owin.Security;
using Microsoft.Owin.Security.ActiveDirectory;
using Owin;

namespace MyWebAPIsample
{
    public partial class Startup
    {
         // For more information on configuring authentication, please visit go.microsoft.com/fwlink/?LinkId=301864
         public void ConfigureAuth(IAppBuilder app)
         {
              app. UseActiveDirectoryFederationServicesBearerAuthentication (
                 new ActiveDirectoryFederationServicesBearerAuthenticationOptions
                  {
                      MetadataEndpoint = ConfigurationManager.AppSettings["ida:AdfsMetadataEndpoint"],
                      TokenValidationParameters = new TokenValidationParameters() {
                           ValidAudience = ConfigurationManager.AppSettings["ida:Audience"]
                        }
                  });
          }
     }
}
- The controller ValuesController will have:
 using System.Web.Http;

namespace MyWebAPIsample.Controllers
{
       [Authorize]
       public class ValuesController : ApiController
       {
           // GET api/values
           public IEnumerable<string> Get()
           {
                 return new string[] { "value1", "value2" };
           }
    ...
- Build the web API application
Host the WEB API application on IIS
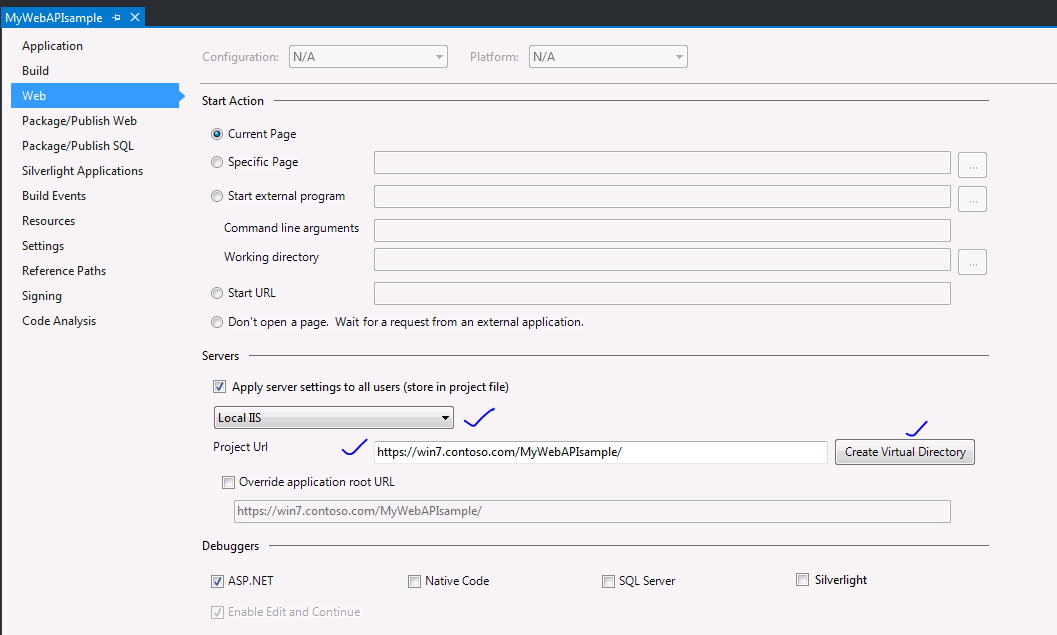
- Right click the MyWebAPIsample project, go to Properties, and then to Web tab
- Set for Local IIS server, provide Project URL and click Create Virtual Directory
- Application would be deployed on IIS
- Otherwise, you are free to follow your own method of deploying the WEB API application on IIS
- Go to IIS manager (Run -> inetmgr) -> Application Pools
- Click on Add Application Pool
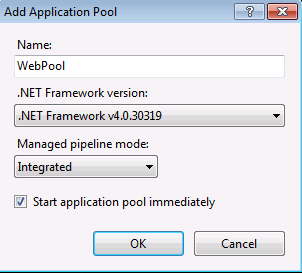
- Select your application under the sites
- Right click -> Manage Application -> Advanced Settings -> select the newly created application pool WebPool
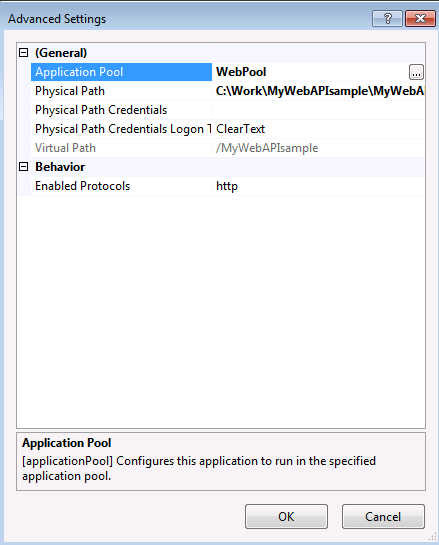
- Web API application hosting is over
ADFS provisioning for Web API application
- Launch Windows PowerShell as an administrator
- Run the following command:
Add-ADFSRelyingPartyTrust -Name WIN7.MyWebAPIsample -Identifier https://win7.contoso.com/MyWebAPIsample/ -IssuanceAuthorizationRules '=> issue(Type = "schemas.microsoft.com/authorization/claims/permit", Value = "true");' -IssuanceTransformRules 'c:[Type == "schemas.xmlsoap.org/ws/2005/05/identity/claims/emailaddress"] => issue(claim = c);'
- Now, the Web API is provisioned as a known RP in ADFS
- Pick a GUID for ClientId [simple way: Solution explorer -> MyWebAPIsample project -> Properties -> AssemblyInfo.cs -> select Guid Value]
- Run the following command:
Add-ADFSClient -Name "WIN7.MyWebAPIsample.Client" -ClientId "09c9a8a2-6bf1-427d-89ba-45c2c02bb9fc" -RedirectUri "anarbitraryreturnuri/"
- Now, OAuth 2.0 client will be registered with ADFS
Note
The ADFS provisioning commands are different for ADFS server 2016. The PowerShell commands such as Add-AdfsRelyingPartyTrust and Add-AdfsClient should map to Add-AdfsWebApiApplication and Add-AdfsNativeClientApplication respectively in ADFS 2016. The documentation /en-us/windows-server/identity/ad-fs/overview/ad-fs-scenarios-for-developers has more details on this.
Consume the Web API on rich client
- Go to your solution explorer
- Add New Project -> Visual C# -> Windows -> WPF Application -> Name as MyWebAPIClient
- Install NuGet package named Microsoft.IdentityModel.Clients.ActiveDirectory - recent version is 3.13.9.1126
- Add reference for System.Net.Http.dll
- Add a button control (add button click event) on MainWindow.xaml
<Grid> <Button x:Name="button" Content="Button" HorizontalAlignment="Left" Margin="124,78,0,0" VerticalAlignment="Top" Width="75" Click="button_Click"/> </Grid>
- Go to the code behind file - MainWindow.xaml.cs
- Add the button click event as
using Microsoft.IdentityModel.Clients.ActiveDirectory;
using System.Net.Http;
private async void button_Click(object sender, RoutedEventArgs e)
{
string authority = "https://adfs.contoso.com/adfs";
string resourceURI = "https://win7.contoso.com/MyWebAPIsample/";
string clientID = "09c9a8a2-6bf1-427d-89ba-45c2c02bb9fc";
string clientReturnURI = "anarbitraryreturnuri/";
var authContext = new AuthenticationContext(authority, false);
var authResult = await authContext.AcquireTokenAsync(resourceURI, clientID, new Uri(clientReturnURI), new PlatformParameters(PromptBehavior.Auto));
string authHeader = authResult.CreateAuthorizationHeader();
var client = new HttpClient();
var request = new HttpRequestMessage(HttpMethod.Get, "https://win7.contoso.com/MyWebAPIsample/api/values");
request.Headers.TryAddWithoutValidation("Authorization", authHeader);
var response = await client.SendAsync(request);
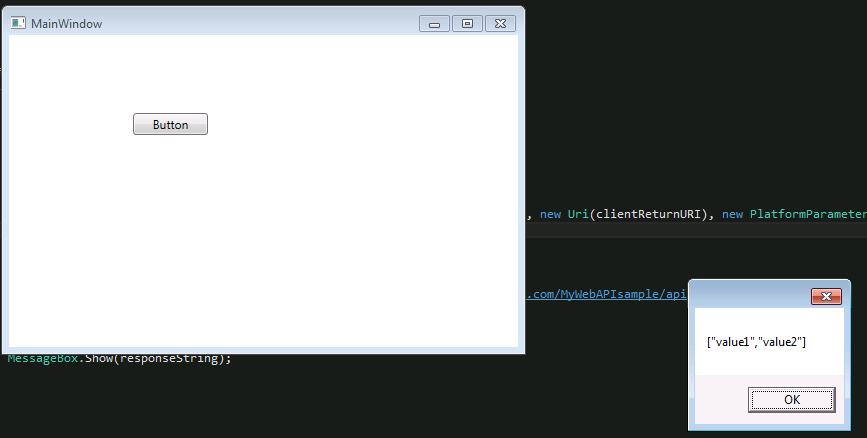
string responseString = await response.Content.ReadAsStringAsync();
MessageBox.Show(responseString);
}
- Build application
Debug and run the rich client
- Set as startup project for MyWebAPIClient
- Hit F5
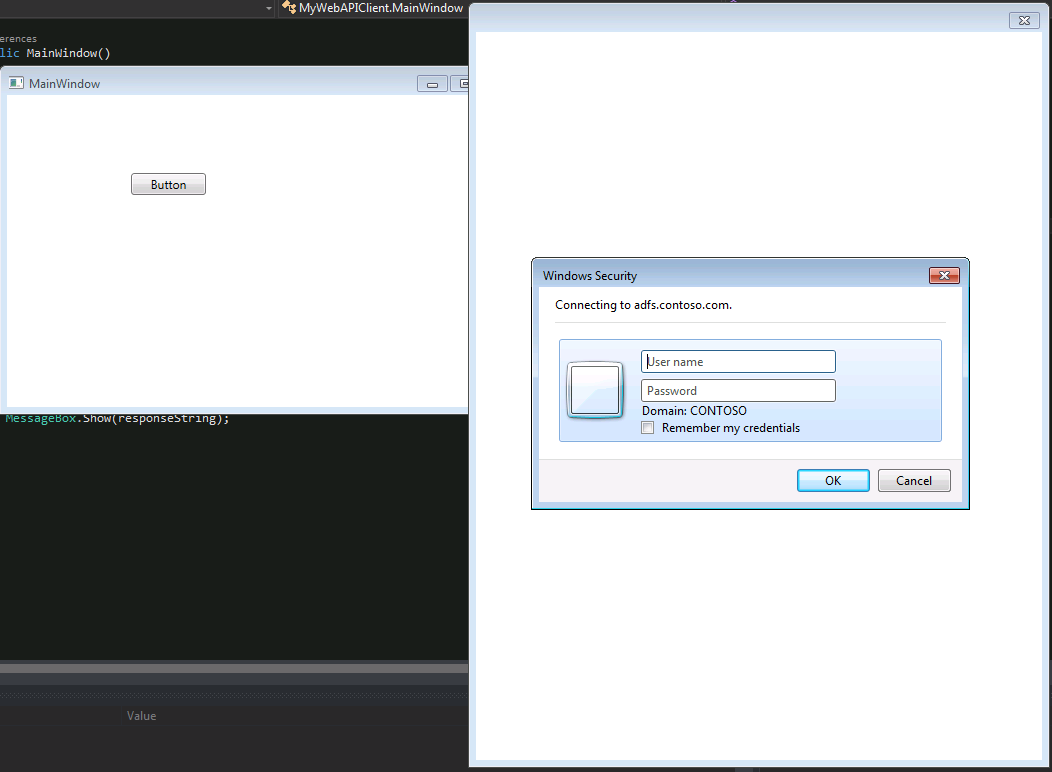
- Provide your credentials, hit F10


- The testing is over.
References
- Securing Web API with ADFS [GUI approach]: <www.cloudidentity.com/blog/2013/07/30/securing-a-web-api-with-windows-server-2012-r2-adfs-and-katana/>
- Securing Web API with ADFS [Command line approach]: <www.cloudidentity.com/blog/2013/10/25/securing-a-web-api-with-adfs-on-ws2012-r2-got-even-easier/>
- ADAL.NET NuGet package: <www.nuget.org/packages/Microsoft.IdentityModel.Clients.ActiveDirectory/>
- ADAL.NET GitHub repo: https://github.com/AzureAD/azure-activedirectory-library-for-dotnet
Note:
- The same solution can be followed for ADFS 2016 as well. I was using ADFS 2012 in my case.
- Sample application is upload for your reference on OneDrive (please click to download it).
Happy Programming!!!