Running Django on Azure Web Apps for Containers with Docker
In this post I will walk you through a very simple approach to developing and hosting a simple Python/Django application in Azure App Service. For this demo we will target Azure Web Apps for Containers which gives us the flexibility to customize our application dependencies by wrapping those needed libraries in a Docker container. Currently, App Service on Linux doesn't support Python, but we will be able to containerize our web app and include any dependencies as needed. If you find your application's runtimes aren't supported by App Service by default, this is the approach you will take to run your application in Azure.
The Application
For this application I will create a simple blog powered by Django/Python. To make it easy to follow the application structure, I have started the application development based on the excellent tutorial here. This tutorial walks you through creating a Poll application, but I have changed that slightly to match a simple blog. For now the blog is based on an open source bootstrap theme, and has just a few working pages, but in the future I will add a proper database, configure debugging, configure telemetry, and setup CI/CD to make deployments much easier.
Dependencies
Install Git Install Docker Install Azure CLI Install Visual Studio Code (optional) Create a free Azure Account Create a Docker Hub Account Create an Azure Container Registry Account for Private Registration of your container
Download the Application
To get started first clone the pre-built repository with the following commands. Open a command prompt, navigate to a place where the application will live on the file system, and type the following.
 mkdir DjangoApps
cd DjangoApps
git clone https://github.com/drewelewis/azure-django-gunicorn-docker.git
cd azure-django-gunicorn-docker
Now that the skeleton of the application has been setup, the next step is to open it in Visual Studio Code. In the command prompt type the following.
code
Anatomy of the Application
The code repository contains both the application code, and the image details all in the same repository. Any changes with our application or the details of our image will be done in the same place.
Here is the rundown of the most important sections.
/mysite
Under the mysite directory is our main Django project, and contains all the settings required for our project to run.
/blog
The blog directory is an application within our project and contains all the bits required for our blog functionality.
init.sh
Init.sh is a script that will run when our Docker container starts. For our purposes, this file will just boot up Gunicorn pointing to the location of our web application.
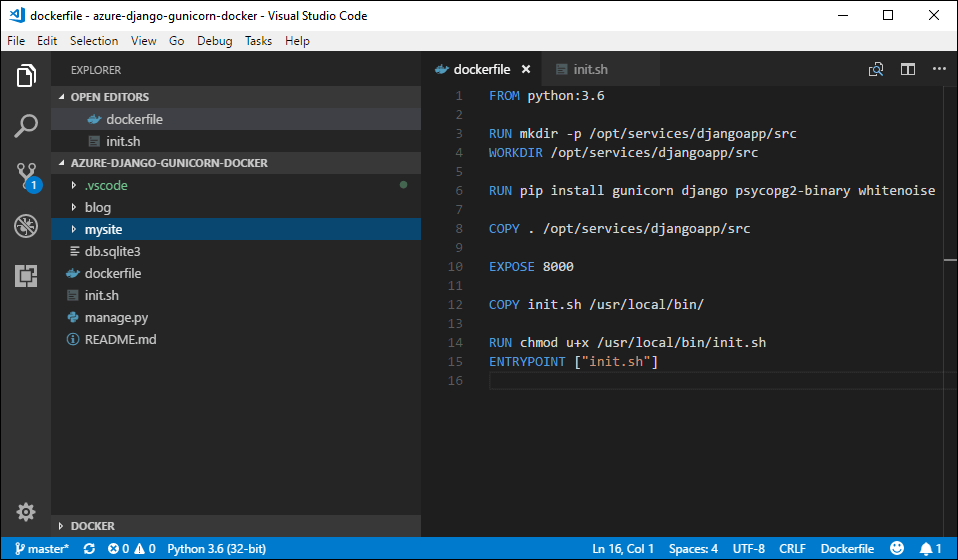
Docker File
At the root of this project is our dockerfile, which contains the details required for Docker to build an image.
The dockerfile is nothing more than a few commands needed to allow docker to build an image, and contains details on specific file locations and dependencies.
Notice the first line in our dockerfile FROM python:3.6. This is a reference to a base image that our image will be built from. You can choose a base image that closely matches your requirements and then customize as needed later by adding in additional libraries.
For a list of base images please check out the Official Repositories list. https://hub.docker.com/explore/
Application Dependencies
Notice the line that starts with RUN pip install. This line installs the specific application dependencies as follows:
Gunicorn: A web server that will serve our dynamic Django content. <docs.gunicorn.org/en/stable/index.html>
Django: Our Python web application framework. https://www.djangoproject.com/
psycopg2: A database driver that we will use later to connect to an Azure-hosted PostgreSQL database.
Whitenoise: A library that will allow Gunicorn to serve static content as well as dynamic content. See more here. <whitenoise.evans.io/en/stable/django.html>
Hosting the Docker Container on Docker Hub
With the basic application and everything configured to run a Docker container ready (see above), the next step is to get the container and the application that is hosted within it, into a Docker repository. This is an important step because Azure will use this container when creating and launching our application.
For this you can host the Docker container on Docker Hub or Azure Container Registry, but for this demo I chose Docker Hub. Once we have a Docker account, we can create a repository and upload our image source code. If you don't have a Docker Hub account, you can set one up here.
To upload the image, open a command prompt, navigate to the application, and type the following.
 cd azure-django-gunicorn-docker
docker login --username your-user-name
docker build -t your-user-name/azure-django-gunicorn-docker:v1.0.0 .
docker push your-user-name/azure-django-gunicorn-docker:v1.0.0
Now if you log back into Docker Hub, you should see your repository uploaded in a similar fashion.
Note: If the repository doesn't exist, a new one will be created. By default, this will be created as a public repository.
Configure Azure
The final step in running our Docker container on Azure App Service is to create our App Service. For this, we will need to create a Resource Group and an App Service Plan, and then we can create our application.
Back in the command prompt, lets first login to Azure. You will be prompted to complete the login process in a web browser.
az login
Resource Groups
Next let's create our Resource Group. This resource group is a container that will allow us to manage a group of resources a bit easier in the future. Be sure to choose a location that is closest to you.
az group create --name azure-django-gunicorn-dockerRG --location "East US"
App Service Plans
Let's create our App Service Plan. A service plan will allow us to group our App Services to make it easier to add or remove additional services. For more details on App Service plans, please have a look at the following resource. Azure App Service Plans Overview
az appservice plan create --name azure-django-gunicorn-dockerSP --resource-group azure-django-gunicorn-dockerRG --sku S1 --is-linux
Azure App Service
The following command will create our Azure App Service. This is where we will reference our Resource Group, App Service, and Docker Hub repository. Please ensure that you have your Docker Hub repository spelled correctly as our application will not load if there is a typo, and you will not be provided an error message if you misspell it.
az webapp create --resource-group azure-django-gunicorn-dockerRG --plan azure-django-gunicorn-dockerSP --name django-on-azure-app --deployment-container-image-name drewl/azure-django-gunicorn-docker:v1.0.0
Application Settings
We will modify our App Service to be aware that our Gunicorn web server is listening on port 8000 for all traffic.
az webapp config appsettings set --resource-group azure-django-gunicorn-dockerRG --name django-on-azure-app --settings WEBSITES_PORT=8000
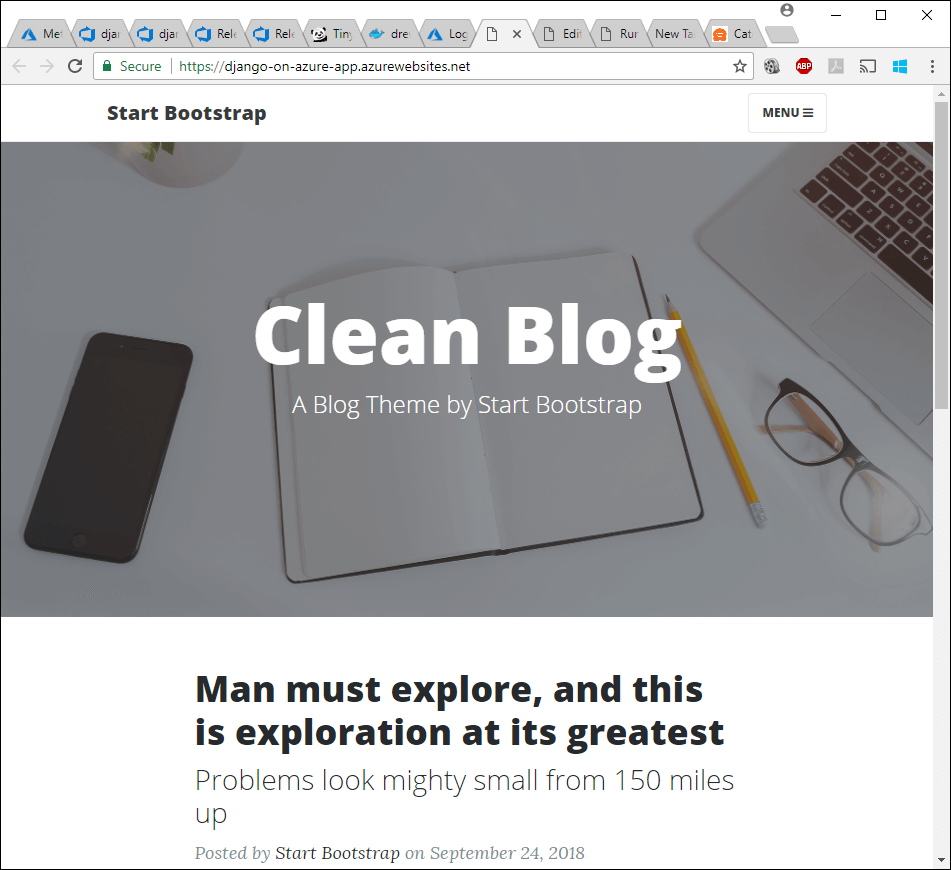
Our Running Application
We now have everything configured and we should be able to see our application hosted within Azure App Service. To have a look, your URL should look something like this.
https://django-on-azure-app.azurewebsites.net
If all went well, here is what you will see!
Next Steps
I will follow this post up by showing you how to make changes to our application and automate the release using Visual Studio Team Services (VSTS).