Creating a Remote App in Microsoft Azure
According to MSDN, “Azure RemoteApp brings the functionality of the on-premises Microsoft RemoteApp program, backed by Remote Desktop Services, to Azure. Azure RemoteApp helps you provide secure, remote access to applications from many different user devices. Azure RemoteApp basically hosts non-persistent Terminal Server sessions in the cloud, and you get to use them and share them with your users.”
Create a template image
You have two options to create an OS template image which will then be used to host your RemoteApps – difficult and easy. Let’s look at the difficult way first.
To create an image, perform the following steps:
1. Locate a Windows Server 2012 R2 DVD or ISO image.
2. Create a VHD file. (VHDX files [Hyper-V virtual hard drives] are not currently supported).
3. The VHD must not be a generation 2 virtual machine.
4. The VHD can be either fixed-size or dynamically expanding. A dynamically expanding VHD is recommended because it takes less time to upload to Azure than a fixed-size VHD file.
5. The disk must be initialized using the Master Boot Record (MBR) partitioning style. The GUID partition table (GPT) partition style is not supported.
6. The VHD must contain a single installation of Windows Server 2012 R2. It can contain multiple volumes, but only one that contains an installation of Windows.
7. The image size should be a multiple of MBs. If you try to upload an image that is not an exact multiple, the upload will fail.
8. The image size must be 127 GB or smaller.
9. Install Windows Server 2012 R2.
10. Install the Remote Desktop Session Host (RDSH) role and the Desktop Experience feature.
11. The Remote Desktop Connection Broker role must not be installed.
12. Install additional features required by your applications.
13. Install and configure your applications.
14. Perform any additional Windows configurations required by your applications.
15. Disable the Encrypting File System (EFS).
16. REQUIRED: Install KB 2977219 on your image. This KB is required for all Azure RemoteApp template images. Uploading your image will fail if you do not install this KB.
17. SYSPREP the image using the parameters /oobe /generalize /shutdown (DO NOT use the /mode:vm parameter).
Thankfully, Microsoft has provided an easy way too to create the template image.
1. In the Azure Portal, go to the Virtual Machines blade and click on the option create a new virtual machine.
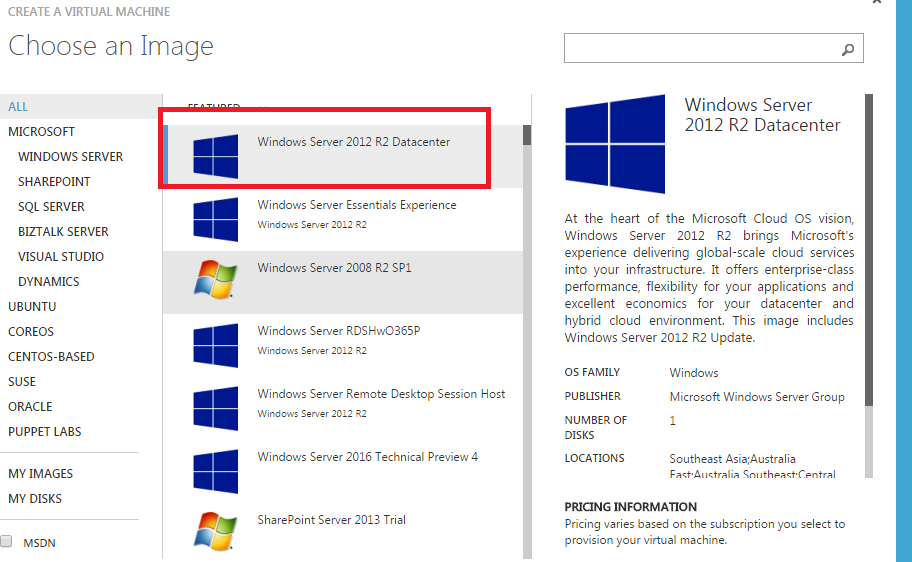
2. Select an image of Windows Server 2012 R2 Datacenter from Gallery. This image already contains all the pre-requisites installed and ready to go.
3. Proceed through the steps of the Wizard to create the VM. It does not really matter what options you choose here as we will be deleting this VM shortly.
4. Once the VM is provisioned and ready (this may take a significant amount of time), log in to the VM and start installing the apps that you need.
5. After you have installed the apps, make sure that you “Pin” them to the Start Screen. This is very essential as we will be using the apps present on Start screen as Remote Apps.
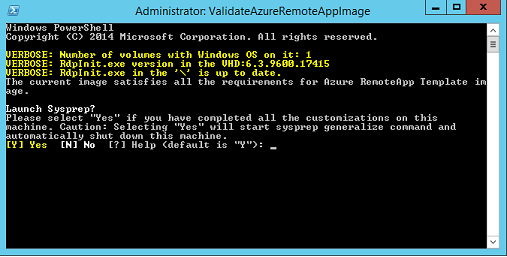
6. Once all the apps are installed and required configuration is done, we now to need to SYSPREP the VM. This will create an OS image with all the software installed and ready to go. To SYSPREP the image, Microsoft has provided a handy desktop link to the PowerShell file which will start the SYSPREP called “ValidateAzureRemoteAppImage.ps1”. Double click on that and answer “Y” to the confirmation prompt.
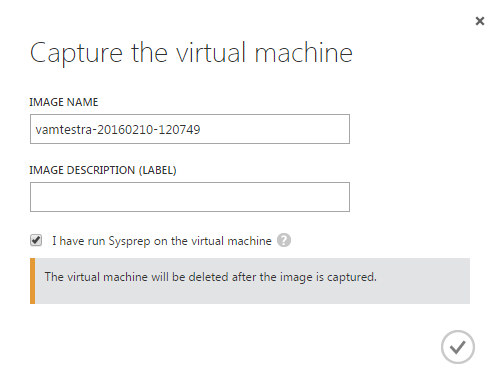
7. The process to start the SYSPREP will initiate and the VM will now shut down. After the VM has shut down completely, use the Azure portal to capture the image of your virtual machine.

8. This will open up a prompt. Confirm that you have run SYSPREP.
9. This will create a new image in your Virtual Machines tab in Azure Portal. We will be using this image to create our RemoteApp.
Add the Disk Image to RemoteApp image
1. Use the Remote Apps tab of Azure Portal to navigate to Template Images tab.
2. Click on Add and choose “Import an image from your Virtual Machines library (recommended).”
3. In the next step, choose your image name from the dropdown and confirm the prompt.
4. Give a name and a location to this image. Keep a note of the location that you are selecting as it will be very important in the next step.
5. This process will take close to an hour to complete. Be patient!
Create a RemoteApp Collection
1. Click on the “New” button on the RemoteApps blade on the Azure Portal.
2. Choose quick create and choose the same region as you had selected while creating the RemoteApp image.
3. Your image will appear in the Template Image dropdown. Select that and let the RemoteApp collection get created. This will again take few minutes.
Publish your apps
In this section we will publish the apps that we want to be available to the end users. Explore the RemoteApp collection that you just created and navigate to Publishing tab.
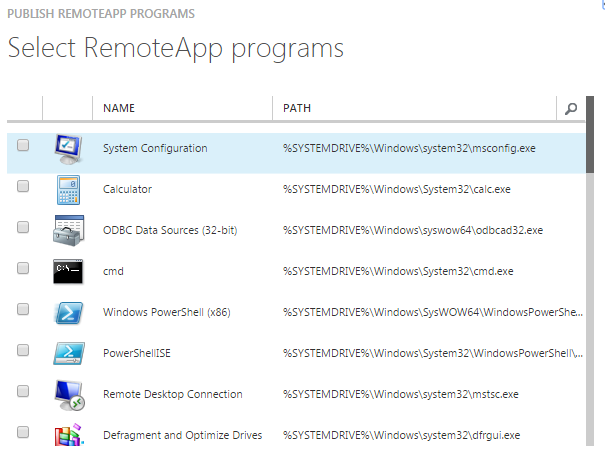
From the bottom bar, select the Publish button and choose the applications that you want to publish. Choose publish start menu programs and select the programs that you had installed earlier.
Additionally you may want to grant access to users from the User Access tab.
Use your RemoteApps
1. Navigate to https://www.remoteapp.windowsazure.com/ and choose your platform and install the Remote App launcher provided by Microsoft.
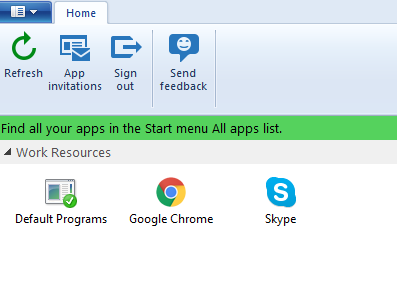
2. Sign in to the Azure RemoteApp application. You should be able to see the programs that you had published earlier.
3. Now launch the apps and enjoy! You can identify a RemoteApp from a local one by the subtle icon change after you have launched the app.

Conclusion
Creating and using RemoteApps has never been easier. Microsoft Azure has provided great tools to make sure that the process is as painless as possible.