Creating Your First Real-World App for Word 2013
If you have not been living under a rock, you must have noticed that the new version of Office has been released for Customer Preview. Office 2013 has a host of new features for end users as well developers. A new Office programming model has been introduced to support HTML5\JavaScript driven apps which can be installed by anyone using the Office Store. VSTO based Add-in development is still supported but is not encouraged going forward.
The new App model leverages the power of HTML5 and JavaScript to create beautiful, powerful apps. The use of web technologies enables the apps to be run anywhere - on the Office client or on browsers. Thus the new App model enables developers to customize Office 365 and all those customizations roam with you from anywhere you log in to Office.
The new App model has a host of features as well as security restrictions. Some of these are -
- Currently we can develop apps for Outlook, Word, Excel and Project only.
- The new App model does not support Ribbon Extensibility. So you cannot customize the ribbon or context menus.
- Office App is basically a web page hosted in an IFrame. No plug-ins or ActiveX components are allowed in the IFrame. Thus all the restrictions of a sandboxed HTML website apply to these apps. This is essential so that a rogue or malfunctioning app does not crash Office and leave a bad taste for the user.
- All interactions with the Office document happens via JavaScript. You don't have access to rich VSTO programming objects that you have come to expect like Range, Hyperlinks etc. It is left up to the developer to figure out how to manipulate the Office document via the JavaScript API.
- Office Apps cannot interact with the host Office process directly. The access to the Host UI thread is managed and your app can never block the Office UI via some modal dialogs. Everything that your app does has to be done asynchronously so that the Office experience remains fluid.
There are three types of Office Apps -
- Task Pane App - This app runs alongside the Office document and has access to contextual information of the Office document and can manipulate its contents. In this blog post, we will look close at this kind of app and also develop one.
- Content App - This app runs inside the Office document and provides rich visualization by accessing the data stored in the Office document.
- Mail App - This app runs next to a mail message, meeting request etc. and has access to that item's information. This kind of app is deployed on your organization's Exchange server and runs seamlessly on Outlook client and Web Access.
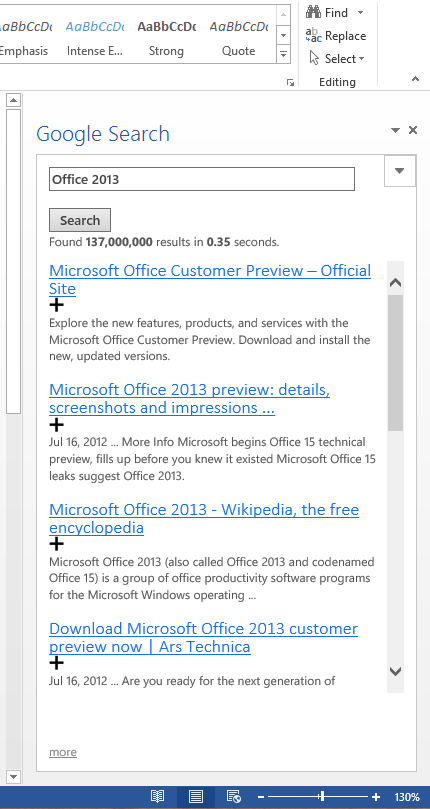
Lets create a simple Task Pane App using Visual Studio 2012 and Office Development Tools for Visual Studio 2012. This app will run alongside a Word document and will let user perform a Google Search from within the Word document and interact with the search results. Whenever the user selects some text in Word, our app will automatically perform a search. User can then click on the + button to insert the search result in the Word document. Here's the end result of what our app will look like.
Step 1: Choosing the right Project Template in Visual Studio 2012
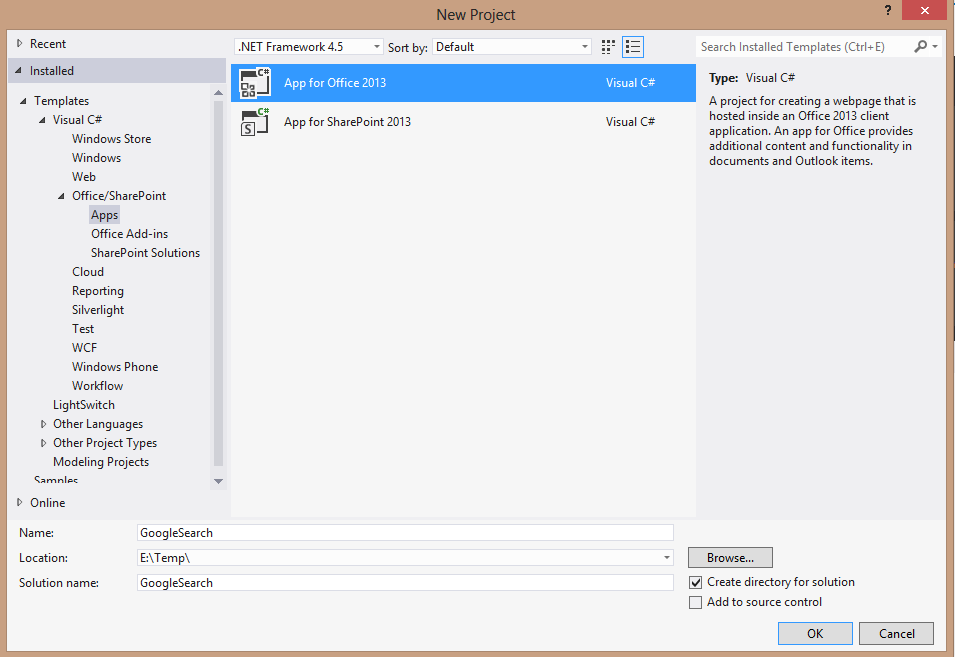
Fire p Visual Studio 2012 and choose App for Office 2013 as shown in the screenshot. Name your project "GoogleSearch" and click on OK.
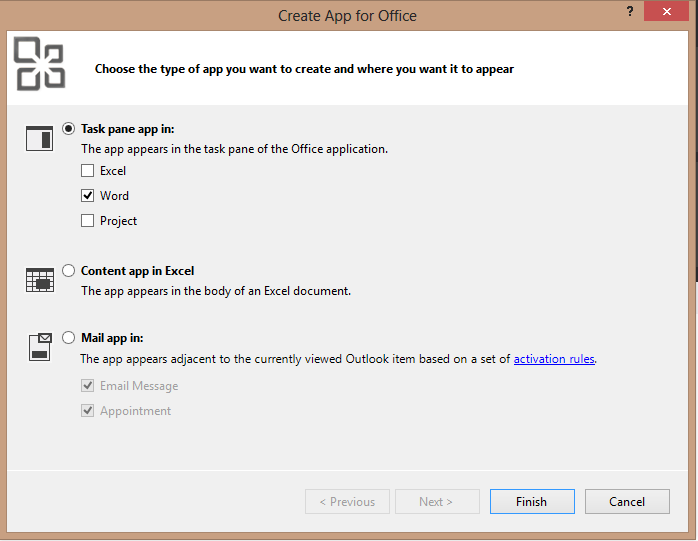
Since we are developing a Task Pane app which will run in Word, de-select Excel and Project options from the Wizard screen.
This will create two projects in your solution. One project (GoogleSearch) is the manifest of your app where you will declare your app's capabilities and information. The other project (suffixed with a Web - GoogleSearchWeb) is the main project which will your app pages, JavaScript, CSS, images and so forth. You can double-click the GoogleSearch.xml file in the GoogleSearch project to edit you app's description and capabilities. We will leave it as it is since it is sufficient for our need at this point.
Step 2: Writing actual code!
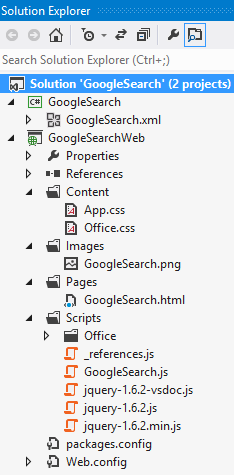
In the Web project, 2 files are of great importance to us - GoogleSearch.html and GoogleSearch.js. The Html page holds all layout of your page. At this point of time, it has two buttons and a text box. You can add as many pages as you want for your app and choose whatever page you want as the Start Page of your app just like you do in a web project. This page also holds reference to JQuery, MicrosoftAjax and the all important Office.js which will let you interact with your office document.
The GoogleSearch.js javascript page holds the guts of your app. Here you will define what will happen when user interacts with your app. It has a Office.initialize method which is called whenever your Office app in initialized. You can hook up event handlers here, or perform any kind of initialization logic (like restoring app's last execution state) etc.
Open up the GoogleSearch.html file and replace the contents of the <body> tag with the following -
 <input type="text" id="txtSearchBox" size="20" name="txtSearchBox" /><br />
 <button onclick="performSearch()">Search</button>
 <div id="searchInfo"></div>
 <div id="resultsContainer">
 <div id="results"></div>
 </div>
 <!--This will add more results when user clicks on the more link-->
 <div id="more"></div>
As is evident from the code, we have added a textbox, button and few divs to display the Search results.
Since we want to trigger a Search whenever the user selects some text, we need to have to find a way to hook up to the DocumentSelectionChanged event. To do this, open the GoogleSearch.js and replace the text within Office.initialize method with this -
 $(document).ready(function () {
 Office.context.document.addHandlerAsync(Office.EventType.DocumentSelectionChanged, SelectionChanged);
 });
What the above code is doing is that its telling the Word document to add a handler to the DocumentSelectionChanged event. We will handle this event in the SelectionChanged method.
Since we want to get only the text which user selects and not any image, hidden text etc., in our SelectionChanged method we will ask the Office document to return the selected data (getSelectedDataAsync) and coerce it to be text (Office.CoercionType.Text) , unformatted and give only visible text ({ valueFormat: Office.ValueFormat.Unformatted, filterType: Office.FilterType.OnlyVisible, })
 Office.context.document.getSelectedDataAsync(Office.CoercionType.Text, { valueFormat: Office.ValueFormat.Unformatted, filterType: Office.FilterType.OnlyVisible, },
 function (result) {
 if (result.status == "succeeded") {
 if (result.value != null && result.value != "") {
 $("#txtSearchBox").val(result.value);
 performSearch();
 }
 }
 });
Similarly when we would be inserting the Search result in the document, we will use setSelectedDataAsync and will coerce our data to be HTML (coercionType: "html").
I will skip over the part where you actually make service request and just show you the complete code. When completed, this is how your final GoogleSearch.js should look like -
 var dataSet = [];
 var justInserted = false;
 var lastSearchedQuery = "";

 // Add any initialization logic to this function.
 Office.initialize = function (reason) {

 // Checks for the DOM to load.
 $(document).ready(function () {
 Office.context.document.addHandlerAsync(Office.EventType.DocumentSelectionChanged, SelectionChanged);
 });
 }

 function performSearch(e) {
 var start;
 if (e == null && lastSearchedQuery == $("#txtSearchBox").val()) {
 return;
 }
 lastSearchedQuery = $("#txtSearchBox").val();
 var queryString = "key=AIzaSyDgUtgvT2lyi-t-nohMkVXhg1TbwPyqdQo&cx=010174932369086434385:oq_8nucxs7w&q=" + $("#txtSearchBox").val();
 if (e != null) {
 queryString += "&start=" + e;
 }
 $.ajax({
 url: 'https://www.googleapis.com/customsearch/v1',
 data: queryString,
 type: 'GET',
 success: function (data) {
 if (e == null) {
 document.getElementById('searchInfo').innerHTML = "Found <b>" + data.searchInformation.formattedTotalResults + "</b> results in <b>" +
 data.searchInformation.formattedSearchTime + "</b> seconds.</br>";
 document.getElementById('results').innerHTML = "";
 dataSet = [];
 }
 if (data.queries.nextPage != null) {
 start = data.queries.nextPage[0].startIndex;
 document.getElementById('more').innerHTML = "<a href='#' onclick='performSearch(" + start + ")'>more</a>";
 }
 else {
 document.getElementById('more').innerHTML = "";
 }
 for (var i = 0; i < data.items.length; i++) {
 var item = data.items[i];
 dataSet.push(item);
 document.getElementById('results').innerHTML += "<a href='" + item.link + "'>" + item.title
 + "</a><a href='#' onclick='insertResult(" + i + ")'><img src='../Images/add.png' alt='Insert in Word document' title='Insert in Word document' height='15' width='15'/></a>" + item.snippet
 + "</br></br>";
 }
 },
 error: function (data) {
 if (data != null) {
 document.getElementById('searchInfo').innerHTML = "";
 document.getElementById('results').innerHTML = data.status + " You have exceeded the daily limit for making search requests.";
 document.getElementById('more').innerHTML = "";
 }
 }
 });

 };

 function insertResult(searchResult) {
 if (searchResult != null) {
 justInserted = true;
 var item = dataSet[searchResult];
 Office.context.document.setSelectedDataAsync("<table><tr><a href='" + item.link + "' style='color:#1670ee;font-family:Calibri;font-weight:200;font-size:large;'>" + item.title
 + "</a></p>" + item.snippet + "</p></tr></table>", { coercionType: "html" }, function (asyncResult) {
 if (asyncResult.status === "failed") {
 writeToPage('Error: ' + asyncResult.error.message);
 }
 });
 }
 }

 function SelectionChanged(eventArgs) {
 if (justInserted === true) {
 justInserted = false;
 return;
 }
 Office.context.document.getSelectedDataAsync(Office.CoercionType.Text, { valueFormat: Office.ValueFormat.Unformatted, filterType: Office.FilterType.OnlyVisible, },
 function (result) {
 if (result.status == "succeeded") {
 if (result.value != null && result.value != "") {
 $("#txtSearchBox").val(result.value);
 performSearch();
 }
 }
 });
 };
The logic to query the Google Search API is within the performSearch method and it demonstrates how we can use JQuery with in an Office App to perform REST service requests.
Congratulations! You have just completed creating a real-world working Office App.
The complete solution is attached with this blog post. Download it and give it a go.