CollectionViewModel
In this post, I'm going to describe an implementation of ICollectionView for Silverlight that allows you to add sorting, filtering, grouping and selection tracking to any Selector based control (such as ListBox or ComboBox). To demonstrate the implementation, I’ve built a sample application that displays a catalog of items that the user can filter, sort, group and select. You can run the sample here, and you can download the source code, complete with unit tests, from here.
In my last post I outlined the key features of the ViewModel pattern and said that WPF's CollectionViews were actually good examples of the ViewModel pattern applied to collection-based models. In this post I explain in more detail why I think of CollectionViews as ViewModels. In fact, the techniques described in this post can be used to implement any kind of ViewModel and are not restricted to just CollectionView scenarios.
CollectionViews In WPF
Before we get stuck into the Silverlight implementation, let's take a quick look at WPF's CollectionView support. MSDN has a pretty good overview of CollectionViews in WPF here, and a related sample application here that allows the user to view and edit a collection of items for sale on an auction site. The interesting thing from our point of view is that it shows the basic capabilities of the CollectionViewSource class, the related classes that implement the ICollectionView interface, and shows how they all work together. If you look at the code, you’ll see that the application’s UI has a ListBox that’s bound to a CollectionViewSource, which in turn references a collection of AuctionItems.
<Window.Resources>
<CollectionViewSource x:Key="listingDataView"
Source="{Binding Source={x:Static Application.Current},Path=AuctionItems}" />
</Window.Resources>
<ListBox Name="Master"
ItemsSource="{Binding Source={StaticResource listingDataView}}">
</ListBox>
CollectionViewSource just acts as a kind of XAML friendly factory for dishing up objects that implement the ICollectionView interface. You can also bind a control directly to a collection and a default ICollectionView object will automatically be created.
There are two main implementations of the ICollectionView interface in WPF - BindingListCollectionView, and ListCollectionView for wrapping IBindingListView/IBindingList collections, or IList collections respectively. In the sample above, the underlying collection of AuctionItems is based on IList (it derives from ObservableCollection) so a ListCollectionView object is created automatically and bound through ItemsSource to the ListBox.
The ListBox control interacts with the CollectionView through the ICollectionView interface so that the UI and the underlying CollectionView are always kept in sync. This interaction is two-way. If the user selects an item in the UI, the CollectionView’s CurrentItem and CurrentPosition properties are updated automatically. If the CollectionView’s selected item is changed (say, due to application logic), the UI is updated to show the corresponding item in the UI as selected. If the user decides to filter, sort or group the items through the UI, the CollectionView is updated accordingly. If the CollectionView is filtered, sorted or grouped due to some application logic, then the UI is automatically updated. It’s this automatic two-way interaction between the control and the CollectionView that makes them so useful.
CollectionView == ViewModel
Whatever implementation of ICollectionView you use, these classes wrap the underlying collection and provide a ‘view’ on top of it that tracks the current selection, and sorts, groups or filters the underlying collection ready for display in a UI of some sort. They sit between the UI (the View) and the underlying collection of objects (the Model) and act as a go-between to manage presentation logic and state. In other words, they are ViewModels!
Let me elaborate on that a little – by presentation logic and state I am referring to logic and state that defines the behavior of the application, but which is not specific to the application’s business logic and data or to the visual representation of the application. In this case, the presentation logic manages the selection, filtering, sorting, grouping of items in a collection. This doesn’t affect the data in the application or ensure its integrity, and we don’t want to persist this information to a back-end database, so it’s clearly not business logic or state.
It also has nothing to do with the UI – yes, it drives the UI, but we can visually represent it in many different ways, so it’s not specific to the UI. Some developers mistakenly treat ‘Selected Item’ state as specific to the UI but that leads to critical application behavior that is very hard to unit test – for example, if you had an app that displayed a list of expense reports to approve or deny, wouldn’t you want to test that the application approves or denies the right expense report?!?
CollectionViews In Silverlight
Unfortunately Silverlight 2.0 doesn’t support CollectionViews out of the box. The ICollectionView interface is defined, but there are no public implementations of this interface that you can use out of the box. Also, none of the Silverlight 2.0 controls have any built-in support for ICollectionView so even if there was an implementation that we could use, the controls won’t automatically track or update the selected item in the CollectionView.
Note: The DataGrid control (specifically, the December release, NOT the one that ships with Silverlight 2.0) is an exception – if you bind the DataGrid to a collection, it will create an internal CollectionView that tracks and updates the selected item and provides support for sorting the collection by clicking on the column headers. Unfortunately, this implementation is not available for use with other controls.
So, to have CollectionView support in Silverlight we need two things – an implementation of the ICollectionView interface, and some way for the controls in our UI to interact with it (without code in the View’s code-behind file!). The implementation in this post tackles both of these issues. Let’s take a look at each in turn.
The CollectionViewModel Class
The CollectionViewModel class in the sample code implements the ICollectionView interface and the required logic to support selection, filtering, sorting and grouping for an underlying collection model. I chose the name ‘CollectionViewModel’ because 1) it’s a ViewModel for collections!!, and 2) so that it wouldn’t clash horribly with any existing classes in WPF or Silverlight.
Some notes on the implementation of this class:
- It’s a generic class and can be used to provide a ViewModel for any underlying collection of type IEnumerable<T>.
- It derives from ObservableCollection<T>, mainly so that I didn’t have to implement the INotifyCollectionChanged interface from the ground up, and to make it easy for the controls in the View to bind against it.
- You should be able to use this class in WPF, but I haven’t test it yet. If you try it, please let me know how it goes.
- This class is roughly the equivalent of the ListCollectionView class in WPF, but there are some minor differences in the class hierarchy and the interfaces that it implements.
- It uses Linq Expressions to implement the filtering, sorting and grouping functionality. I really didn’t want to implement this functionality myself from the ground up, plus I wanted to play with Linq Expressions so this seemed like a good opportunity. I am not sure that the implementation is efficient or in any way represents best practice for dynamic Linq Expressions though...
- The CollectionViewModel class implements a number of common commands (see below) that allow next/previous selection and sorting and grouping through the UI, without requiring View code-behind or commands in a parent ViewModel.
Let’s see how this class is used in the sample application.
The sample displays a shopping catalog and lets the user filter, sort, and group the items in the catalog. The app has a single CatalogView that’s bound to a CatalogViewModel. The CatalogView has a ListBox control that’s bound to the Catalog property of the CatalogViewModel. This property is of type ICollectionView and simply returns an instance of the CollectionViewModel class.
The CatalogView is defined like this:
<UserControl x:Class="Helix.Samples.CollectionViewModel.CatalogView" ...>
<UserControl.DataContext>
<h:CatalogViewModel />
</UserControl.DataContext>
...
<ListBox ItemsSource="{Binding Catalog}" ...>
</ListBox>
...
</UserControl>
The CatalogViewModel looks like this:
public class CatalogViewModel : INotifyPropertyChanged
{
private ObservableCollection<CatalogItem> _catalogModel;
private ICollectionView _catalogViewModel;
public CatalogViewModel()
{
_catalogModel = new ObservableCollection<CatalogItem>();
...
_catalogViewModel = new CollectionViewModel<CatalogItem>( _catalogModel );
}
public ICollectionView Catalog
{
get { return _catalogViewModel; }
}
...
}
A couple of things to note: The CatalogViewModel is created by the view and set as the View’s data context (this is a simple way to implement the View-First composition pattern). The CatalogViewModel’s constructor creates the model and fills it with dummy data. In a real application, the model would likely be populated via a web service and created through a data access service component.
Under The Covers
So how does the CollectionViewModel work? In a way, it’s a simple enough class because it really just implements the ICollectionView interface. The only complication is the internal implementation of the filtering, sorting and grouping.
The consumer of the ICollectionView interface can specify a filter, or one or more sorting or grouping criteria. Linq is clearly good at this kind of stuff, but since there can be one or more criteria at runtime we can’t just write a straightforward Linq query against the underlying collection. We have to build a dynamic query on the fly using Linq Expressions. So if we have multiple sort criteria, for example, the query equates to a ‘SortBy + n*(ThenBy)’ style query on the underlying collection. I’m not sure whether you’d ever want multiple levels of grouping, but the ICollectionView supports it so it’s possible I guess…
Interacting With The View
OK – we’re about half way there. If you run the code described above, you’ll get the catalog items to show up in the ListBox, and you can programmatically add filtering, sorting and grouping criteria, but as you select items in the ListBox the CurrentItem & CurrentPosition properties on the CollectionViewModel won’t be updated. In addition, if you want to provide UI that allows the user to choose how to filter, sort or group, you’ll likely have to add lots of nasty to test code to the code-behind file of the View. Blecch!
Selected Item Tracking
The next goal is to link the ListBox to the underlying CollectionViewModel that it is bound to, so that as the user selects items in the ListBox the current item in the CollectionViewModel is updated, and vice versa. We could do this hook-up in code behind but it would be much better if we could specify this behavior declaratively in the XAML. Remember, the goal is to reduce or eliminate any code behind in the View.
Attached Properties are a popular extensibility mechanism in Silverlight. They are used most often to associate a simple value to a control so that some other control can lay it out in some way – think of the Grid.Column attached property, which is used to assign a column value to a control so that its parent grid control can lay it out appropriately.
It turns out that attached properties are actually much more powerful than you might think. You can define an attached property that alters the behavior or appearance of the control to which it is attached. This kind of attached properties are often called attached behaviors, or just behaviors. The sample implements a behavior called ‘SynchronizeCollectionViewBehavior‘ that links the ListBox control to the CollectionViewModel so that the two are kept in sync with respect to the currently selected item.
You use the behavior like this.
<ListBox ItemsSource="{Binding Catalog}" ...
h:SelectionChanged.SynchronizeCollectionView="{Binding Catalog}"/>
If you run the code now, as you select items in the ListBox, the current item in the CollectionViewModel is updated. And if you programmatically select an item on the CollectionViewModel (say using the MoveCurrentToPosition method) the corresponding item in the ListBox is selected. And all with no code-behind!
Under The Covers
How does this work? The SelectionChanged class (in the Selector.SelectionChanged.cs file) defines an attached property SynchronizeCollectionView. This attached property allows the developer to specify the source ICollectionView object to be synchronized with the target control. This class and the attached property it defines together define the SelectionChanged.SynchronizeCollectionView attached property syntax shown above. This naming convention follows an ‘event.action’ pattern that we’ll also be using for commands below.
When this value is set via XAML, an instance of the SynchronizeCollectionViewBehavior class is created and ‘attached’ to the target control. When it is attached, this behavior subscribes to the target control’s SelectionChanged event (so it can update the CollectionViewModel as the user interacts with the UI) and subscribes to the CurrentChanged event on the source CollectionViewModel (so it can update the target control’s UI as the underlying CollectionViewModel is changed). The following diagram shows how this works.
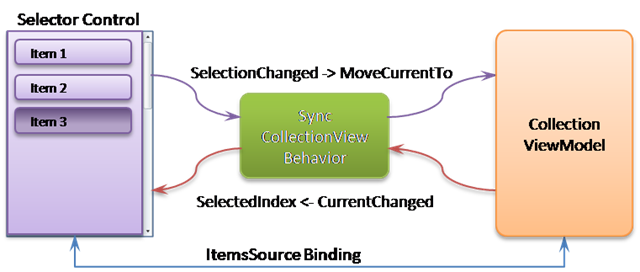
To improve re-use opportunities, the SynchronizeCollectionViewBehavior class derives from a SelectionChangedBehaviorBase class, which in turn derives from a Behavior base class. You can implement other SelectionChanged behaviors, or more general behaviors, using these two base classes.
Commands
So now that we have the ListBox and CollectionViewModel selected items synchronized, we can turn our attention to commands. In our sample application, the View provides UI that allows the user to show in-stock items only, or to sort by description or price, or to group by rating. The user can also select the next or previous items in the list by clicking buttons. The View defines the UI but we want the behavior to be defined in the ViewModel where we can test it. So the challenge is how to connect the UI in the View to the corresponding behavior defined in the ViewModel(s) without having any code-behind in the View?
Prism provides a solution to this problem using the exact same attached property/behavior pattern described above. We can use that to hookup controls to command handlers defined in the View’s ViewModel. Prism provides a Click.Command behavior which can be used to hook any ButtonBase control (essentially all controls that fire a Click event) to a command handler through data binding. For the buttons that allow the user to step forwards or backwards through the catalog, we can simply set the Click.Command attached behavior on them like this:
<Button Content="Next"
p:Click.Command="{Binding Path=Catalog.SelectNextCommand}"/>
Note that the Next and Previous commands are actually implemented on the CollectionViewModel for the Catalog. These are pretty useful generic commands to have on a CollectionViewModel and can be useful in any scenario where the user wants to step through the collection.
The CollectionViewModel class implements two other useful commands – SortBy and GroupBy. These commands take a string parameter and allow the View to perform simple sorting and grouping quickly and easily without requiring any code in the View’s ViewModel. The sample uses these two commands like this:
<Button Content="Sort By Description"
p:Click.Command="{Binding Path=Catalog.SortByCommand}"
p:Click.CommandParameter="Description" />
Prism provides an out-of-the box solution for binding buttons to commands on a ViewModel. You can extend this to support any control or event by defining a suitable attached property. To show you how to do this, the sample application uses a check box to allow the user to filter the view so that only items that are in stock are shown. The check box control is attached to the ViewModel’s FilterInStock command using a CheckedCommandBehavior class. Using this, we can hook-up the check box to the command like this:
<CheckBox Content="Show In Stock Only"
h:Checked.Command="{Binding FilterInStockCommand}"/>
Putting It All Together
The following diagram shows how the sample app is put together.
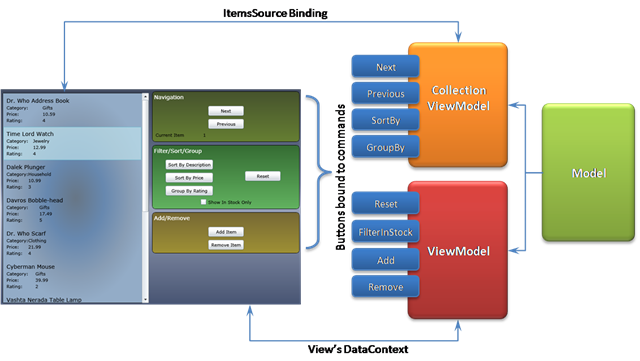
You can switch out the ListBox in the View for a ComboBox or a DataGrid (December Release) or any Selector based control and the rest of the application will just work. The XAML in the View is pretty simple and there are no complicated triggers or binding expressions to worry about. Similarly, if you look at the application's code, it’s also very simple – all of the complicated code is encapsulated in re-usable classes . This makes it very easy for a UI designer to create an experience on top of a ViewModel, which can be independently developed and tested by an application developer.
A Note On Helix
You'll notice that the more general purpose classes in the sample application are in the Helix folder. I’ll be moving these into the Helix library for its next release...