Silverlight Navigation - Part 2
Welcome to the second in my short series of articles on navigation in Silverlight!
In the first article I introduced the core Helix navigation framework and illustrated how the three main classes – Form, NavigationPage, and NavigationLink – could be used to support simple navigation scenarios in Silverlight. In this article I’ll be adding to the core framework to support more advanced scenarios. This article will take us a bit further along the road to Navigation Nirvana. You can download the latest Helix source code from here.
The Helix navigation framework uses Uri’s to link everything together within the application. Each navigable part of the application is associated with a specific Uri. The user switches between these navigable parts by navigating to the associated Uri. In the simple scenario described in part 1, each Uri simply refers to a page that’s defined in the main application assembly. By navigating to the page’s corresponding Uri, the page is created and shown in the Frame. Linking pages together in this way is very much like a traditional web application where each hyper-link refers to a distinct page by name.
However, the Helix framework is not restricted to just linking pages together by simple names and can support many more flexible and powerful navigation strategies.
The Navigation Cycle
If you look at the underlying architecture of Helix, you’ll see that it basically consists of a number of provider and handler classes chained together to make a pipeline for processing Uri’s. This pipeline essentially takes a Uri, stores it in a journal, turns it into content and then passes the content to the navigation target. The architecture separates out the key elements of this navigation process into three pluggable components. Each of these is responsible for a specific stage of the navigation process and they work together to implement the overall navigation cycle.
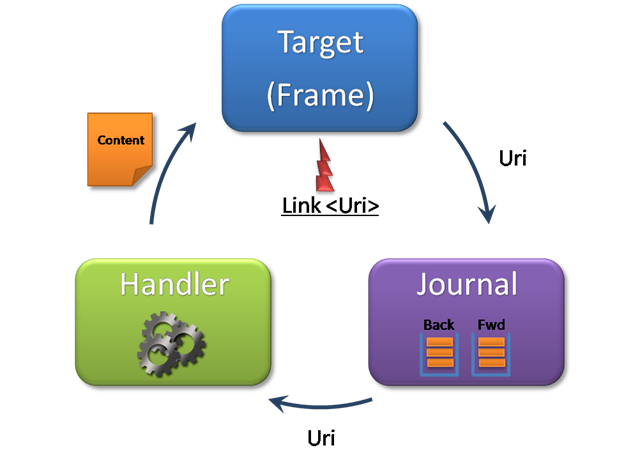
Let’s take a closer look at each of these:
Journal – The journal is responsible for keeping a record of the Uri’s that have been visited (or that are to be visited). The user can navigate forward or backwards through the Uri’s in the journal, or they can add a new Uri directly to the journal in order to navigate to it. Either way, once the Journal has a Uri to process, it passes it onto the navigation handler…
Handler – The navigation handler is responsible for turning a Uri into ‘content’. In part 1, the Uri referred to a page control in the application’s resources, and so the handler simply created an instance of that page control. There are more interesting and flexible ways of turning a Uri into content, as we’ll shortly see. Once the handler has the content ready, it is passed to the target…
Target – The target is the ultimate destination for the content. It is responsible for displaying the content in the UI. In part 1, the content was a page control and the navigation target was Frame (i.e. a ContentControl) which simply displayed the page control in the UI. To complete the picture, the Frame has a reference to the Journal so that it can initiate navigation as a result of the user’s interaction with some part of the UI that is contained in the Frame, say by clicking on a NavigationLink.
By plugging in different implementations of Journals, Handlers and Targets, you can implement many different navigation strategies. You can also configure the navigation strategy on a per Frame basis so you can use multiple strategies in different parts of your application, according to your needs.
A Custom Navigation Handler
To illustrate some of the flexibility of Helix, I’m going to implement a new navigation handler that supports a more powerful and flexible navigation scheme than that shown in part 1. To illustrate the various concepts and features I’m going to build a simple application for managing customers and theirs orders. In this application, the user can choose a customer from a list, review their current orders, and then edit an order. The application therefore has three pages – Customers, Orders and OrderEdit.
In part 1, the Uri’s linking pages together were very basic and just contained the target page’s name. While this basic mechanism is ok for linking simple pages together, it isn’t very flexible and doesn’t allow us to pass any parameters, context or state between pages. This means that the page itself has to figure out how to initialize itself or to retrieve any data for it to display.
In our customer orders application, the Orders page will need to know the ID of the customer whose orders are to meant be displayed. How can we tell the Orders page which customer we are interested in? Well, wouldn’t it be nice if we could pass the Customer ID parameter to the Orders page via the Uri so that it can use it to display the right set of orders?
Let's implement a custom navigation handler to do just that…
Imitation – The Sincerest Form of Flattery
If you’re familiar with ASP.NET you’ll have seen much excitement recently about the new ASP.NET Model-View-Controller (MVC) Framework. This framework provides a way for a web application to separate out its state or data into a ‘Model’ component, its UI into a ‘View’ component, and the logic that coordinates the user’s interaction with the application (by handling and responding to user input and actions) into a ‘Controller’ component. One of the main benefits of the ASP.NET MVC framework is that it helps maintain a clean separation of concerns between the web application’s data, business logic and user interface, which then allows the use of test driven development (TDD) for web application development. ScottGu has a great series of articles that describe the many powerful features of this framework.
One of the coolest parts of the ASP.NET MVC framework is the ‘routing’ mechanism which lets the developer define the format of the Uri’s in their application and which ensures that incoming page requests are routed, according to their Uri format, to an appropriate controller for processing. Essentially, routing allows the developer to define how the Uri’s are parameterized – how it’s various pieces are split out into individual values. The routing mechanism passes these parameters to the correct controller for processing. The controller typically uses the parameters to construct or initialize a View and a Model, and connects them together before the page is rendered to the user’s browser.
There are (at least) three things that I really like about this architecture:
First, it helps to maintain a strong separation between the user interface of the application, and the non-visual ‘guts’ of the application. This allows developers to focus on the application logic, while the designers can focus on the user experience. It also allows the developers to unit-test almost all of the non-visual parts of their application before it is even deployed and put in front of user.
Second, it’s an extremely powerful and flexible architecture that can very easily be tweaked to support a navigation strategy that suits my particular application. In my humble opinion, navigation is an often neglected but absolutely critical part of an application’s design. From a usability perspective, structuring the application so that the user can easily and intuitively access its various features, functions and data is hugely important. From a development perspective, being able to implement this structure in a simple, flexible and testable way is critical. There will be times when a one-size-fits-all navigation framework will simply not work well for certain types of applications (one could argue that the default Web Form model in ASP.NET fits into this category).
Third, it’s an architecture that fits extremely well in a RIA scenario. There are various scenarios where the 'application' is really a hybrid of a web host application and a Silverlight sub-application (or sub-applications). When this is the case, the user expects to be able to navigate seamlessly through the application and they don’t want to worry about whether they are in a traditional web page or in Silverlight page. The ASP.NET MVC framework helps to support this scenario.
So, to honor the great work that the ASP.NET guys have done with their MVC framework, I’m going to borrow some of their ideas!
Navigation Routes
To support the same kind of flexibility that ASP.NET MVC provides, I built a custom navigation handler (called RouteNavigationHandler) that allows the developer to define parameterized Uri’s for their application and to associate them with a controller component. There are three main classes to this implementation – the RouteNavigationHandler itself, a Route class that defines a Uri template that specifies how a Uri is to be parameterized, and a Controller class that processes the parameters extracted from the Uri. To use these classes, we simply create an instance of a RouteNavigationHandler, add one or more Route objects to associate a Uri format with a controller instance, and then hook it up to the Frame’s journal.
RouteNavigationHandler handler = new RouteNavigationHandler();
handler.Routes.Add( new Route( "[PageName]", new NavigationPageController() ) );
rootFrame.Journal.NavigationHandler = handler;
We’ll talk more about controllers in the next section. In this section, we’ll mainly focus on the Route object which is how the system parameterizes incoming Uri’s.
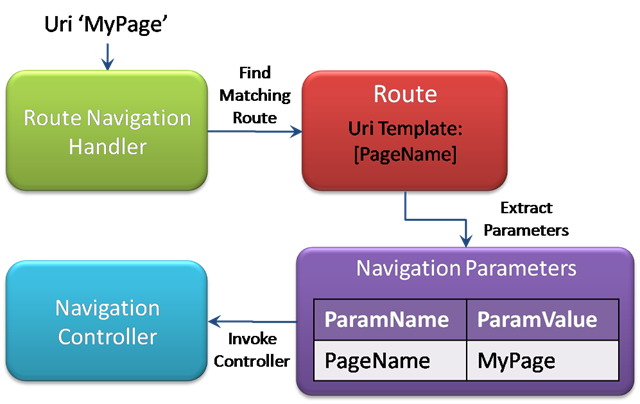
The above example shows a simple route that defines a Uri with a single parameter called PageName. Any Uri that contains a single value (say ‘Page1’ or ‘Page2’) will match this route. When processed, the content of the Uri will be extracted and will be stored in a parameter called ‘PageName’. The PageName parameter will then be added to a list of navigation parameters and passed to the NavigationPageController for processing. This controller looks for a parameter called PageName in the list of parameters and then loads the corresponding page, just as in the previous article.
This is just a basic example and doesn’t even scratch the surface of the flexibility of this approach, but it does illustrate how the basic system works. The following diagram shows how this example fits together.
In the above example, the PageName parameter is an example of a positional parameter - the value that this parameter will be assigned depends on the position of the value in the Uri. In this example the Uri contains only a single parameter so there is no relative positioning of parameters, but you could define two parameters separated by a forward slash like this:
new Route( "[Parameter1]/[Parameter2]", myController )
and then the first value before the slash will be assigned to Parameter1, and the second value after the slash will be assigned to Parameter2.
When defining routes, you can also define fixed fields, as well as positional parameter fields. You can also define multiple routes. In this case, the RouteNavigationHandler will look for the first matching route and then pass control to the associated controller. This lets you direct processing to a specific controller according to the exact format of the Uri.
For example, say we had a media style application and wanted to have two controllers, one to show the user’s Photo collection, and one to show the user’s Video collection. We could define two routes like this:
RouteNavigationHandler handler = new RouteNavigationHandler();
handler.Routes.Add( new Route( "/Photos/[Tag]", new PhotoController() ) );
handler.Routes.Add( new Route( "/Videos/[Tag]", new VideoController() ) );
rootFrame.Journal.NavigationHandler = handler;
The Uri ‘/Photos/Vacation2008’ would be directed to the PhotoController, which would then likely locate and display all photographs with the ‘Vacation2008’ tag, while the Uri ‘/Videos/Wedding’ would be directed to the VideoController so that it can locate and display all videos with the tag ‘Wedding’. In both cases, each controller will receive a parameter called Tag which will contain the tag value specified on the actual Uri.
We can also capture query string parameters on the Uri by appending ‘?[params]’ to the Route’s Uri template like this:
RouteNavigationHandler handler = new RouteNavigationHandler();
handler.Routes.Add( new Route( "[PageName]?[params]", new NavigationPageController() ) );
rootFrame.Journal.NavigationHandler = handler;
When this route processes Uri’s, any query string parameters on the Uri are added as name-value pairs to the navigation parameters. So for the example above, a Uri like this
MyPage?ID=17&OrderBy=Date
will cause three parameters to be passed to the controller – PageName, ID, and OrderBy (with values of ‘MyPage’, 17, ‘Date’ respectively). This is a quick way to allow arbitrary parameters to be extracted from the incoming Uri and passed on to the controller.
The Uri route defined above (‘[PageName]?[params]’) actually defines the default navigation routing strategy in Helix. It is, in fact, almost equivalent to the strategy used in the first article but with one important addition – we can now add parameters to the page’s Uri and have them passed to the target page! That job is actually handled by the navigation controller...
Navigation Controllers
Ok, so the Route object uses a template to define how parameters are to be extracted from a Uri. When an incoming Uri is matched by a Route, it extracts the actual values from the Uri and constructs named parameters, according to its Uri template, which it then adds to a collection. This collection of navigation parameters is simply a dictionary of string name-value pairs. The navigation parameters are then passed to the navigation controller specified by the route. This object does all of the heavy lifting to actually process the parameters and turn them into content ready for displaying in the Frame.
A navigation controller is simply an object that implements the INavigationContoller interface. This interface defines a single method:
public interface INavigationController
{
object Execute( NavigationParameters parameters, NavigationMode mode );
}
The Execute method takes the navigation parameters and does whatever it needs to do to process those parameters and return the content to be passed to the navigation target.
The default PageNavigationController expects a PageName parameter. It uses this to create an instance of the specified page so it can be displayed in the target Frame. Any additional parameters added to the Uri as a query string will also be passed to the controller. It passes these on to the target page via a new method on the INavigationPage interface:
public interface INavigationPage
{
string PageTitle { get; }
bool KeepAlive { get; }
bool CanNavigateAway { get; }
void OnNavigate( NavigationParameters parameters, NavigationMode mode );
}
If the target page implements the INavigationPage interface, the OnNavigate method will be called and all of the parameters from the navigation Uri will be passed to it. The page can then extract the parameters that it needs, say to retrieve data or configure itself. If the target page doesn’t implement this interface, then it is just displayed in the Frame as usual. The default implementation of this interface (the NavigationPage class) defines OnNavigate as a virtual method, so you just have to override this method if you want to handle navigation parameters on your page.
Note that this mechanism has some drawbacks (that I’ll discuss at length in the next article). In particular, having the page process the navigation parameters means that you’ll likely have way too much presentation logic in the page, which is not good because it can’t be easily unit tested. On the other hand, if you aren’t particularly interested in unit testing, or in using strong separated UI patterns, this approach has the advantage of being relatively simple and light-weight.
Navigation Link Parameters
So now we can process a Uri by extracting parameter values from it and we can pass those parameters to a target page. But how do the parameters get included in the Uri in the first place?
The NavigationLink control allows you to specify the navigation Uri so we could just specify the link explicitly and include any parameters (positional or query-string). So for example, we could have:
<NavigationLink Content="Next" NavigateUri=" MyPage?ID=17&OrderBy=Date"/>
if we’re using query string parameters (note the use of & to specify an ampersand in XAML) , or something like
<NavigationLink Content="Next" NavigateUri=" MyPage/17/Date"/>
if we’re using positional parameters. This works fine as long as we know the parameter values up-front. But what about the times when, say, the link parameters depend on the currently bound item? This is the case when you use a link in a data template, say for items displayed in a list box.
It would be rather nice if we could define something like
<NavigationLink Content="Next" NavigateUri=" MyPage/{Binding ID}/Date"/>
but we can’t embed binding expressions in the NavigateUri string like this unfortunately.
In any case, since the link parameters basically define the user’s navigation through the application, they represent, in some sense, presentation logic. Embedding presentation logic in the view is bad because it means that the application navigation can’t be unit tested, and it means that the view designer has to know about the navigation scheme employed by the application.
There are a few alternative approaches that we could use to solve this problem, but by far the simplest (and I would argue, the most elegant) is to use a ViewModel to encapsulate the application’s presentation logic, including it’s navigational or workflow structure. This means that we can just do this:
<NavigationLink Content="Next" NavigateUri=" {Binding NextLink}"/>
You’ll see this in action in the sample application below, but it means that the view is largely decoupled from the navigational structure of the application, and that we can unit test the application (including the navigational structure!) without going through the UI. It also makes the view designer’s life much easier. I’ll be talking much more about how ViewModels and the Helix navigation framework can work together in the next article in the series.
Putting It All Together
With the RouteNavigationHandler, Route and NavigationController classes added to the mix, the Helix navigation pipeline now looks like this:
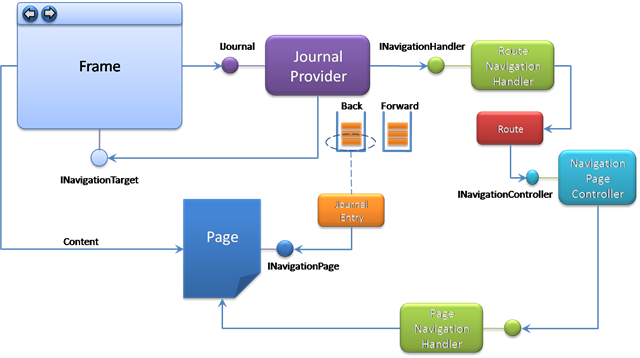
Since the default route and controller as described above are already setup by Helix, the only thing you really have to do receive additional navigation parameters in a target page is to implement the INavigationPage interface and extract the parameters in the OnNavigate method. If your page derives from the NavigationPage base class, you just need to override the virtual OnNavigate method.
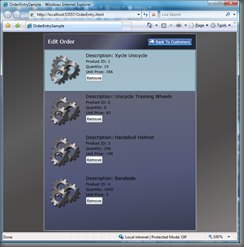
The OrderEntry Sample Application
To see the complete system in action, let’s build our simple order entry application. In this application, we’ll define three pages – Customers, Orders, and OrderEdit. The Customers page shows a list of customers. From there the user can select a customer and navigate to the Orders page, which will display the orders for that customer. From there, the user can elect to edit an order by navigating to the OrderEdit page.
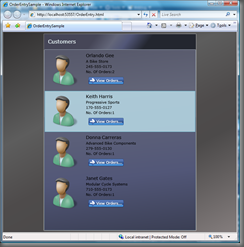
You can run the completed sample application here. Let’s take a look at how this application is put together.
First we’ll define the view model(s) for the application. In this sample, I defined a set of simple classes for Customer, SalesOrder and LineItem. In a real-world app, you’d likely define these entities based on a real database and populate the data model by retrieving data via a Data Service call. But to simplify things, I just created some dummy view model data as an application level resource:
<Application.Resources>
<l:Customers x:Key="AppViewModel">
<l:Customer CustomerID="1" FirstName="Orlando" LastName="Gee"
CompanyName="A Bike Store" Phone="245-555-0173">
<l:SalesOrder SalesOrderID="1" OrderDate="10/15/2008"
ShipDate="10/21/2008" Status="Pending">
<l:LineItem LineItemID="1" ProductID="1" OrderQty="10" UnitPrice="356.99" />
…
</l:SalesOrder>
<l:SalesOrder SalesOrderID="2" OrderDate="10/25/2008"
ShipDate="10/31/2008" Status="Pending">
<l:LineItem LineItemID="5" ProductID="1" OrderQty="10" UnitPrice="356.99" />
…
</l:SalesOrder>
</l:Customer>
…
</l:Customers>
</Application.Resources>
With the application’s ViewModel defined, we can turn our attention to the page navigational structure. For this application, I created two additional routes that define positional parameters that can be passed to the various pages.
RouteNavigationHandler handler = new RouteNavigationHandler();
NavigationPageController controller = new NavigationPageController();
handler.Routes.Add( new Route( "/[PageName]/[CustomerID]", controller ) );
handler.Routes.Add( new Route( "/[PageName]/[CustomerID]/[SalesOrderID]", controller ) );
rootFrame.Journal.NavigationHandler = handler;
Remember, the default route already allows any Uri that just contains a page name to be handled just like in the previous article. These two additional routes define routes for Uri’s that contain CustomerID and SalesOrderID positional parameters. All routes are handled by the same controller, so all of the parameters will be passed on to the target page via the OnNavigate method.
Next, let’s look at the pages themselves. The Customers page is simple. It displays the list of customers using a ListBox and lets the user navigate to the Orders page by clicking on a NavigationLink control. To display the customers, it defines a DataTemplate that defines how to render a Customer object in the UI. This data template includes a NavigationLink to the Orders page, parameterized on the customer ID. By clicking on this link, the user navigates to the Orders page and the corresponding customer ID is passed along with the parameters.
<ListBox.ItemTemplate>
<DataTemplate>
<Grid>
…
<StackPanel Grid.Column="1" Orientation="Vertical" Margin="4">
<StackPanel Orientation="Horizontal">
<TextBlock FontSize="14" Text="{Binding FirstName}" />
<TextBlock FontSize="14" Text="{Binding LastName}" Margin="4,0,0,0"/>
</StackPanel>
<TextBlock Text="{Binding CompanyName}" />
<TextBlock Text="{Binding Phone}" />
<StackPanel Orientation="Horizontal">
<TextBlock>No. Of Orders:</TextBlock>
<TextBlock Text="{Binding SalesOrders.Count}" />
</StackPanel>
<h:NavigationLink Content="View Orders..." NavigateUri="{Binding ViewOrders}"/>
</StackPanel>
</Grid>
</DataTemplate>
</ListBox.ItemTemplate>
The data template just uses a grid to show the various properties of the customer. Notice the ‘View Orders’ link binds to the ViewOrder property of the customer view model. The actual link that is constructed by the customer ViewModel is as defined by the routes above.
Things get a bit more interesting in the Orders page. The UI of this page is very similar to the Customer page in that it uses a ListBox and a simple DataTemplate to define how individual SalesOrder objects are rendered. What’s really different is that this page uses the parameters passed to it during navigation to determine which SalesOrders are to be displayed.
public override void OnNavigate( NavigationParameters parameters, NavigationMode mode )
{
if ( parameters.ContainsKey( "CustomerID" ) )
{
Customers customers = Application.Current.Resources[ "AppDataModel" ] as Customers;
SalesOrders orders =
customers.First( c => c.CustomerID == parameters[ "CustomerID" ] ).SalesOrders;
this.DataContext = orders;
}
}
The page first checks to make sure that the incoming navigation parameters include a CustomerID. It then gets a reference to the application data and uses a simple Linq query to extract the sales orders for the specified customer. Finally, it sets the data context of the page so that the data binding expressions in the data template can take over.
Please note that, as I mentioned above, this approach is not really ideal since this kind of logic shouldn’t really be in the view’s code behind page. Also, a real application would likely get a reference to the correct data context through a data service agent rather than via a resource. I’ll be addressing these issues in the next article, but in the meantime this simple approach will suffice - this article is long enough as it is :-)
The data template for the Orders list box includes a link that’s bound to the SalesOrder ViewModel’s EditOrder property.
<NavigationLink Content="Edit Order..." NavigateUri="{Binding EditOrder}"/>
The OrderEdit page expects a CustomerID and a SalesOrderID to be passed to it during navigation, so it’s OnNavigate method looks like this:
public override void OnNavigate( NavigationParameters parameters, NavigationMode mode )
{
if ( parameters.ContainsKey( "CustomerID" ) && parameters.ContainsKey( "SalesOrderID" ) )
{
Customers customers = Application.Current.Resources[ "AppViewModel" ] as Customers;
SalesOrders orders =
customers.First( c => c.CustomerID == parameters[ "CustomerID" ] ).SalesOrders;
CurrentOrder = orders.First( o => o.SalesOrderID == parameters[ "SalesOrderID" ] ); ;
DataContext = CurrentOrder;
}
}
And that's it. The OrderEntry application is a simple application but I think it illustrates some of the flexibility of the Helix navigation framework. The source code for it is included with the latest Helix source code here. In addition to the additions described above, you might also notice some minor name changes and I also tidied up some of the error state handling in the Frame control.
oO------Oo
In the next article, I’ll be extending the Helix navigation to embrace separated presentation patterns like Model-View-ViewModel. This will simplify application construction significantly, add a great deal of flexibility and provide support for test driven development.
Helix is a work in progress and is still in the experimental stage, but I’d love to know what you think of it – what you like, what you don’t like, what’s missing, what should be removed. So if you have any feedback on Helix please drop me a line.