Configuring Kerberos Delegation with .NET Remoting 2.0 [Rick Rainey]
Version 2.0 of the .NET Framework supports the use of ‘secure channels’. These are powerful new features but they can be extremely challenging to setup.
For example, I recently was tasked with trying to get an application to use Kerberos delegation in a double hop scenario and found that while my application was actually working, it was not using Kerberos end-to-end. It started off using Kerberos and on the 2nd hop defaulted to NTLM authentication. This discussion illustrates how to make this work using Kerberos on both hops between 2 machines.
Rather than explain what Kerberos authentication and delegation is I will instead refer you to these links:
Exploring Kerberos, the Protocol for Distributed Security in Windows 2000
www.microsoft.com/msj/0899/kerberos/kerberos.aspx
Kerberos Authentication in Windows Server 2003
www.microsoft.com/windowsserver2003/technologies/security/kerberos/default.mspx
If you’re wondering about secure channels and delegation, the best source is from our patterns and practices group (see below). While this document is dated, it has been revised for v2.0. Where I hope to add value in this post is with regard to the Kerberos delegation configuration.
Building Secure ASP.NET Applications: Authentication, Authorization, and Secure Communication
msdn.microsoft.com/library/default.asp?url=/library/en-us/dnnetsec/html/SecNetch11.asp
Solution
Attached is a sample .NET 2.0 Remoting solution that demonstrates how to use Kerberos delegation between two servers. The solution consists of 3 projects:
- RemObj.dll – This is the remote object hosted on the server. It is a C# class library.
namespace RemObj
{
public class RemoteObject : MarshalByRefObject
{
public void Process()
{
IPrincipal cp = Thread.CurrentPrincipal;
IIdentity cid = cp.Identity;
Console.WriteLine("\nName = " + cid.Name);
Console.WriteLine("IsAuthenticated = " + cid.IsAuthenticated);
Console.WriteLine("AuthenticationType = " + cid.AuthenticationType);
}
public override object InitializeLifetimeService()
{
return null;
}
}
}
- RelObj.dll – This is the remote object hosted on the relay server that makes the call into RemObj. It is a C# class library.
namespace RelObj
{
public class RelayObject : MarshalByRefObject
{
public void Process()
{
IPrincipal cp = Thread.CurrentPrincipal;
IIdentity cid = cp.Identity;
Console.WriteLine("\nName = " + cid.Name);
Console.WriteLine("IsAuthenticated = " + cid.IsAuthenticated);
Console.WriteLine("AuthenticationType = " + cid.AuthenticationType);
RemObj.RemoteObject ro = new RemObj.RemoteObject();
ro.Process();
}
public override object InitializeLifetimeService()
{
return null;
}
}
}
- Program.Exe – This is an all in one application that can run as the server, relay server, or client. It is a C# console application.
namespace Program
{
class Program
{
// Display registered authentication modules.
private static void displayRegisteredModules()
{
// The AuthenticationManager calls all authentication modules sequentially
// until one of them responds with an authorization instance. Show
// the current registered modules.
IEnumerator registeredModules = AuthenticationManager.RegisteredModules;
Console.WriteLine("\r\nThe following authentication modules are now registered with the system:");
while (registeredModules.MoveNext())
{
Console.WriteLine("\r \n Module : {0}", registeredModules.Current);
IAuthenticationModule currentAuthenticationModule = (IAuthenticationModule)registeredModules.Current;
Console.WriteLine("\t CanPreAuthenticate : {0}", currentAuthenticationModule.CanPreAuthenticate);
}
}
static void Main(string[] args)
{
displayRegisteredModules();
Thread.GetDomain().SetPrincipalPolicy(PrincipalPolicy.WindowsPrincipal);
RemotingConfiguration.Configure(string.Format("{0}.config", args[0]), true);
IPrincipal cp = Thread.CurrentPrincipal;
IIdentity cid = cp.Identity;
Console.WriteLine("\nName = " + cid.Name);
Console.WriteLine("IsAuthenticated = " + cid.IsAuthenticated);
Console.WriteLine("AuthenticationType = " + cid.AuthenticationType);
if (args[0].Equals("client"))
{
RelObj.RelayObject ro = new RelObj.RelayObject();
Console.WriteLine("About to call RelayObject.Process()");
Console.WriteLine("Press Any Key...");
Console.ReadKey();
ro.Process();
cp = Thread.CurrentPrincipal;
cid = cp.Identity;
Console.WriteLine("\nName = " + cid.Name);
Console.WriteLine("IsAuthenticated = " + cid.IsAuthenticated);
Console.WriteLine("AuthenticationType = " + cid.AuthenticationType);
}
else if ((args[0].Equals("relay")) || (args[0].Equals("server")))
{
Console.WriteLine("Press ENTER to exit: ");
Console.ReadLine();
}
else
Console.WriteLine("Error: Invalid switch");
}
}
}
To install the solution, just copy the assemblies and config files (client.config, relay.config, server.config) to each machine.
Note: your config file settings (such as IP addresses, user names, and SPNs ) will need to be changed to match your environment.
To run the solution, open two command prompts on the client / server machine. In one command window type ‘program server’. This will launch the application as a server and load the server.config file settings. In the other command window, type ‘program client’. This will launch the application as a client and load the client.config file settings. On the Relay Server, open a command prompt and type ‘program relay’. This will launch the application as the relay server and load the relay.config file settings. Finally, go back to the command prompt on the client / server machine where you have the client application running and press ENTER. This will cause the client to call the RelObj.Process method on the Relay Server which in turn will call the RemObj.Process method back on the client / server machine. The Process method in both objects displays the authenticated user and how the user was authenticated.
The physical hardware setup looks like this:
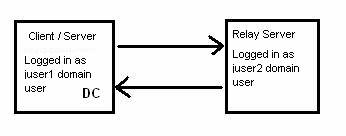
The Domain Controller (DC) is the same machine that client application and server application will run on. In my test lab environment, this machine was a Windows Server 2003 SP1 machine.
The Relay Server is just a member server in the domain. In my test lab environment, this machine was a Windows XP SP2 machine.
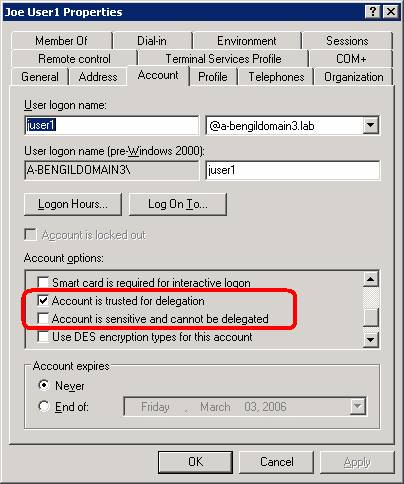
I created two domain users in the Active Directory: juser1 and juser2. Both these users need to be trusted for delegation and make sure that the “Account is sensitive and cannot be delegated” is not checked. For example,
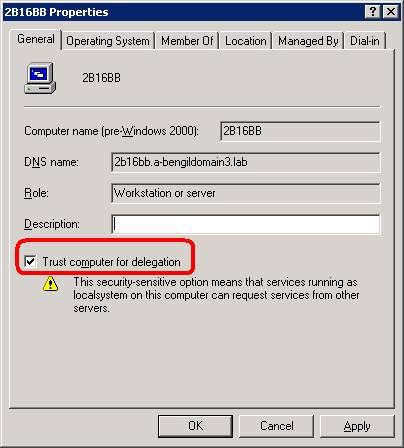
Also, each computer needs to be trusted for delegation. For example,
NOTE: In the following steps replace your domain name with the lab-assigned domain that I have here, which is A-BENGILDOMAIN3.
The key to making this work correctly is the servicePrincipalName (SPN) setting in the config file. In an unmanaged environment, we typically use setspn.exe to get the SPN. This typically looks something like ‘HOST/2B17C.A-BENGILDOMAIN3.LAB’. While using this SPN works in a native DCOM solution, it does not work in a managed .NET Remoting solution. Therefore, it is imperative that you use the following format for the servicePrincipalName in this case:
‘JUSER2@A-BENGILDOMAIN3’ // Again, this will be different depending on your environment; user(s) and domain name
For example, the application config file for program.exe would look like this:
<configuration>
<system.runtime.remoting>
<application>
<client>
<wellknown type="RelObj.RelayObject,RelObj" url="tcp://"
<ipaddress of="" relay="" server="">
:8123/relobj" />
</client>
<channels>
<channel ref="tcp" port="8123" secure="true" tokenImpersonationLevel="Delegation" servicePrincipalName="juser2@a-bengildomain3"/>
</channels>
</application>
<customErrors mode="Off"/>
</system.runtime.remoting>
</configuration>
Notice how the domain part of the name differs from the DNS name as shown above. For example, instead of
‘A-BENGILDOMAIN3.LAB’
it is
‘A-BENGILDOMAIN3’
Other settings in the config files such as ‘secure’ and ‘tokenImpersonationLevel’ are necessary but pretty much self explanatory. The SPN setting is then one that needs special attention because it is not what you would expect if you had done this before in a native DCOM environment.
The application config file for RelObj.dll would look like this:
<configuration>
<system.runtime.remoting>
<application>
<channels>
<channel name="server" ref="tcp" port="8123" secure="true" tokenImpersonationLevel="Delegation" servicePrincipalName="juser1@A-BENGILDOMAIN3" authenticationMode="IdentifyCallers"/>
</channels>
<service>
<wellknown mode="Singleton" type="RelObj.RelayObject,RelObj" objectUri="relobj" />
</service>
<client>
<wellknown type="RemObj.RemoteObject,RemObj" url="tcp://"
<ipaddress of="" client=""/server>:8124/remobj" />
</client>
</application>
<customErrors mode="Off"/>
</system.runtime.remoting>
</configuration>
Application config file for RemObj.dll would look like this:
<configuration>
<system.runtime.remoting>
<application>
<channels>
<channel ref="tcp" port="8124" secure="true"/>
</channels>
<service>
<wellknown mode="Singleton" type="RemObj.RemoteObject,RemObj" objectUri="remobj" />
</service>
</application>
<customErrors mode="Off"/>
</system.runtime.remoting>
</configuration>
The application output will tell you whether or not this is working end-to-end. If you see that the Client, Server, and Relay instances output Kerberos then you have configured it successfully. For example, the output should look something like this on all three:
Name = <some user name>
IsAuthenticated = True
AuthenticationType = Kerberos