Accessing an OData Producer using an Office 2010 Add-in
To continue the theme of landing external data in Office 2010, I’ve taken a demo excerpt from a session I presented at a conference last week to show how easy it is to land OData information in an add-in. In this sample I simply use the Northwind Database which is a publicly available OData producer. You can read more about OData on the OData.org site. By simply clicking the Northwind link you can see a collection of the database tables you can access. This sample uses Customers, https://services.odata.org/Northwind/Northwind.svc/Customers, to retrieve an Atom document with all the customers in the database. You’ll then load the customers into the add-in using the same document-level add-in pattern as used in the previous post.
Sample Office Add-in OData Project
- Create a new Visual Studio 2010 and select New Project…
- Add Rich Content Controls to the document
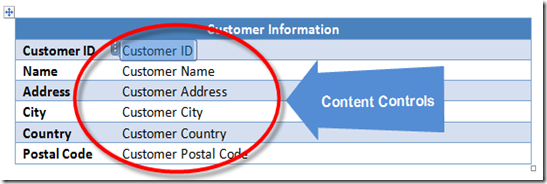
- Create a two column table on the ODataSample.docx document similar to the one below (formatting is optional). The left column is simply text so just type that information in.
- Place RichTextContentControls from the toolbox into the second column of the table

- In the Property Window, provide property values for the Name and Text for each content control. The Names to use are listed here. For the Text property use the appropriate value as shown above in each content control.
- wccCustomerID
- wccContactName
- wccAddress
- wccCity
- wccCountry
- wccPostalCode
- Add References
- In the Solution Explorer, right-click ODataSample and choose Add References…
- In the .NET tab, select System.XAML, UIAutomationProvider and WindowsFormsIntegration and click OK.
- Add a User Control to the project.
- In the Solution Explorer, right-click ODataSample and choose Add, New Item…
- Select User Control, name it CustomerUserControl and click Add.
- In the Properties Window set the Size to 150,750.
- (Note: this user control will host the WPF control.)
- Add a WPF User Control to the project.
- In the Solution Explorer, right-click ODataSample and choose Add, New Item…
- Select WPF from Installed Templates, and select User Control (WPF)
- Name it CustomerPicker.xaml and click Add.
- In the XAML window, completely replace the <Grid></Grid> elements with the following XML
<StackPanel> <Button Name="button1" Content="Insert Customer Information" Margin="5" Click="button1_Click" /> <ListBox Name="customerListBox" ItemsSource="{Binding}"> <ListBox.ItemTemplate> <DataTemplate> <StackPanel> <StackPanel Orientation="Horizontal"> <TextBlock Text="{Binding CustomerID}" FontWeight="Bold" /> <TextBlock Text=": " FontWeight="Bold" /> <TextBlock Text="{Binding ContactName}" /> </StackPanel> <TextBlock Text="{Binding ContactTitle}" Margin="5 0 0 0" /> </StackPanel> </DataTemplate> </ListBox.ItemTemplate> </ListBox> </StackPanel>
- Add a Data Source for Northwind.svc
- From the menu choose, Data, Add New Data Source…
- Select Service and click Next.
- Type, https://services.odata.org/Northwind/Northwind.svc, and click Go.
- Don’t change the name, click OK, and Finish.
- Add the Code behind for CustomerPicker.xaml.cs
- In the Solution Explorer, right-click CustomerPicker.xaml and choose View Code.
- Add the following using statements just after the ODataSample namespace
using ServiceReference1; using System.Net;
- Instantiate the Northwind entities object as a class-level variable
// Instanitate Northwind Entities object NorthwindEntities dc = new NorthwindEntities( new Uri(https://services.odata.org/Northwind/Northwind.svc));
- Add the OnInitialized override method
protected override void OnInitialized(EventArgs e) { // Bind Customers to the Listbox datacontext customerListBox.DataContext = dc.Customers; base.OnInitialized(e); }
- Add the button1_Click event
private void button1_Click(object sender, RoutedEventArgs e) { // Cast the selected item to a customer object Customer customer = (Customer)customerListBox.SelectedItem;
// Load document content controls with selected customer data Globals.ThisDocument.wccCustomerID.Text = customer.CustomerID; Globals.ThisDocument.wccContactName.Text = customer.ContactName; Globals.ThisDocument.wccAddress.Text = customer.Address; Globals.ThisDocument.wccCity.Text = customer.City; Globals.ThisDocument.wccCountry.Text = customer.Country; Globals.ThisDocument.wccPostalCode.Text = customer.PostalCode; }
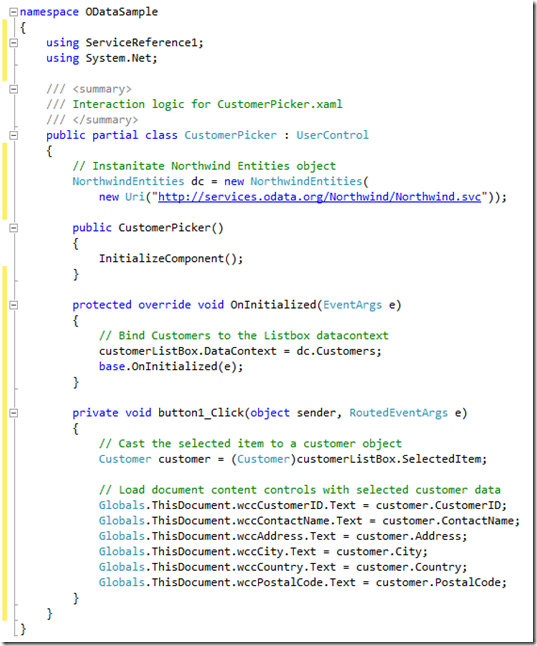
- When done, your code should look like this:

- Add the Code behind for ThisDocument.cs
- In the Solution Explorer, right-click on ThisDocument.cs and choose View Code.
- Add the following using statement
using System.Windows.Forms.Integration; - Add the following class-level variable
private CustomerUserControl CustomerActionPane = new CustomerUserControl();
- Add the following code to ThisDocument_Startup method
ElementHost host = new ElementHost(); host.Dock = DockStyle.Fill; host.Child = new CustomerPicker(); CustomerActionPane.Controls.Add(host); this.ActionsPane.Controls.Add(CustomerActionPane);
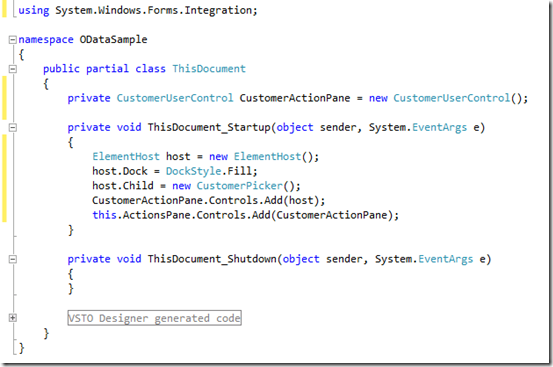
- When done, your code should look like this

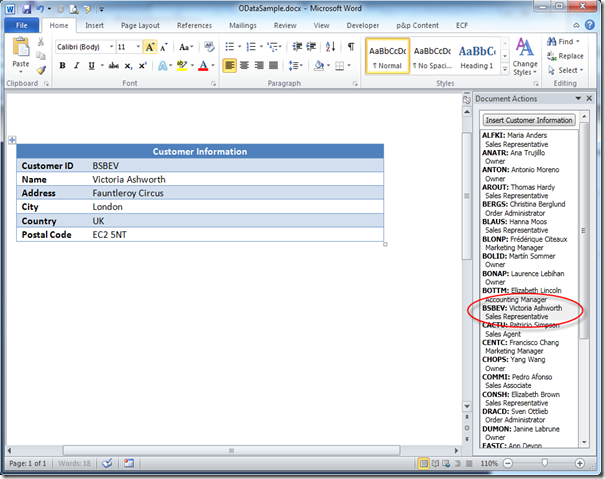
- That’s it, press F5 and see your add-in load with customers from an OData source. Your final result should look something like this once you click on a customer in the listbox and then click the Insert Customer Information button.

So there you have it, another way to land data in the Office clients (think about pulling data into Excel this way). Accessing data like this is extremely powerful because you can essentially land data that is exposed as an OData end-point by simply using WCF Data Services.
Enjoy!
