Creating Virtual Machines for Microsoft Code Name “Geneva” - Part 2
I trust you’ve had fun exercising the Geneva Framework Samples. Now let’s take the steps to build out a Geneva Server. Again, as mentioned in my previous post, if your intent is to build out the full working end-to-end scenario then follow the explicit guidance in the Geneva Step-by-Step Guide in the Downloads section of the Microsoft Code Name “Geneva” Connect site. The VM we build out here will be limited (we’re using localhost) to exploring Geneva Server on a single VM. This VM will not be easily extended into other scenarios (e.g. federation) without additional certificates, certificate exchanges and DNS/networking configuration which are beyond the scope of my purpose here. But if you want to experiment with a single VM, then please proceed. Otherwise, I suggest you invest your time in building out the step-by-step’s more robust environment.
Disclaimer: This blog is not the source for official guidance regarding Microsoft Code Name “Geneva”. Please always refer to the Geneva Team Blog for official information from the product group and post any Geneva questions on the Geneva Forum.
Step 1: Create a New VM from a Copy of the Backup [Copy time]
- Using the backed up files from step 9.3 of the previous post, copy the Geneva-Base.vhd and .vmc into a new folder.
- Rename each of these to Geneva-Server so you have both a GenevaServer.vhd and Geneva-Server.vmc file.

Step 2: Configure the VPC Settings [3-5 minutes]
- Open the Virtual PC Console.
- Click New… to open the wizard, click Next.
- Select “Add and existing virtual machine” and click Next.
- Browse… to the folder with your newly renamed Geneva-Server files, select the Geneva-Server.vmc file, click Open and click Next.
- Click Finish.
- The Setting file should open automatically, if not, click the Settings button.
- Click on Hard Disk 1 and notice that it is still associated with Geneva-Base.
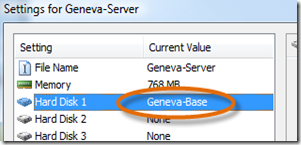
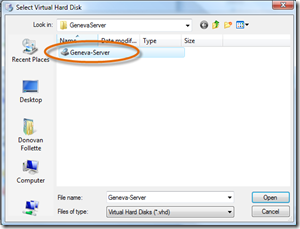
- Click Browse… , then in the Select Virtual Hard Disk, choose the Geneva-Server file and click Open.
- Click OK to close Settings.
Step 3: Rename the Machine to genevasts [3-5 minutes]
- Open the Virtual PC Console and Start the Geneva-Server.
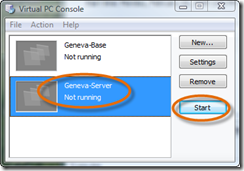
- Logon, click Start, right-click Computer and select Properties. We’ll rename the machine to genevasts.
- Choose Change Settings.

- On the Computer Name tab, click Change… , then type genevasts and click OK.
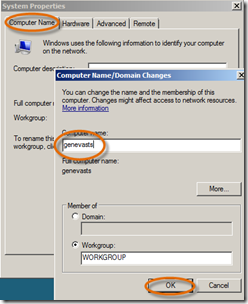
- Click Ok, OK, Close and Restart Now.
Step 4: Download Geneva Server Beta and SQL Server 2008 Express with Tools [Time depends on connection speed]
- Before we turn the VM into an Active Directory Domain Controller (DC) with a static IP, we need to download the Geneva Server Beta install file.
- Logon to the rebooted VM.
- Open IE and navigate to the Connect site https://connect.microsoft.com/site/sitehome.aspx?SiteID=642.
- In the “Geneva Server” section click the link to the “x86 setup package.”
- “SAVE” this, don’t Run it yet, to a location on the C drive.
- Download (SAVE) Microsoft SQL Server 2008 Express with Tools (x86 version) from, https://www.microsoft.com/downloads/details.aspx?FamilyId=7522A683-4CB2-454E-B908-E805E9BD4E28&displaylang=en to a location on the C drive.
Step 5: Set a Static IP [3-5 minutes]
- Because this DC will have DNS installed on it as well, we’ll use a static IP. You can use what you like, but if you don’t have a preference then you can use 192.168.20.2.
- Right-click the network icon in the system tray, select Network Sharing Center.
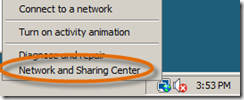
- Select the View Status link beside the Local Area Connection.
- On the General tab, click Properties.
- On the Networking tab, click on Internet Protocol Version 4 (TCP/IPv4) and click Properties.
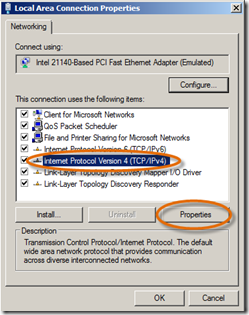
- Select Use the following IP address and enter 192.168.20.2 or an IP of your choosing. The subnet mask will default as shown.
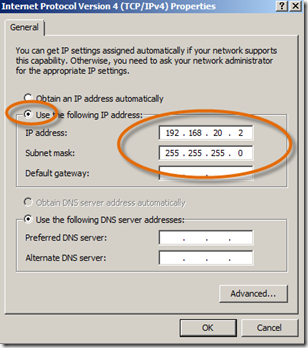
- Click OK, Close, Close and close the Networking and Sharing Center.
Step 6: Build the VM into an Active Directory Domain Controller [15-20 minutes]
- Click Start, Administrative Tools and Server Manager.
- Right-click the Roles node and select Add Roles.
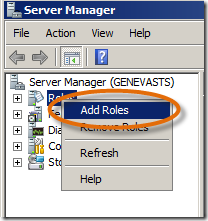
- Click Next on the first panel of the wizard and click the Checkbox for Active Directory Domain Services.
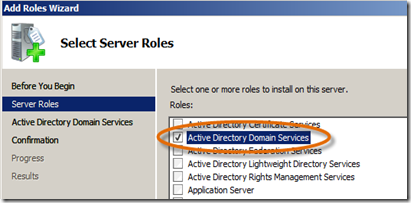
- Click Next, Next and Install.
- Once the install has completed you’ll see that the instructions say that you need to now run the dcpromo.exe wizard which will actually “promote” the server to a DC. Click Close on the wizard and close the Server Manager.
- In Start Search type dcpromo and press Enter.
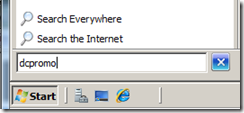
- When the wizard opens, click Next.
- On the Operating System Compatibility panel, click Next.
- On the Choose a Deployment Configuration panel, select Create a new domain in a new forest. Click Next.
- On the Name the Forest Root Domain panel, type in a name of your choice, I chose contoso.local. Click Next.
- On the Set Forest Functional Level panel, select Windows Server 2008 since this will be the only DC in the forest. Click Next.
- On the Additional Domain Controller Options panel, click Next. When prompted with the Static IP assignment message, choose Yes. (This has to do with IP v6 and not what we set.)
- When prompted about delegation and DNS asking if you want to continue, click Yes.
- On the Location for Database, etc. panel, click Next.
- On the Directory Services Restore Mode Administrator Password panel, type a password you can remember – generally for a test server like this you can use the Administrator password. (The point is that you shouldn’t need to use this in this test environment anyway.) Click Next.
- At the Summary panel, click Next.
- Click Finish and Restart now.
- Now’s a good time to shutdown and backup your new DC.
Step 7: Install Windows PowerShell, SQL Server Express 2008 and Geneva Server Beta 1 [50-75 minutes]
- Open the Virtual PC Console and Start the Geneva-Server.

You will notice that it takes a little bit longer to come up now that it’s a DC since it has a number of new services that it must fire-up at startup. - Click on the VM window, press Right-Alt+Delete and login.
- First, we need to install Windows PowerShell which is needed for the SQL Server Express install. Click Start, Administrative Tools, Server Manager.
- Right-click on the Features node and select Add Feature.
- Select Windows PowerShell and click Next.
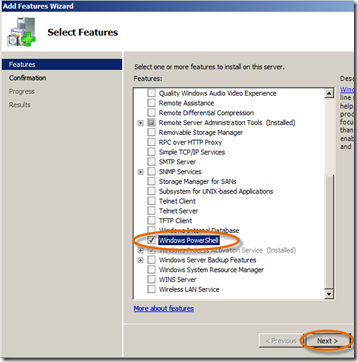
- Click Install and when done, click Close.
- Now, we’ll install SQL Server Express 2008. Open Windows Explorer, navigate to the location where you saved the SQL Server Express install download, SQLEXPRWT_x86_ENU, and double-click it.

- On the SQL Server Installation Center, click the Installation link and then the New SQL Server stand-alone installation or add features to an existing installation link.

- On the Setup Support Roles panel, click OK.
- On the Product Key panel, click Next.
- On the License Terms panel, accept the terms and click Next.
- On the Setup Support Files panel, click Install.
- On the Setup Support Rules panel, click Next.
- On the Feature Selection panel, select all but Replication and click Next.
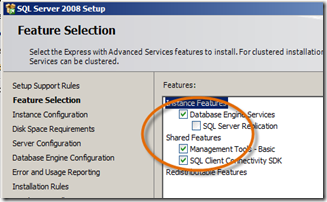
- On the Instance Configuration panel, click Next.
- On the Disk Space Requirements panel, click Next.
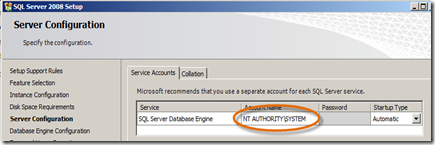
- On the Server Configuration panel, select NT AUTHORITY\SYSTEM click Next.
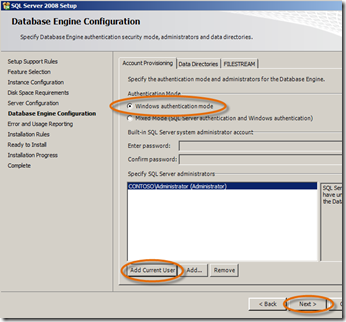
- On the Database Engine Configuration panel, click Windows Authentication mode, click the Add Current User button, click Next.
- On the Error and Usage Reporting panel, click Next.
- On the Installation Rules panel, click Next.
- On the Ready to Install panel, click Install.
- Once the install completes (this can take some time), Click Next.
- On the Complete panel, click Close.
- Close the SQL Server Installation Center.
- Lastly, we’ll install Geneva Server Beta. Open Windows Explorer, navigate to the location where you saved the Geneva Server install download, Geneva.IdentityServer.x86, and double-click it.

- The install wizard will start. Follow through the wizard and simply take all the defaults. Click Finish and the Geneva MMC will open automatically.
- Ok, this gets you a DC with Geneva Server installed. Now for the instructions to configure the server and learn more about it, I’ll refer you to the product group provided documents on the Connect Download site. Download the Geneva Server How-To Guides.
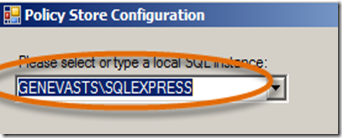
- Use the InitialConfig document to finalize your configuration. For the Policy Store Configuration selection you will drop-down the selection list and choose, GENEVASTS\SQLEXPRESS.
- Then read the Getting Started document and go on to the other documents as desired.
- Now’s a good time to shutdown and backup your new Geneva Server.
Please post any questions relating to the Geneva Framework or Geneva Server on the Geneva Forum. If you have questions about this VM setup, please feel free to post them here.
In my next post we’ll wire up the code samples for the Simple Claims-Aware Web Applications to the Geneva Server.
Enjoy your Geneva Server!