From DSLs and Models to “Quadrant” using “Oslo” May CTP – Part III
This is the 3rd and final part of our look at the “Oslo” May CTP. In Part I, we created a simple domain model for a fictional company’s employee information. In Part II, we used the M language support to created a domain specific language (DSL) model that took a simple text input and generated model values for our previously created EmployeeInfo domain model. At the end of Part II we had compiled artifacts for our Employee Model and our Employee values (from the DSL input text). In Part III we will load our Employee model and values into the Oslo Repository and inspect them using the Quadrant model viewer.
First we need to the model and model data into the Repository. To do this we execute the mx command. The actual command will look like this:
mx install Employee.mx -d:Repository
This basically tells the mx command to install the Employee.mx values and our Employee model (which if you remember when we compiled this in Part II, we had to pass in a reference to our compiled model EmployeeModel.mx) into the Repository database. Now that our model is in the Repository lets take a look at it using “Quadrant”.
Oslo “Quadrant” is a visual tool for interacting with models and model data is included as part of the “Oslo” May CTP. Quadrant itself is a great example of a model driven application. We will make use of this fact a little later to customize the view of our model. Let’s use Quadrant to take a look at our Employee model. Launch Quadrant by clicking on the icon in the “Microsoft Codename Oslo Quadrant” folder in the Start Menu.
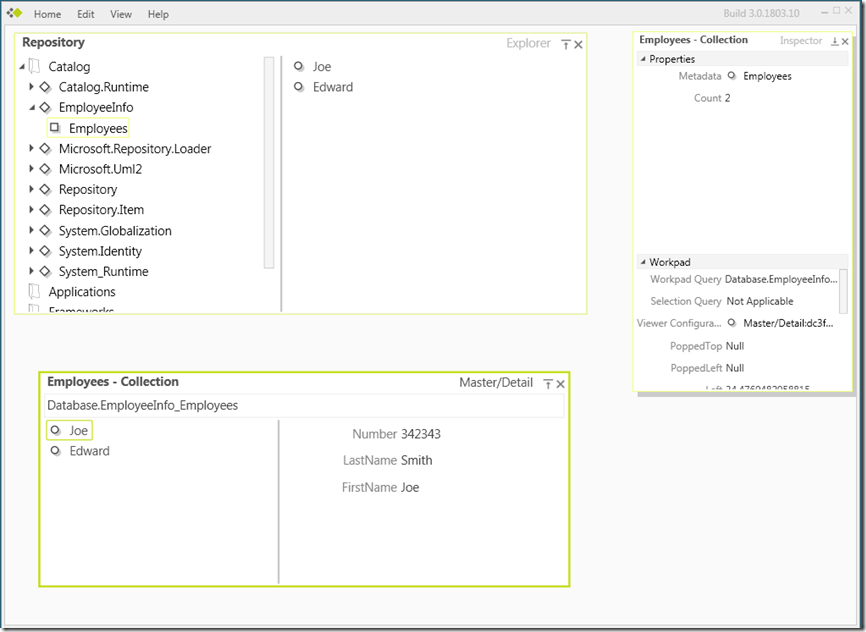
When Quadrant loads up, the Repository is displayed in a Tree Master/Detail view. Expand Catalog and you will see our EmployeeInfo domain holding our Employees model. Click on the Employees model. Notice it displays a list of the first names of the employees that we specified in our DSL input text which is now in the Repository. Remember this as we will come back to it shortly.
Now drag the Employees model onto the workspace. Notice Quadrant displays our model values in a Table view. Let’s change this to a Master/Detail view to make it easier to see. In the upper right of our Employees view, click on where it says Table. A list of different viewers will be shown in the dropdown. Select Master/Detail. A picture of the view setting is shown below (I placed a red oval around the Master/Detail setting you should select):
You will see Quadrant now shows the list of first names on the left and when you click on a name, it shows the detail on the right (in a property view). Notice, the Table view was tagged in the dropdown as the Default view. Let’s make the Master/Detail view the Default view. From the main menu select View|Set Default View. Master/Detail will now be the default view for our model. If we close the Employees model and re-drag it from the Catalog, it should come up in our new default view.
When Quadrant displays our Employees model data, it shows the FirstName field. Quadrant looks at a model and grabs the first field it finds that contains “name” as the default field to display. Remember previously I said Quadrant was a great example of a model driven application. Well, we can change this behavior for our Employees model by updating one of Quadrant’s models, telling Quadrant what field we want it to display by default. This is done by adding instance data for the ViewerHintCatalogTypes in Quadrant’s own model Repository.
We can use M to insert this data. Let’s have Quadrant display an Employee’s Number instead of FirstName as the default display value. Below is what the M value looks like for our ViewerHintCatalogTypes. We tell Quadrant that our host is the localhost – “ . ”, our the Catalog where our Employees model is stored is called “Repository”, the schema name for our model is call “EmployeeInfo”, the type we want to modify the display for is “Employees” and that when it displays the Employees model, it should show the “Number” field. Put the below M in a file called EmployeeConfiguration.m:
module Quadrant.SchemaExtensions
{
import Quadrant.SchemaExtensions;ViewerHintCatalogTypes
{
{
Host => ".",
CatalogName => "Repository",
SchemaName => "EmployeeInfo",
TypeOrAssociationName => "Employees",
ViewerHint =>
{
DescriptionProperty => "Number",
GroupingProperty => "",
SpatialProperty => ""
}
}
}
}
Because we are inserting values into one of Quadrant’s models, we included an import of Quadrant’s SchemaExtensions model. Now we need to compile our EmployeeConfiguration M. We will need to pass the M compiler a reference to Quadrants models on the command line. Quadrant’s models are compiled into a file called Quadrant.mx which can be found in the Oslo install directory. The command to compile our EmployeeConfiguration is shown below:
m EmployeeConfiguration.m /r:"C:\Program Files\Microsoft Oslo\1.0\bin\QuadrantModels.mx"
The next step is to install our configuration values for our model into Quadrant’s repository. To do this we first need to find out what Quadrants repository is named. You can do this by loading up SQL Server Manager and looking at the databases or executing the command below from a command line:
sqlcmd -s ./SQLSERVER -Q "select name from sys.databases"
On my machine, Quadrant’s repository is contained in a database called Quadrant.3.0.1803.10.DKAUFMAN-OSLO which is a combination of the name Quadrant, the Oslo version and the name of my computer. Yours should be similar with a different computer name at the end. We will use the mx command to install the configuration file, telling it to use the Quadrant repository and passing a reference to Quadrant’s compiled models. The command looks like this:
mx install EmployeeConfiguration.mx -d:Quadrant.3.0.1803.10.DKAUFMAN-OSLO.Administrator /r:"C:\Program Files\Microsoft Oslo\1.0\bin\QuadrantModels.mx"
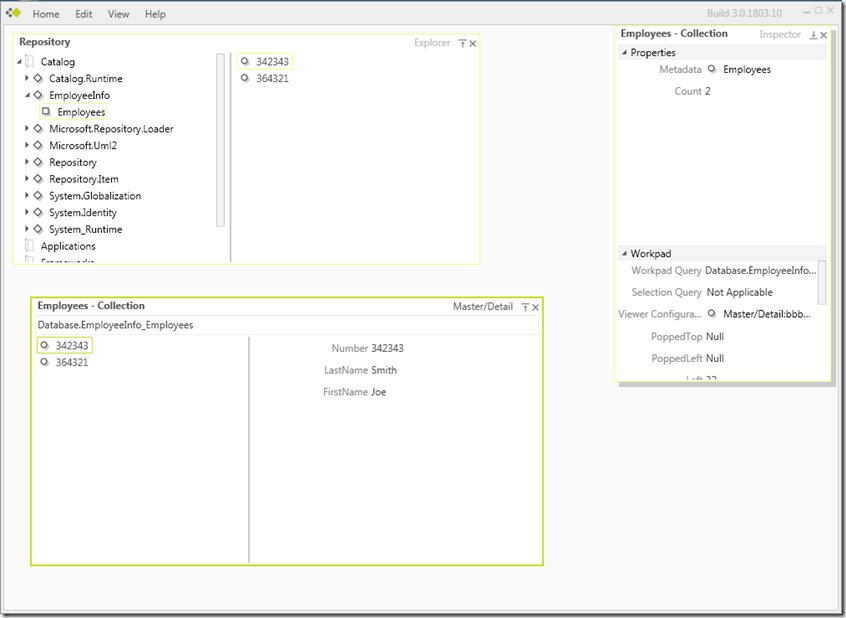
Our customization is now installed. Close Quadrant and re-start it. Notice now in the Repository Tree view when you click on our Employees model, a list of Employee Number is displayed on the right instead of FirstName. Also, in our default model view for our Employees model, Employee Number is now shown on the left hand side in the Master/Detail and clicking on the number shows the employee info on the right. Below is a screenshot of Quadrant showing the visual customization for our Employees model:
That’s it for our tour of the “Oslo” May CTP. Through these posts, we saw how easy it was to build a model, create a DSL for getting data into our model, install our model into the Oslo Repository, display our model visually using Quadrant and customizing the view of our model. You can download the Oslo artifacts for this example here. I included batch files to build, clean and install the example. Also, included is a batch file to re-build the default Oslo repository (you might have to edit directories or the name of the Quadrant repository in the batch files to match your install).
Now it’s your turn. Install the latest Oslo CTP and take it for a spin. And please let me know about the applications you build as you experiment with this exciting new technology.


