Configure Forms Based Authentication(FBA) using ASPNetMembershipProvider for Claims based web applications in SharePoint 2010
This article willl help you to configure FBA using ASPNetMembership provider on a claims based web application. Here are the steps that are needed to configure SQL for MemberShip store:
- Create SQL database
- Create SQL User in the SQL database
To Create SQL Database for the SQLMembershipProvider
1. Install and then open the Visual Studio 2008
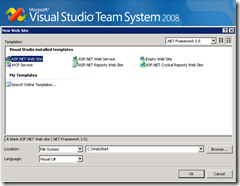
2. Select new website, select template as ASP.NET web site and select language as C#
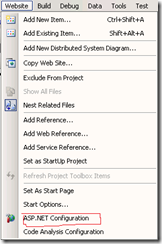
3. Once you have the website created, click on Website menu and select the ASP.NET configuration..
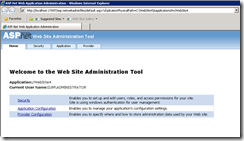
4. Once you click on it, it will take you to : \&applicationUrl=/websitename">https://localhost:53663/asp.netwebadminfiles/default.aspx?applicationPhysicalPath=C:\<website_location>\&applicationUrl=/websitename
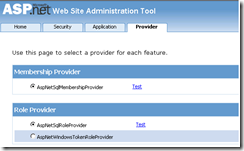
5. Click on Providers and Click the Select a different provider for each feature (advanced)
6. Test both the Membership Provider & Role Provider and ensure that it is successful.
7. Now click on the Security tab and Select authentication type under Users
8. Select the option “From the internet" and click on Done.
9. Click on Create User and enter all the field required and click on “Create User”.
10. Once you have created the user, right on the website that we created in the VS 2008 and click on the refresh folder, you will now see the following database : ASPNETDB.MDF
11. Close the web site from VS 2008 and browse to the location where you created the web site like C:\<website_location>\App_Data
12. Copy the MDF and LDF files and rename if required and then paste it in the directory where you have the SQL server databases.
13. Attach the database to the SQL database server using SQL Management Studio with whatever name you wish you have.
OR
You can create the ASP.NET membership database using this method:
1. On the SQL server, open Windows Explorer.
2. Navigate to the path %System Drive%\Windows\Microsoft.NET\Framework\v2.0.50727.
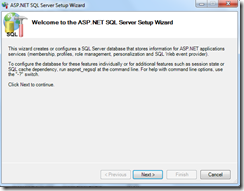
3. To start the ASP.NET SQL Server Setup Wizard, double-click aspnet_regsql.exe.
4. Start the wizard by clicking Next, and then complete the wizard :
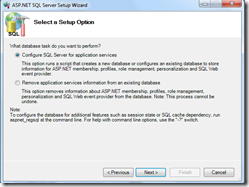
5. Click Configure SQL Server for application services, and then click Next.
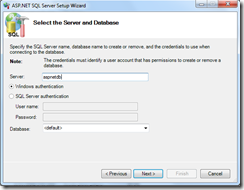
6. In the Server box, type aspnetdb for the database name, and then click Next
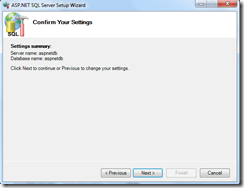
7. Confirm that the data you typed is correct, and then click Next
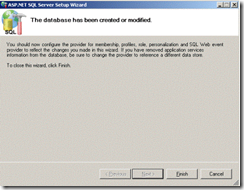
8. The database is created and the final status information is displayed. Click Finish to complete the wizard
To perform the tasks such as creating users and groups and managing passwords, you can use the tool named MembershipSeeder. The tool and source code are available on CodePlex from the MemberShipSeeder page. You can use the MembershipSeeder tool as is for simple user and role management, or you can use the source code as a base on which to create your own tool; however, Microsoft does not provide support for this tool.
Before you create users from the MembershipSeeder tool
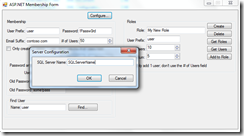
Start the MembershipSeeder tool. Click Configure.
In the dialog box that opens, type the name of the computer running SQL Server that hosts your SQL membership database.
Save your changes, and then restart MembershipSeeder so that it will use the new server name.
To create users for testing purposes
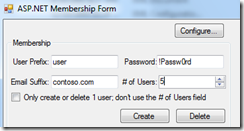
In the User Prefix field, type a value.
In the Password field, type the password you want each user to have.
In the # of Users field, select the number of users to create.
Click Create to create users where the user name is the value of the User Prefix field with an incrementing number added to the end.
You can also refer the following : https://msdn.microsoft.com/en-us/library/bb975136(office.12).aspx
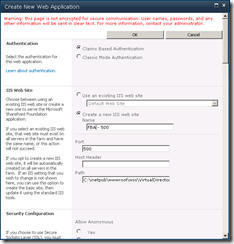
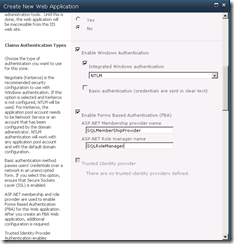
Now that we have created the users, lets create the web application by selecting the authentication as Claims Based Authentication:
Select the Claims Authentication Type as shown below, you can either use “NTLM” or “Negotiate(Kerberos or NTLM)” for Windows Authentication.I have selected NTLM in this example
Once the web application is created, we will need to edit 3 web.config files for enabling claims:
1.The web.config file of the Central Administration site.
2.The web.config file of the Web Application.
3.The web.config file of the STS (SecurityTokenService) Application. This is important because it is this service that will ensure claims tokens are being passed correctly between the SQL provider and the Central Admin and the Web Application.
Central Administration web.config changes:
Place the below snippet between </SharePoint> & <system.web> in the web.config
<!-- Connection String for FBA Start -->
<connectionStrings>
<add name="SQLConnectionString" connectionString="data source=<SQLServerName>;Integrated Security=SSPI;Initial Catalog=<SQL_DB_NAME>" />
</connectionStrings>
<!-- Connection String for FBA End –>
Place this between <machineKey validationKey… /> & </system.web>
<!-- Role Manager & Membership Provider for FBA-->
<roleManager defaultProvider="AspNetWindowsTokenRoleProvider" enabled="true" cacheRolesInCookie="false">
<providers>
<add connectionStringName="SQLConnectionString" applicationName="/" description="Stores and retrieves roles from SQL Server" name="SQLRoleManager" type="System.Web.Security.SqlRoleProvider, System.Web, Version=2.0.3600.0, Culture=neutral, PublicKeyToken=b03f5f7f11d50a3a" />
</providers>
</roleManager>
<membership defaultProvider="SQLMembershipProvider">
<providers>
<add connectionStringName="SQLConnectionString" passwordAttemptWindow="5" enablePasswordRetrieval="false" enablePasswordReset="false" requiresQuestionAndAnswer="true" applicationName="/" requiresUniqueEmail="true" passwordFormat="Hashed" description="Stores and Retrieves membership data from SQL Server" name="SQLMembershipProvider" type="System.Web.Security.SqlMembershipProvider, System.Web, Version=2.0.3600.0, Culture=neutral, PublicKeyToken=b03f5f7f11d50a3a" />
</providers>
</membership>
<!-- Role Manager & Membership Provider for FBA -->
In the Web Application web.config changes:
Place this between </SharePoint> & <system.web> in the web.config
<connectionStrings>
<add name="SQLConnectionString" connectionString="data source=<SQLServerName>;Integrated Security=SSPI;Initial Catalog=<SQL_DB_NAME>" />
</connectionStrings>
Place this between <machineKey validationKey…. /> & </system.web>
<!-- Add membership Provider and Role Manager: -->
<roleManager defaultProvider="c" enabled="true" cacheRolesInCookie="false">
<providers>
<add name="c" type="Microsoft.SharePoint.Administration.Claims.SPClaimsAuthRoleProvider, Microsoft.SharePoint, Version=14.0.0.0, Culture=neutral, PublicKeyToken=71e9bce111e9429c" />
<add connectionStringName="SQLConnectionString" applicationName="/" description="Stores and retrieves roles from SQL Server" name="SQLRoleManager" type="System.Web.Security.SqlRoleProvider, System.Web, Version=2.0.3600.0, Culture=neutral, PublicKeyToken=b03f5f7f11d50a3a" />
</providers>
</roleManager>
<membership defaultProvider="i">
<providers>
<add name="i" type="Microsoft.SharePoint.Administration.Claims.SPClaimsAuthMembershipProvider, Microsoft.SharePoint, Version=14.0.0.0, Culture=neutral, PublicKeyToken=71e9bce111e9429c" />
<add connectionStringName="SQLConnectionString" passwordAttemptWindow="5" enablePasswordRetrieval="false" enablePasswordReset="false" requiresQuestionAndAnswer="true" applicationName="/" requiresUniqueEmail="true" passwordFormat="Hashed" description="Stores and Retrieves membership data from SQL Server" name="SQLMembershipProvider" type="System.Web.Security.SqlMembershipProvider, System.Web, Version=2.0.3600.0, Culture=neutral, PublicKeyToken=b03f5f7f11d50a3a" />
</providers>
</membership>
<!-- Add membership Provider and Role Manager ends -->
In the following location : C:\Program Files\Common Files\Microsoft Shared\Web Server Extensions\14\WebServices\SecurityToken
Place the below code between : </system.net> & </configuration>
<!-- FBA configuration -->
<connectionStrings>
<add name="SQLConnectionString" connectionString="data source=<SQLServerName>;Integrated Security=SSPI;Initial Catalog=<SQL_DB_NAME>" />
</connectionStrings>
<system.web>
<roleManager defaultProvider="c" enabled="true" cacheRolesInCookie="false">
<providers>
<add name="c" type="Microsoft.SharePoint.Administration.Claims.SPClaimsAuthRoleProvider, Microsoft.SharePoint, Version=14.0.0.0, Culture=neutral, PublicKeyToken=71e9bce111e9429c" />
<add connectionStringName="SQLConnectionString" applicationName="/" description="Stores and retrieves roles from SQL Server" name="SQLRoleManager" type="System.Web.Security.SqlRoleProvider, System.Web, Version=2.0.3600.0, Culture=neutral, PublicKeyToken=b03f5f7f11d50a3a" />
</providers>
</roleManager>
<membership defaultProvider="i">
<providers>
<add name="i" type="Microsoft.SharePoint.Administration.Claims.SPClaimsAuthMembershipProvider, Microsoft.SharePoint, Version=14.0.0.0, Culture=neutral, PublicKeyToken=71e9bce111e9429c" />
<add connectionStringName="SQLConnectionString" passwordAttemptWindow="5" enablePasswordRetrieval="false" enablePasswordReset="false" requiresQuestionAndAnswer="true" applicationName="/" requiresUniqueEmail="true" passwordFormat="Hashed" description="Stores and Retrieves membership data from SQL Server" name="SQLMembershipProvider" type="System.Web.Security.SqlMembershipProvider, System.Web, Version=2.0.3600.0, Culture=neutral, PublicKeyToken=b03f5f7f11d50a3a" />
</providers>
</membership>
</system.web>
<!-- FBA CONFIG ENDS -->
NOTE: ensure that you have taken the backup of the web.config file before making changes.
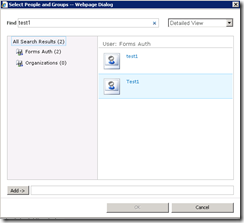
Now go ahead and add a user by going to User Policy ribbon option in the Web Applications Management page having selected the web application. Hit Add Users in the Policy for Web Application dialog. Use the Browse button in the Choose Users people picker control. You will now see sections like Active Directory, All Users, Forms Auth & Organizations. When you search for users, it would now tell you if its AD or Forms Auth as seen below.
Add the user to the site and browse to the site. You should be able to successfully login to the site.
Hope this helps!!!
