Arduino M0 Pro Debugging using the built-in EDBG Interface with Atmel Studio 7
Introduction
 The Adafruit Proper Debugging of ATSAMD21 Processors has a ton of detail on getting started with Atmel Studio 7 and the Arduino Zero with EDBG debug chip, so I suggest you read this article first.
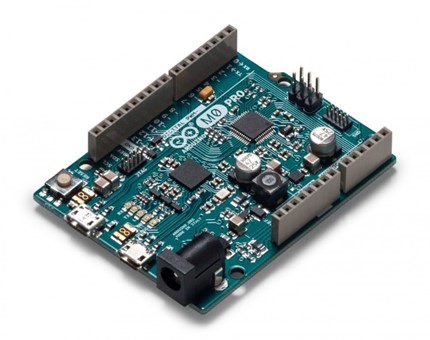
This article is and addendum to the Adafruit article with tips and tricks that go that focus on the issues I and lot of others hit when getting started debugging ATSAMD21G18A based Arduino boards. The Adafruit Proper Debugging of ATSAMD21 Processors article is based on the Arduino Zero, I'm using the Arduino M0 Pro which is pretty much the same board bar some minor differences.
If you are anything like me then you have gotten very frustrated debugging Arduino projects using Serial.println or changing LED state.
There are some software tools that help such as Visual Micro plug in for Visual Studio but I was keen to try more advanced debugging of my LoraWAN Azure IoT Hub project with the Embedded Debugger (EDBG) AT32UC3A4256 chip found in a number of the ARM based Arduino boards. The Atmel EDBG has the ability to program and debug Atmel AVR® and Atmel ARM® Cortex®-M core based microcontrollers.
I was intrigued to see that we are working on EDBG support with the Arduino extension for Visual Studio Code, it's a great extension but I found debugging has some limitations so I wanted to debug using Atmel Studio.
Creating your first Arduino Project
So with great excitement I followed the notes in the "Let's go!" page and created my project and tried to build the solution. Hmmm, problem number 1 the Arduino Core project will not build, "recipe for target 'src/core/delay.o' failed". Huh, and I thought this was just going to workJ
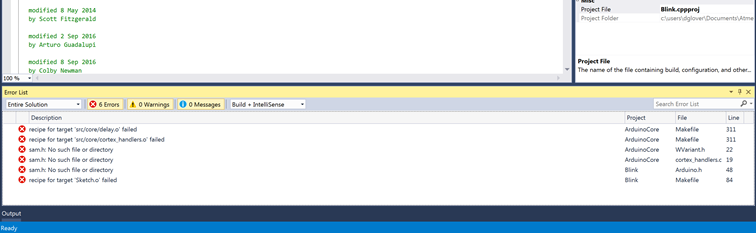
After a bit of digging around the web I found this article "Atmel Studio 7 Create Project From Arduino Sketch Build Failure" It seems with the latest build of Atmel Studio things got moved around.
"I had the same problem. The issue is that the Arduino SAMD core started using the CMSIS-Atmel package as of version 1.6.9. This moved the location of sam.h and all of its dependencies to a different directory and Atmel Studio can't find it using the built-in template for creating projects from Arduino sketches."
There are two approaches
Set up a file system Link
mkdir C:\Users\xxx\AppData\Local\Arduino15\packages\arduino\tools\CMSIS\4.0.0-atmel\Device
cd C:\Users\xxx\AppData\Local\Arduino15\packages\arduino\tools\CMSIS\4.0.0-atmel\Device
mklink /J ATMEL C:\Users\xxx\AppData\Local\Arduino15\packages\arduino\tools\CMSIS-Atmel\1.0.0\CMSIS\Device\ATMELOr add the missing directories to the project
When you created the AS7 project from the Arduino sketch, it creates a Solution with two Projects, one named "ArduinoCore" and one with the name you chose for your Arduino sketch. In order to get AS7 to build correctly with SAMD-based projects (Zero, MKR1000, MKRZero, M0, Tian, etc.) you need to add the path to the Atmel CMSIS library in four places: one for the C compiler and one for the C++ compiler in the ArduinoCore project plus one for the C compiler and one for the C++ compiler in the project associated with your Arduino sketch.
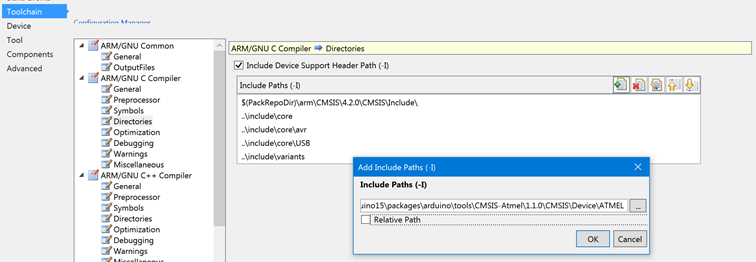
To do this, in the Solution Explorer pane, right click the ArduinoCore project and select Properties. This will open the Properties pane. On the left, select Toolchain. Then under ARM/GNU C Compiler select Directories. Click the Add Item button and then enter the full path to the SAMD CMSIS files. Uncheck the Relative Path box and click on OK. Repeat this for the ARM/GNU C++ Compiler. Then repeat the process again starting with right clicking on the project associated with your Arduino sketch.
The path will look something like this:
C:\Users\<myWindowsName>\AppData\Local\Arduino15\packages\arduino\tools\CMSIS-Atmel\1.1.0\CMSIS\Device\ATMEL
These files are installed by the Arduino IDE when you use the board manager to install support for SAMD boards. Note that the path name may change with new releases of the Arduino IDE or board support packages, so verify the location on your system.
Adding missing paths to Arduino Libraries
I chose to add the directories directly to the project. It's important to add for both the ARM/GNU C compiler and the ARM/GNU C++ Compiler and for both the ArduinoCore project and your project (blink.cpp) in my case.
Great, now I can compile my solution and deployJ
But not so fast. The next issue I hit was this after what looked to be a promising compile.
Cannot open linker script file label.id: no such directory
recipe for target 'blink.elf' failed
id returned 1 exit status

Ok, so what the heck is an flash.id file? Well it turns out that it's the file that defines the memory layout of the MUC.
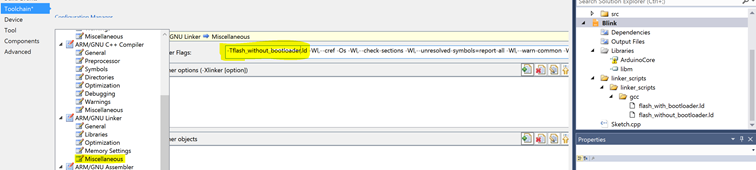
Hmmm, so where is this file? Well with a bit more digging around I spotted two files that ended with .id in the linker_scripts/linker_scripts/gcc directory in the project.
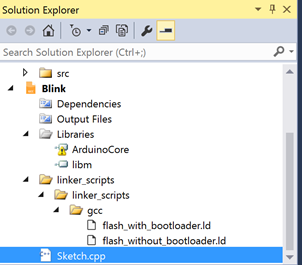
Setting the Flash.Id file

Success, time to deploy and debug
The solution compiles now time to deploy the code to the Arduino M0 Pro and starting stepping through the codeJ
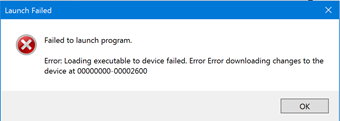
Next step is to start debugging (Tools -> Debugging and break) and I get a
Failed to launch program.
Error: Loading executable to device failed. Error Error downloading changes to the device at 00000000-00002600.
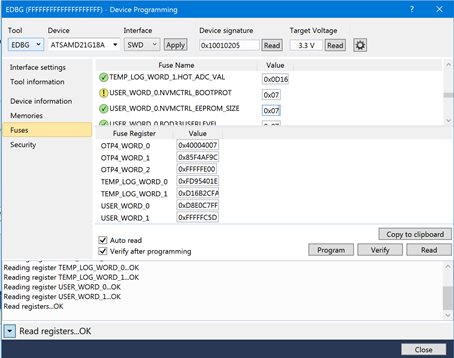
Unlocking the Boot Protection
After more searching the solution is to change the USER_WORD_0.NVMCTRL from it's default value of 0x01 to 0x07.
You need to click on Program to save this change to the firmware on the device.
Success
Finally, after updating the Boot Protection fuse setting and starting debugging the project deployed to the Arduino M0 Pro and I was able to step through the project. It's a great debug experience and worth some of the pain to setup.
Be sure to checking the Adafruit Paths and Optimizations section and learn about turning off the optimiser to improve the debug experience.
And finally, be sure to check out Restoring Bootloader.