Storage Spaces is a feature of Windows Server that lets you create a virtual disk (also known as a storage space) out of a number of underlying physical disks. The Performance Guidance for SQL Server in Azure VMs whitepaper mentions (on pages 15 and 26) that in Azure VMs, Storage Spaces can be used to improve storage performance for SQL Server workloads. This is achieved by creating a virtual disk from a striped set of physical disks. In Azure VMs, physical disks use Azure Blob storage, which has certain performance limitations. However, creating a storage space on top of a striped set of such physical disks lets you work around these limitations to some extent. With larger VMs that support many (up to 16) physical disks, a very significant increase in storage performance is possible. This can enable Azure as a viable platform for many SQL workloads that would be too constrained by the I/O performance of a single Azure disk otherwise.
In some scenarios, i.e. when creating a new database, creating a storage space may not be necessary. In that case, it will be easier to design the database with multiple data files, and place each file (or a group of files, to enable future expansion) on a separate physical disk, which will achieve a similar result of improving I/O performance. There are, however, some scenarios where this is not feasible or not possible, e.g. when an existing database that uses one large data file needs to be migrated to Azure as-is.
On a standalone Azure VM, creating a storage space is straightforward. Server Manager provides a simple UI to accomplish this task. However, doing this on a failover cluster that uses Azure VMs as nodes presents certain complications. This is relevant for SQL Server because AlwaysOn Availability Groups, which is probably the most commonly used HA solution for SQL Server in Azure VMs, requires an underlying failover cluster. Each SQL Server instance hosting an availability replica needs local storage, which in Azure may need to use a Storage Spaces virtual disk to improve I/O performance, while at the same time running on a node of a failover cluster. This is where the complications arise. When a virtual disk is created on a cluster, Storage Spaces makes the disk and the underlying storage pool accessible to every node in the cluster. It also creates cluster resources (a pool and a disk) to let the cluster manage storage spaces, i.e. to allow one node read-write access while other nodes have read-only access. This cluster awareness is needed in particular to support Clustered Shared Volumes (CSVs), which is arguably the primary scenario for using Storage Spaces on a failover cluster.
However, as it happens, this scenario is not supported in Azure VMs. Disks based on Azure Blob storage do not support persistent reservations, therefore when Storage Spaces creates a new storage pool and a virtual disk on top of that pool, and then creates corresponding cluster resources, these resources fail to come online.
Nevertheless, using Storage Spaces to create better performing local storage on cluster nodes is possible, simply by managing storage pools and virtual disks manually instead of letting the cluster do that. The following steps describe the procedure of adding a Storage Spaces virtual disk to a node of a two node failover cluster. This cluster can then be used to host a deployment of SQL Server Availability Groups with two availability replicas, with the database(s) residing on Storage Spaces virtual disks.
- Create a failover cluster using Azure VMs. The detailed procedure is not described here – there are many tutorials, walkthroughs, and scripts available online. The cluster in this example is named CL01, and the two nodes are named CL01N1 and CL01N2. A cluster with more than two nodes can be used as well.
- In Azure management portal, attach three empty disks to each node. In this example, three disks are used for simplicity only. The actual number of disks to use depends on the performance requirements of the SQL Server workload, and is limited by the size of the VM. When attaching disks, consider creating disk blobs in separate storage accounts, to avoid a shared performance cap of a single storage account. Using a non-default storage account to create a new empty disk is currently not supported in the Azure management portal, but the Add-AzureDataDisk PowerShell cmdlet can be used to do this. There is no downside in using the maximum size for each disk. Storage in Azure is thin-provisioned and is billed based on actual space usage.
- For each node, enable Remote Management. This can be done in Server Manager under the properties of local server. Without Remote Management enabled, server inventory in Server Manager will not complete, and storage pools and disks in the cluster will not be manageable from Server Manager.
- In Server Manager on each node, go to File and Storage Services, Disks, and initialize the new disks just added. If disks do not appear, refresh the view first (this can take several minutes). You can also initialize disks from the Storage Management MMC console. Do not create any volumes once disks have been initialized.
-
Go to File and Storage Services, Volumes, Storage Pools. You should see two Primordial storage pools listed, one for each node. As you click on each Primordial pool, you will see the disks that belong to the pool listed under Physical Disks.
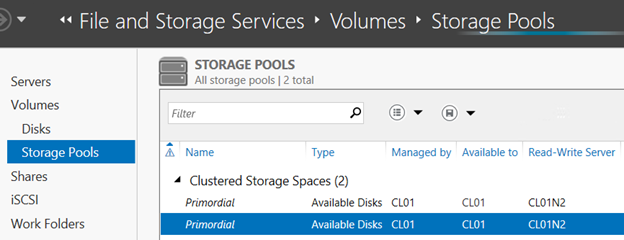
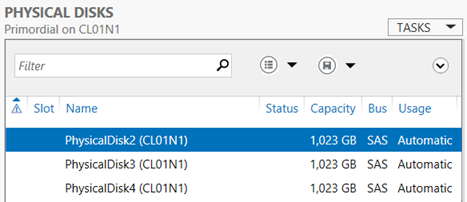
In the first screenshot, the Primordial pool on the CL01N1 node is selected. This is not obvious until you look at the second screenshot that shows the disks in the pool, and notice that the node name is listed in parentheses after each disk name. Note that in the first screenshot, both pools are managed by and available to CL01, which is the cluster name. This is an indication that with Clustered Storage Spaces, it is the cluster that will manage the pools and the virtual disks by default.
-
Create a new storage pool on one of the nodes (CL01N1 in this case). Right-click on one of the Primordial pools, taking note of the node to which it belongs by checking the list of physical disks, and select New Storage Pool. Click through the wizard, giving the new storage pool a name and selecting the disks that you want added to the pool. In this example, the pool name is StoragePool01, and it is using all three disks that have been added to the node.
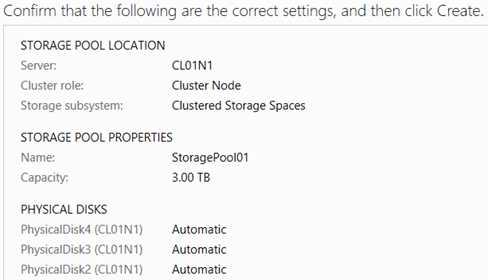
Click Create, and close the wizard once all actions are complete. Note that the wizard will not let you create a storage pool based on less than three disks. If a two-disk pool is needed, then a workaround is to create a three-disk pool first, and then remove a physical disk from the pool before creating a virtual disk on top of that pool.
-
Back in Server Manager, you will see that a new storage pool named StoragePool01 now exists, however there is a warning sign next to it, blocking the creation of a virtual disk on top of this pool. The same warning sign is displayed next to each of the three disks in this pool.
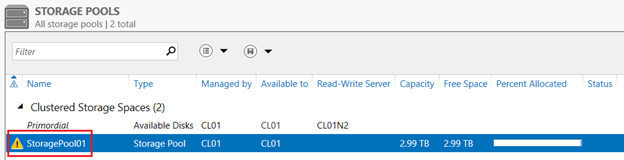
There is no clear indication in the Server Manager why this warning is displayed. However, if you open Failover Cluster Manager and go to Storage, Pools, you will see that a new cluster resource named Cluster Pool 1 is now listed, and its status is Failed. As noted earlier, the cluster fails to bring the resource online because the disks in this pool do not support persistent reservations.
-
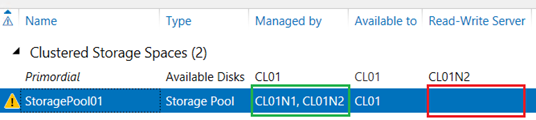
Delete the Cluster Pool 1 resource. Back in Server Manager, refresh the view. Once refresh completes (which could take a few minutes), note that the warning sign next to the storage pool is still displayed, however the warning signs next to each disk are gone. Notably, the storage pool now appears as managed by individual cluster nodes (CL01N1, CL01N2) instead of by the cluster as it was earlier. Note that the value in the Read-Write Server column is blank, meaning that neither node can write to the pool. Therefore, virtual disk creation is still blocked.
-
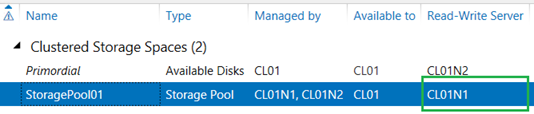
Right-click on the storage pool, and select Set Read-Write Access. Be sure to select the node where the disks in this storage pool are attached. This makes the pool writeable on that node, making it possible to create a virtual disk on this pool. Note that the warning sign next to the storage pool is now gone, and the node name (CL01N1) appears as the Read-Write Server.
-
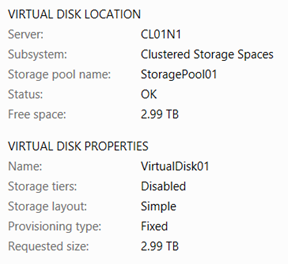
Right-click on the storage pool just created, and select New Virtual Disk. Click through the wizard, giving the new virtual disk a name, selecting Simple as the layout, and using the maximum size for the pool. In this example, the name of the virtual disk is VirtualDisk01. The Simple layout will stripe all disks is the storage pool, which provides maximum performance but no redundancy, similar to RAID 0. This may sound like a bad idea for SQL Server storage, but keep in mind that in this case, disks are backed by Azure Blob storage, which already provides triple redundancy.
-
Click Create. The wizard will run through the tasks, however the Initialize Disk task will fail:
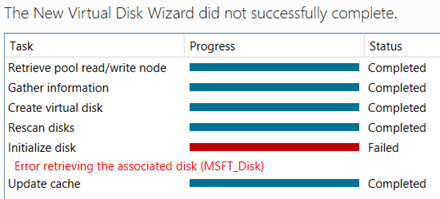
- As it happens, the reason for the failure is again due to failing cluster resources. Open Failover Cluster Manager, and notice that there are now two new resources added. One is again a pool named Cluster Pool 1, and one is a disk named Cluster Virtual Disk (VirtualDisk01). The disk has the Failed status, and the pool is offline. Delete both resources, first the disk and then the pool.
- Back in the Server Manager, refresh the view. You will see that both the storage pool and the new virtual disk have warning signs next to them. Set read-write access on the storage pool to the node where its disks are attached again, in the same way as in the previous step. This will remove the warning sign next to the storage pool, but the sign next to the virtual disk will still be there. This is because the virtual disk is not yet attached to the node that has read-write access on the underlying storage pool.
-
Right-click on the virtual disk and select Attach Virtual Disk. After confirming the prompt, you will see that the warning sign is gone. Now, if you go to File and Storage Services, Volumes, Disks in Service Manager, you will see the new virtual disk in the list of all disks.
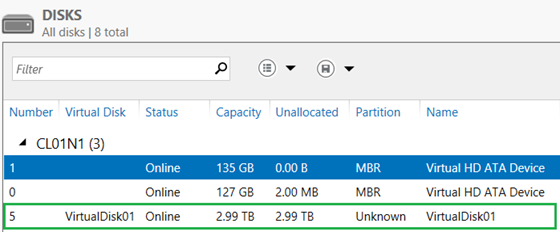
The new disk is also listed in the Disk Management MMC console.
- Initialize the new disk, and create a new simple volume. This can be done either in Server Manager, or in Disk Management console. This is no different from the regular process of creating a new volume on a new disk. Using Disk Management may be simpler because it does not depend on Remote Management being available.
- At this point, it may look as if you are done, and the new disk is ready for use. Actually, a very important step still remains. Note that in a previous step, we had to attach the new virtual disk manually. By default with Clustered Storage Spaces, virtual disks are not attached automatically when they become available or when the server is started, because they are managed by the cluster. But we had to delete cluster resources, effectively taking the management of virtual disks upon ourselves. This means that we have to ensure that the virtual disk remains available upon server restart. Storage Spaces provides a virtual disk property named IsManualAttach. By default in Clustered Storage Spaces, this is set to True. For the disk to be automatically attached upon server restart, this property must be set to False.
-
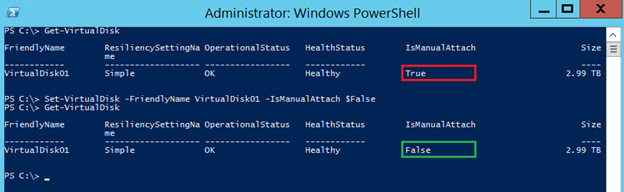
Server Manager does not provide a UI to change the IsManualAttach property, although it provides a read-only view of all virtual disk properties, including this one. Therefore, we have to use PowerShell (incidentally, all previous tasks can be accomplished in PowerShell as well). Open an administrator PowerShell command prompt, and execute the Get-VirtualDisk cmdlet. This will output the properties of the disk that you just created. Note that the IsManualAttach property is set to True. Type and execute the following command: Set-VirtualDisk -FriendlyName VirtualDisk01 -IsManualAttach $False. Execute Get-VirtualDisk one more time to confirm that the property has been changed.
- At this point, the disk is ready for use. In this example, we created a single virtual disk out of three physical disks, but other configurations are certainly possible. On larger Azure VMs, up to 16 physical disks can be used to create one or more storage pools and virtual disks.
- Finally, repeat the steps on all other nodes of the cluster.
In closing, a caveat needs to be added. Microsoft Azure is a fast changing environment, and this blog is written based on its current state as of this writing (Spring 2014). Future developments may change or invalidate some of the information presented in this blog.
Update 2014-07-14: New guidance on Azure storage disk striping has been recently published as a part of Performance Best Practices for SQL Server in Azure Virtual Machines help topic. Please review this topic, specifically to the Disks and performance considerations section, before provisioning Azure storage to be used by SQL Server.
Update 2014-08-08: One clarification to make is that these steps apply to the scenario where a cluster has already been created, and local Storage Spaces now need to be added on every node. If a cluster is being built from scratch, it would be easier to add local Storage Spaces to each node before the cluster is formed, and then answer No to the prompt to add that storage to the cluster.
Update 2014-11-16: In the scenario where a new node is added to an existing cluster with the above Storage Spaces configuration, if the option to add available storage to the cluster is selected, then the cluster attempts to add the storage pools and virtual disks from the existing nodes, which then promptly become unavailable for local access. To resolve this, follow similar steps as above, deleting cluster objects, allowing write access on a storage pools, attaching the virtual disks (and setting IsManualAttach to False again), and bringing the disks online.
© 2019 Microsoft. All rights reserved.