Azure: Securing your Web App (Website)
Sources
- MVA: https://bit.ly/azurewebapps
- Articles: https://bit.ly/securewebjobsazure
- Previous Blog Next Blog
Overview
After reading this blog you will be able to create a Web App (Web Site) using Visual Studio 2015 and add WebJobs from the same Visual Studio solution (a solution makes up multiple projects). You will secure the Web App (Web Site) using two forms of security certifications.
Work Description:
You work for a company that needs to upload images to a web site, they don’t have much money and hope to test out the value of the idea using the basic MSDN account, which gives you $200 or $150 for your MSDN Subscription. The owner of the company just got divorced and bought a new car, so money is tight, but the owner has promised that if this takes off you will get 25% of all net profits (if you don’t know what net profits mean, seriously look it up, sounds better than it is). The owner is also leaving on a long vacation with new paramour, so if you get this going quickly you might be able to goof off on some other things you want to work on. Since you will getting part of the NET profits, not GROSS profits you must design your system efficiently, but it must scale appropriately, be secure and not reveal any trade secrets.
Current Status
You have created your Web App (Web Site) and know how to use WebJobs in a continuous manner. You have used a low security practice to get your webjob to work.
What you need to do
Determine how to secure your WebJobs
How to do it
This is easy, because you are using the provided domain name, freeloader.azurewebsites.net, then you have a been provided with an SSL certificate. But the *.azurewebsites.net are not as secure as a website with a custom domain name, and come on, you can get a custom domain name from GoDaddy for $4.99 per year. Cheap. Either way. Go ahead, try it.
What about a custom domain name, how do you secure it? You will need a security certificate, and there are a number of providers. SSL certificates can be gotten for free for a limited time like 90 days, then you have to pay, usually around $100 or less per year, usually much less. For this sample, I will run through the process using Comodo LTD, https://secure.instantssl.com/products/SSLIdASignup1a.
Process
- Determine if you need an SSL and what type of SSL using the following article for the way to do the generations using IIS or OpenSSL. You will need to budget real money to secure your site, security is not free.
- https://bit.ly/certificategeneration
- In this case, a Custom Domain Name is required to create the SSL
- if you do nave a custom domain name, the free certs from COMODO require that you use your websites custom domain name email, for example: admin@customdomain.us. That may vary but that was my experience.
- if you use Godaddy as your source for the Custom Domain Name, then you can use the Forwarding Mail to a free Outlook or other email account.
- Once you get your certification, which took me awhile till I noticed that I had entered my super simple and short URL incorrectly, using .com instead of .us
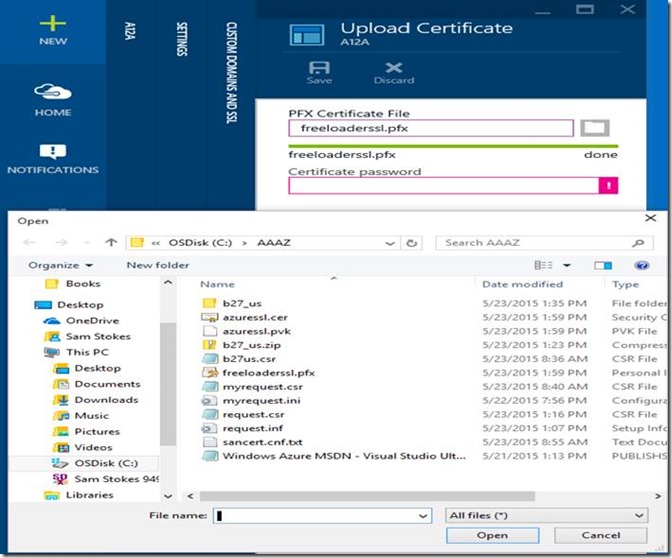
- Using the *.pfx file, you can now upload this to your Web App (Web Site)
- If the whole process described above seems a bit long, I include it because it what you should know how to do, but here are some command line (cmd) scripts that will get you a test certificate. But you shouldn’t use it unless you have not tried the above process. Really:
C:\BBB\makecert -r -pe -n "CN=FreeloaderSSL" -sky 1 "Freeloaderssl.cer" -sv "FreeLoaderssl.pvk" -ss My- Then do the following, where “BBB” is the directory where your file is located:
C:\BBB\pvk2pfx -pvk "FreeLoaderssl.pvk" -spc "FreeLoaderssl.cer" -pfx "FreeLoaderssl.pfx" -pi password1
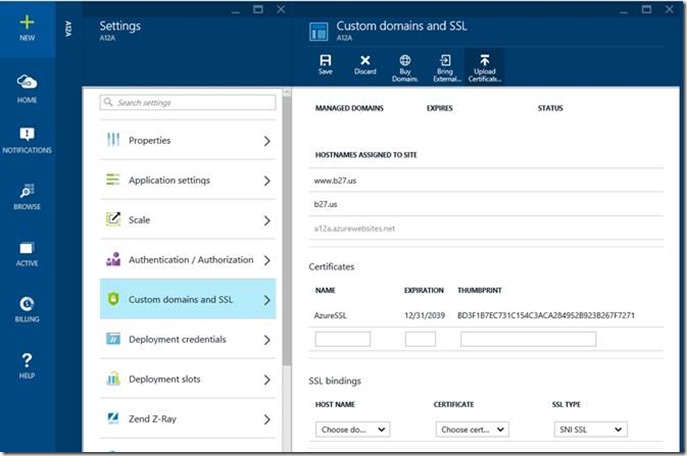
Now let’s do the upload to Azure using our certificate, if you are using the MakeCert, this is NOT a secure certificate, scroll down to see the Azure Preview Portal action to add the certificate.
· · Then you will see the Upload Certificate. Select the file, then add your password, then Save. |
Conclusion
This may seem like a repeat of other articles, it is, which a few changes. But I found that once I got into determining how to make security certificate, that took time. So if you have gotten this far, you likely have discovered that it took longer than you thought it would and there many tools. It turns out there are other ways to create a certificate. But in Azure generally speaking you use the built in, but weaker security SSL for Web Apps (WebSites) that use the domain hame: *.azurewebsites.net. For custom domains you must add the certificate and it must have an extension of *.pfx.
Some of the issues you might find:
Free certificates that are really secure usually may not output the *.pfx file, so you will need to use a conversion process, for many of these can you use the pvk2pfx command from the command line in Administrator mode
You can use the MakeCert and then the PVK2PFX tool, for a certificate that isn’t as secure and fit for testing purposes.
Upload the certificate and now your Web App (Web Site) is secure, or is it?
- Well not quite, you will need to enforce HTTPS on your Web App (Web Site) because people viewing your site could just use HTTP still. I will discuss this in my next article, but for now you can do early reading at:
- https://bit.ly/certificategeneration scroll down toward the bottom.

