IOT: Preparing your broken toy for use with Arduino
Hopefully you found a useful toy that was broken, gently broken that is. You should have at least the following from the toy, I am using a Thunder Tumbler that I bought the night before Christmas at discount, which is a fairly generic device. This has four “ground” wheels and one wheel for a “wheelie” action, it goes right forward/backward and left forward/backward, as well as a turbo switch which goes fast forward, so there are 5 functions. You will need to scroll down to see the process for creating an open loop control system for a Thunder Tumbler.
The Thunder Tumbler does not have good reviews at Amazon, but if you shop around you can get them for less than $15 (2015 US), I got mine for $9.99 on 12/24/2014 from a “Drug Store”, in the US Drug Stores sell all kinds of stuff, not only prescription drugs. The Thunder Tumbler works well for internet of things research, as long as you don’t run it into a wall or drop it very far. In the case for Littoral Space Exploration, this device is excellent as the environment is harsh and likely to destroy anything you take down to the sea, so might as well be cheap, because to make sure whatever you have won’t destruct is quite expensive. The downside I found during testing was that the Thunder Tumbler would “float” due to it’s balloon tires, which is good in a way, but reduces traction if you are going to reverse out of the incoming waves of destruction. If you can get it for a good price, get two, you will take apart one of the controllers so that you can receive data from it, in this case you will need a 27 MHZ and a 49 MHZ Thunder Tumbler.
Why not a helicopter? Four reasons: Price, physical data regime (that is sand, temperature, etc.) weight and people’s general dislike of helicopters at the beach. For about $35 dollars (2015 US) you will have a nice little vehicle that can do sampling of a number of sites quickly and then return to you. The main vehicle will implement a simple sensor array that if lost will be inexpensive to replace, and when dealing with the ocean, one must assume loss as you will lose your device. Guaranteed. The ancient myths of water sprites and sea demigods were for a reason, the ocean and it’s environments are nice most of the time, but just when you think you got it all correct, the water sprites play a trick on you, and there goes your research vehicle heading toward Hawaii via the Pacific.
- The toy might have:
- Motors: 1 or 2
- Power controller (relay, solid state switch, transistors): 1 per motor
- Power limiting resistor: 1,000 ohms (1 K ohms)
- Transmitter (RC) at 27 MHz or 49 MHZ
- Receiver (RC) at 27 or 49 MHZ
- Battery Pack: usually the vehicle has a compartment, not easy to use, but can work, or you could buy battery clips
- You will need:
- Arduino, we will use the UNO, but the smaller versions work just as well, and we might use the Lauchpad from TI just to make sure it works.
- Raspberry PI, which we will use eventually to connect with Azure, not needed, but you might want to begin saving up for it, or ordering it whatever.
- “Standoffs” to support your work in the case
- Equipment: Requires a purchase from a store like Radio Shack, Lowe’s, Home Depot, Hardware Store:
- Punch Block, Pin Blocks, Breadboards (different terms sort of the same things): Usually about $8 (2015 US), Radio Shack or online
- Soldering Iron, usually the cheaper the more likely it doesn’t have temperature control, which you need to prevent delamination of the printed circuits, the delamination will occur if the traces are overheated, around 100 C degrees or are repeatedly heated. A good soldering iron will cost around $50, but they last forever. I still have one I bought when I was 19, and that was a very long time ago.
- Solder: Have to buy this, usually the .031 or .062 rosin core will do the job
- Safety Glasses: If you don’t wear glasses, get some safety glasses. These are handy when drilling, or even soldering, because you don’t want hot solder in your eyeball, or a piece of plastic when you drill something. Of course if you don’t use safety glasses you might not get that piece of dust in your eye. But…
- Hand Tools:
- Variable Speed Drill motor, you need this from time to time, I got a nice one that is a 4.8 volts, smaller and fits nicely in my toolkit. If you use one of the types of drills that has a large battery it will take up more space.
- Wire Stripper: You need this, don’t use a “hot” stripper, a “hot” stripper heats the insulation, and that could release toxic gasses. Hot strippers take up more room and have their place, but I don’t recommend them.
- Wire Cutters: nice to have, your wire stripper will cut coiled wire, but a wire cutter is handy for close in work.
- Wire crimper: although I avoid using this when possible as it can nick wires leading to failures, Bret Stateham’s clean use of this tool has convinced me to start using them again. You will also need the crimp nuts, and cheaper units will have them, but these units wear out faster.
- Needle nose: Don’t steal the one from your mom that she uses for beading, just don’t, get your own. Really you need this one.
- Socket wrenches: Nice to have, usually smaller sizes are good.
- Screwdrivers: You will need a small set of screwdrivers to take things apart.
- Hammer: Useful to take things apart with stripped screw heads, or to just end a project gone badly. Useful if your robots attempt to take over.
- Safety on the beach or in wetlands:
- The batteries you are using have high energy densities, make sure that you do not conduct the battery current from your hands and fingers to your feet. Why? This path could take the current through the area of your heart and cause damage to your heart or death, really. Shoes with salt water in them can be very conductive. If you are using rechargeable batteries, these can have up to over 2000 milli-amp hours, which is enough to do damage in a number of scenarios.
- When focused on your vehicle, make sure to keep an eye on the waves, they might be gentle one moment, but a random wave does happen from time to time that could swamp your work and you. Rogue waves do occur, and keep in mind that about one cargo ship is lost each year to rouge waves, and I have seen one that just wiped out a summer beach crowd with no warning, phones everything damaged.
- In the winter time there is often no lifeguards on the beach, if you are working alone, make sure that someone else knows where you are.
- Also, if you encounter a game warden, make sure you have a good story or expect a fine in California for taking fish.
Getting started:
Hand Controller:
As Bret Stateham stated, we will go “Ghetto on the controller”. Not sure why he would say that, as most of the inner city kids I work with have a great deal of respect for the few toys they have and usually don’t take them apart. But it makes sense. In this case we will need to determine if we can use the raw output of the Arduino or will we need to use a “conditioning” transistor or relay.
The RC Controller Transmitter uses a chip called a TX2/RX2 and to find out how to use it you have to go to:
https://www.alibaba.com/product-detail/TX2-RX2-Remote-control-IC_635522647.html
Scroll down on the page to find out more about the chip. I will write about how to use this chip separately in another blog. But in a nutshell, the TX2/RX2 is an inexpensive chip that provides the capabilities to control devices using 5 functions: Left, Right, Up, Down and Turbo. It provides the oscillator for use with an transmitter or receiver (same chip) at a number of frequencies, but usually 27 MHZ, 40 MHZ and 49 MHZ. It can also control a IR LED type of transmitter and receiver which is very low cost, but can only work in scenarios that are in line of sight of the transmitter and won’t work in bright outdoors usually. These chips are usually soldered as surface mounted, but using leads so they could be desoldered. If you bought these from Alibaba in quantity they cost as little as $.10 (2015 US). They do require a crystal in most countries, so that adds cost, but this is the chip that rules them all.
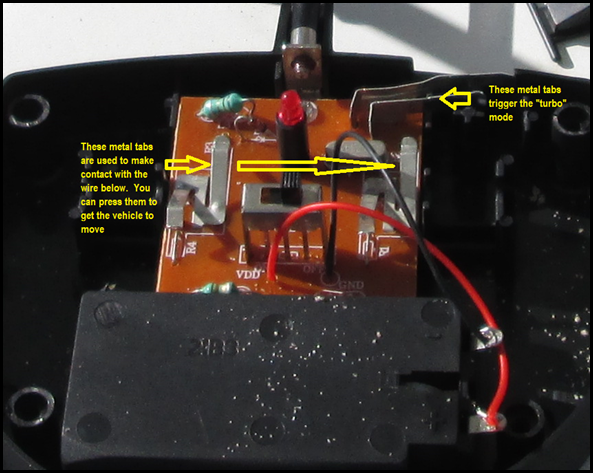
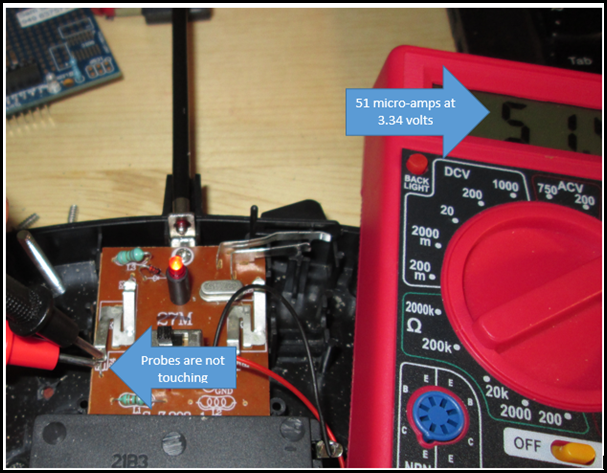
Now we need to determine the current between the metal strip to the wire when transmitting. To do this I will use an inexpensive DMM, in fact the battery in the Digital Multi-meter (DMM) cost more than the DMM which I got on sale for $3 (2015 US) and the battery for some reason cost $3.49.
On the volt/amp meter or digital multi-meter (DMM) I set the current selector to 200 micro-amps, and then measure between the metal tab and wire, without the metal tab and wire touching. For the left side the current is about 51 micro-amps and the turbo switch is about 100 microamps, so it should be ok to use your Arduino directly with the switching. This is a relatively low current so there will be variations.
The metal tabs are connected to ground and the wire that the metal tab contacts is connected to a voltage of about 3.4 volts (may vary). This means that you will need to drop the voltage to the wire on the board.
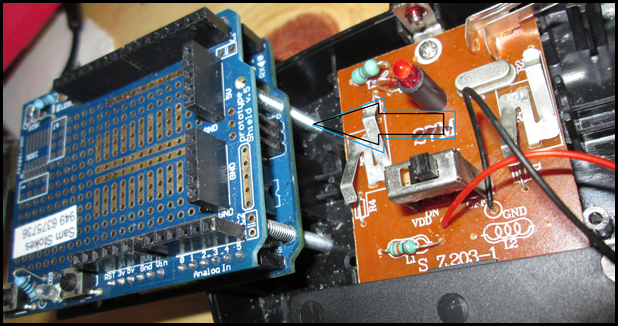
Attaching your Arduino to the controller. I drilled two holes that mapped to the Arduino UNO R3 holes on the side opposite of the USB and power connector, these two holes are in a line parallel to the edge. In the US I used two 6-32 screws (metric: M3.5 x 0.6) that are 1.5 inches (38 mm) in length. I usually buy screws long and then cut them to length using my Wire Crimper, and if you buy cheap ones this is difficult to do, you do need leverage and good handles, which comes with the better ones. In this case the screws are used as full length. The screws cost about $.07 (in a box of 100), and no nuts are used, the plastic seems to be holding the screws. As you can see I have attached the UNO to the screws which have a nice friction hold for the UNO, the protoshield is simply attached normally to the UNO, but you do need to back off the supporting screws a turn or two.
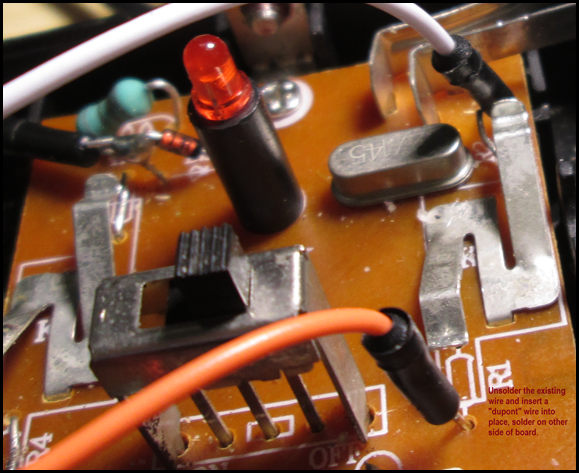
Wiring your Arduino to the Transmitter: I used the “dupont’ male pinned wires that are usually included with the various kits, you can order the wires with either male or female ends in a ribbon cable, which are nice since you can strip off the wires in groups, not cheap but available. Unsolder the existing wire and replace it with a “DuPont” type of wire, or a regular wire will work, but you will need to tin the other end if it is stranded. Use the same battery for the Arduino UNO R3, in this case the UNO will use 9 volts. (NOTE: DO NOT use 9 Volts on a Galileo Version 1, that board will only work with 5 volts according to specifications.)
9 Volts connection: Locate the power terminal for the Arduino UNO, and solder wires from the 9 Volt battery containment to the Arduino, remove the battery before soldering, some batteries are sensitive to the heat of the soldering iron. On the Thunder Tumbler the voltage wires to the battery compartment are quite weak, so you may break them. I simply restriped the wires and used them, but you could just as easily add extra wires.
Testing with simple software
This is easy, but physically the Tumbler vehicle might surge. You can simply attach the leads to the digital output pins, in fact you could just use the Blink test, with a much longer delay and attach one of the pins to digital pin 13. PICK UP and TURN the TUMBLER over so it’s wheels are not touching the ground for this test. Now, Turn on the Tumbler Vehicle and the transmitter (the unit with the antenna), and if you have loaded the blink test onto your Arduino you should see one of the wheels turn rapidly, now turn off your Tumbler vehicle. Turn off the transmitter and remove the battery as the Arduino in this configuration is not powered off with the switch on the transmitter.
Vehicle preparation:
Initially do not modify the vehicle, for this lab we modified only the controller and attached it to an Arduino.
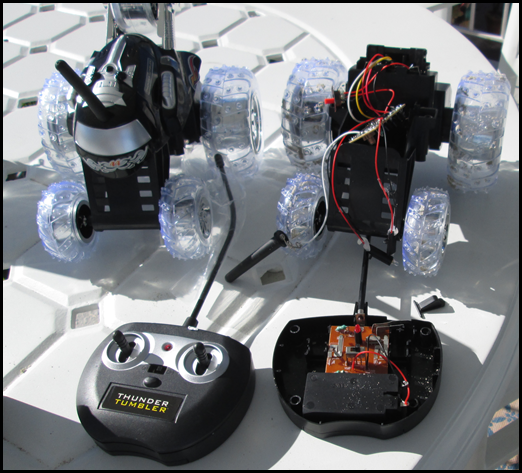
In case you are curious there is what the vehicle and RC controller taken apart. If you look closely you will see sand on the vehicle on the right, I have tested the vehicle down at the beach with the vehicle taken apart. FYI: Do not try to get to the motors, the motors are inside of a glued together case, if you break the case, you can still use the vehicle, but it will lose it’s ability to resist moisture.
Conclusion:
Ok, as usual, this doesn’t do much, but you are controlling the Thunder Tumbler via the Arduino and the supplied transmitter unit. You did not have to purchase any extra component, just tools and wires. And in the case of wires, if you break down some of your other electronic based toys, you could get more wire, it will be hard to work with as it will be 24 gauge, or you can use solid core wire instead of the DuPont wire.
You have now created an open loop control system, this means that you can send signals, but you will not be able to determine the state of your system, for instance voltage levels and so forth. Other improvements would be to use the power switch to turn the Arduino off at the same time as the transmitter controller.
Finally, do not steal your mother’s beading needle nose pliers, that likely will not go well. Instead save up some money to buy the tools cheaply at a store like Harbor Freight in Southern California.
