Lab: Move an object using Silverlight and XNA in Windows Phone Part 1
Charles Petzold free eBook is great, except that it doesn’t cover the use of Sliverlight-XNA tools that are in the current version of Windows Phone.
One of the most reliable source on how to use the Silverlight XNA hybrid is the MSDN Article at:
- How to: Combine Silverlight and the XNA Framework in a Windows Phone Application
- Completed code sample: https://msdn.microsoft.com/en-us/library/ff431744(v=vs.92).aspx, Silverlight/XNA Framework Sample is the third one down
In he Silverlight/XNA hybrid, you are working with two tools: Silverlight which uses XAML for the Presentation layer, and the XNA layer which can do a presentation layer and high speed connection with GPU, etc.
In the default template you have a Main Page and a Game Page. The Main Page has a button that sends you to the game page which by default opens the default XNA “blue” game. The Game Page xaml and class (in my examples are CSharp, but could be VB).
When you look at the initial MainPage.XAML, the work is done in the following:
The Click event is the way that the XAML page communicates with the “code behind”, when there is an existing event you can right click on it and then select the “Navigate to Event Handler”, in this case you will see:
You are then transported to the following event, events vary, and this event was created by the template (or actually the author of the template):
This is how the template author decided to navigate to the Gamepage.xaml. There are a number of ways to do this, but this is efficient.
If you click on the button you then “Navigate” to the game page, and when that opens you get the XNA “blue” game or the cornflower blue screen that you would get with a regular XNA game. Like XNA, the class and class scope fields are constructed: Add the code or variables (a type of field):
Code Snippet
- public partial class GamePage : PhoneApplicationPage
- {
- //This is the class scope area, it is where you place
- //or declare variables that will be used in the entire
- //class
- ContentManager contentManager;
- GameTimer timer;
- SpriteBatch spriteBatch;
- /************Code Added Begin*******************/
- /************Add Textures***********************/
- //Add three textures, one to hold a changing texture and one to hold a specific texture or picture
- /// <summary>
- /// The texture with texture is to be used has a holder
- /// </summary>
- Texture2D holderTexture;
- /// <summary>
- /// Use this for the enenmy image
- /// </summary>
- Texture2D enemyTexture;
- /// <summary>
- /// Use this for the friendly image
- /// </summary>
- Texture2D friendlyTexture;
- /*************End Adding Textures****************/
- /************Add Vector**************************/
- /// <summary>
- /// A vector to show the position of the texture
- /// </summary>
- Vector2 spritePosition;
- /// <summary>
- /// A vector to use for the speed of the texture
- /// </summary>
- Vector2 spriteSpeed = new Vector2(100.0f, 100.0f);
- /*************End Adding Vectors*****************/
- /*************Code Adding End********************/
Unlike XNA the first procedure fired is the OnNavigatedTo, here is the example of the OnNavigatedTo method. Here you would add things that need to be loaded, like images, etc.which is shown in the code below:
Code Snippet
- protected override void OnNavigatedTo(NavigationEventArgs e)
- {
- // Set the sharing mode of the graphics device to turn on XNA rendering
- SharedGraphicsDeviceManager.Current.GraphicsDevice.SetSharingMode(true);
- // Create a new SpriteBatch, which can be used to draw textures.
- spriteBatch = new SpriteBatch(SharedGraphicsDeviceManager.Current.GraphicsDevice);
- // TODO: use this.content to load your game content here
- /***************Code Added begin***********************************/
- if (null == holderTexture)
- {
- enemyTexture = contentManager.Load<Texture2D>("enemy");
- friendlyTexture = contentManager.Load<Texture2D>("friendly");
- // Start with the red rectangle.
- holderTexture = friendlyTexture;
- }
- /***************Code Added end***********************************/
- // Start the timer
- timer.Start();
- base.OnNavigatedTo(e);
- }
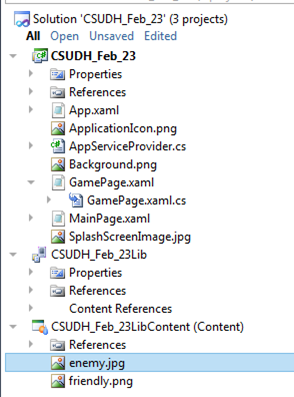
You will need to add two images to the Solution, right click on the content project and add your existing images, I added two images named enemy.jpg and friendly.jpg
Now add the OnUpdate code, this is identical to the MSDN Example, but we are going to make a change by “refactor” and extract method, see the steps after this entry:
Code Snippet
- private void OnUpdate(object sender, GameTimerEventArgs e)
- {
- // Move the sprite by speed, scaled by elapsed time.
- spritePosition += spriteSpeed * (float)e.ElapsedTime.TotalSeconds;
- /***************Code Added Begin***********************************/
- int MinX = 0;
- int MinY = 0;
- int MaxX = SharedGraphicsDeviceManager.Current.GraphicsDevice.Viewport.Width - holderTexture.Width;
- int MaxY = SharedGraphicsDeviceManager.Current.GraphicsDevice.Viewport.Height - holderTexture.Height;
- // Check for bounce.
- if (spritePosition.X > MaxX)
- {
- spriteSpeed.X *= -1;
- spritePosition.X = MaxX;
- }
- else if (spritePosition.X < MinX)
- {
- spriteSpeed.X *= -1;
- spritePosition.X = MinX;
- }
- if (spritePosition.Y > MaxY)
- {
- spriteSpeed.Y *= -1;
- spritePosition.Y = MaxY;
- }
- else if (spritePosition.Y < MinY)
- {
- spriteSpeed.Y *= -1;
- spritePosition.Y = MinY;
- }
- /***************Code Added End***********************************/
- }
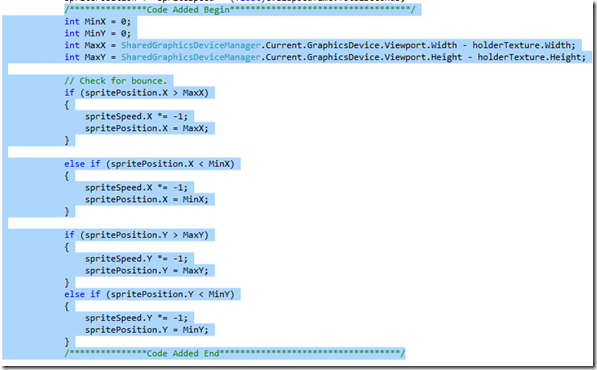
Select the code you want to extract, as shown:
Then right click and select Refactor-Extract Method:
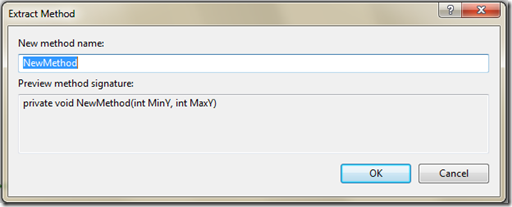
Enter a name for your refactor code:
You will get a method call in your OnUpdate methods and you will get a method with the name you gave it:
Code Snippet
- private void SpritePostionSpeed()
- {
- /***************Code Added Begin***********************************/
- int MinX = 0;
- int MinY = 0;
- int MaxX = SharedGraphicsDeviceManager.Current.GraphicsDevice.Viewport.Width - holderTexture.Width;
- int MaxY = SharedGraphicsDeviceManager.Current.GraphicsDevice.Viewport.Height - holderTexture.Height;
- // Check for bounce.
- if (spritePosition.X > MaxX)
- {
- spriteSpeed.X *= -1;
- spritePosition.X = MaxX;
- }
- else if (spritePosition.X < MinX)
- {
- spriteSpeed.X *= -1;
- spritePosition.X = MinX;
- }
- if (spritePosition.Y > MaxY)
- {
- spriteSpeed.Y *= -1;
- spritePosition.Y = MaxY;
- }
- else if (spritePosition.Y < MinY)
- {
- spriteSpeed.Y *= -1;
- spritePosition.Y = MinY;
- }
- /***************Code Added End***********************************/
- }
Now add code to the OnDraw method:
Code Snippet
- private void OnDraw(object sender, GameTimerEventArgs e)
- {
- SharedGraphicsDeviceManager.Current.GraphicsDevice.Clear(Color.CornflowerBlue);
- // TODO: Add your drawing code here
- /***************Code Added Begin***********************************/
- SharedGraphicsDeviceManager.Current.GraphicsDevice.Clear(Color.Black);
- // Draw the sprite
- spriteBatch.Begin();
- // Draw the rectangle in its new position
- spriteBatch.Draw(holderTexture, spritePosition, Color.White);
- spriteBatch.End();
- /***************Code Added End*************************************/
- }
If you run your program, not much happens, just a black screen. See the next blog for the XAML code.


