Exam Guide 70-511: SuperSimpleBinding
Windows Forms or WPF. Rebecca, the manager wants to try out WPF, but CRO doesn’t agree. (And this may seem like a repeat, but I am using the Comic Chat to make my point)
CRO hasn’t kept up with the latest technology, although CRO is good at slamming out code, he ignored XAML and DataBinding. Armando, who is a nice guy, also kept up with the latest technology, which is why he wears a beret.
 Armando and CRO initially reviews the existing code base for tested and proven code. CRO knows that there is a module that fits their requirements, so this saves enough time for Armando.
Now Armando has enough time to help CRO find out more about XAML.
CRO and Armando review code on the Team Foundation Server, finding a class module that has been tested and ready for quality control. If they can use this class module, then it will save a bunch of time.
Once they find the reusable code, now they will need to work on the XAML.
Armando, being a nice guy, decides to start CRO off with a really simple binding example that he found at:
https://msdn.microsoft.com/en-us/library/aa480224.aspx
So they will come back to the management tool. Which also includes a discussion that uses a collection, which is interesting, but first Armando knows that CRO needs to come up to speed so he doesn’t get lost.
Here is the XAML, it binds to data using the ObjectDataProvider, one of the better explanations of the difference
Armando also discusses the various lines:
CRO, first of the line:
<Window x:Class=”GleamingXAML.MainWindows”
This line is used to connect with the code behind, which is a partial class that connects the C# with the XAML. Changing the Class name will cause the “Initialize Component” to get a squiggly line under it.
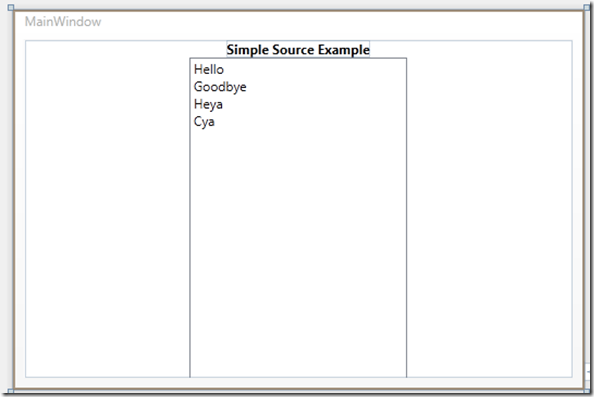
Let’s start with the XAML. In this XAML we are using a StackPanel, a TextBlock and a ListBox:
 <Window
         x:Class="MyString.MainWindow"
         xmlns="https://schemas.microsoft.com/winfx/2006/xaml/presentation"
         xmlns:x="https://schemas.microsoft.com/winfx/2006/xaml"
         xmlns:local="clr-namespace:MyString"
         Title="MainWindow" Height="350" Width="525">
     <Window.Resources>
         <ObjectDataProvider
                 x:Key="MyStringData"
                 ObjectType="{x:Type local:MyStrings}" />
     </Window.Resources>
     <StackPanel>
         <TextBlock
                 HorizontalAlignment="Center"
                 FontWeight="Bold">
       Simple Source Example
         </TextBlock>
         <ListBox
               Name="theListBox"
               Width="200"
               Height="300"
               ItemsSource="{Binding Source={StaticResource MyStringData}}"
         />
     </StackPanel>

 </Window>
Once you have put this code in your XAML Editor, you may see some blue squiggly lines, press F6 and this will build the app, usually this will make the blue squiggly lines disappear.
Now you will need a class named MyString, I added a class using the “Add” Class, and give the class module the name of MyString.CS.
Then in your class module add the following code:
 using System;
 using System.Collections.Generic;
 using System.Linq;
 using System.Text;

 namespace MyString
 {
     class MyStrings : List<String>
     {
         public MyStrings()
         {
             this.Add("Hello");
             this.Add("Goodbye");
             this.Add("Heya");
             this.Add("Cya");
         }
     }
 }
Your XAML Design environment should look like the following:
