
Introducing Azure DevOps Project
In today’s world, organizations need to innovate and get to market faster. This requires learning latest technologies, using them in your product and deploying at a faster pace.
Adopting Azure is one such scenario. Existing on-premise apps are getting migrated to Azure and new applications are getting developed to take advantage of Azure services. But there are multiple challenges that can slow down the learning and implementation. For example, which Azure Resource to use, how to create and configure it, how to deploy an app to the newly created resource. The deployment steps themselves differ based on the choice of Azure resource and the framework used for developing your application. Similarly, for getting your application in the hands of customers faster you need a DevOps pipeline and a setup to monitor the app.
We are happy to announce the public preview of Azure DevOps Project. Azure DevOps Project helps you launch an app on an Azure App Service of your choice in a few quick steps and set you up with everything you need for developing, deploying, and monitoring your app. Creating a DevOps Project provisions Azure resources and comes with a Git code repository, Application Insights integration and a continuous delivery pipeline setup to deploy to Azure. The DevOps Project dashboard lets you monitor code commits, builds and, deployments, from a single view in the Azure portal.
Key benefits of a DevOps Project:
- Get up and running with a new app and a full DevOps pipeline in just a few minutes
- Support for a wide range of popular frameworks such as.NET, Java, PHP, Node, and Python
- Start fresh or bring your own application from GitHub
- Built-in Application Insights integration for instant analytics and actionable insights
- Cloud-powered CI/CD using Visual Studio Team Services (VSTS)
Walkthrough When setting up a new DevOps project, you are first presented with an option to either choose from a set of sample apps developed by using .NET, Node.js, PHP, Python, Java or bring your own code.
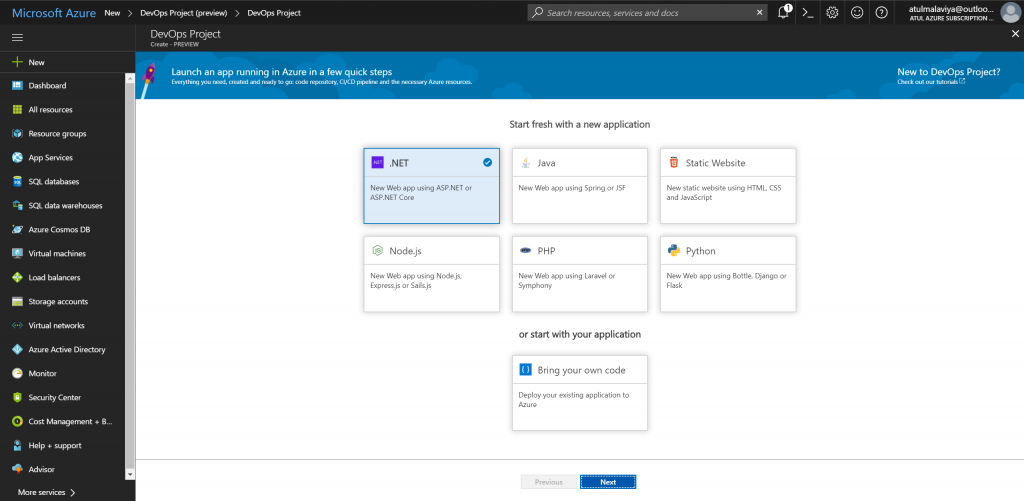
You can choose a sample application in the framework of your choice. For example, you can choose either a simple Node.js application or an app developed in Express.js which is a popular web framework for Node.js.
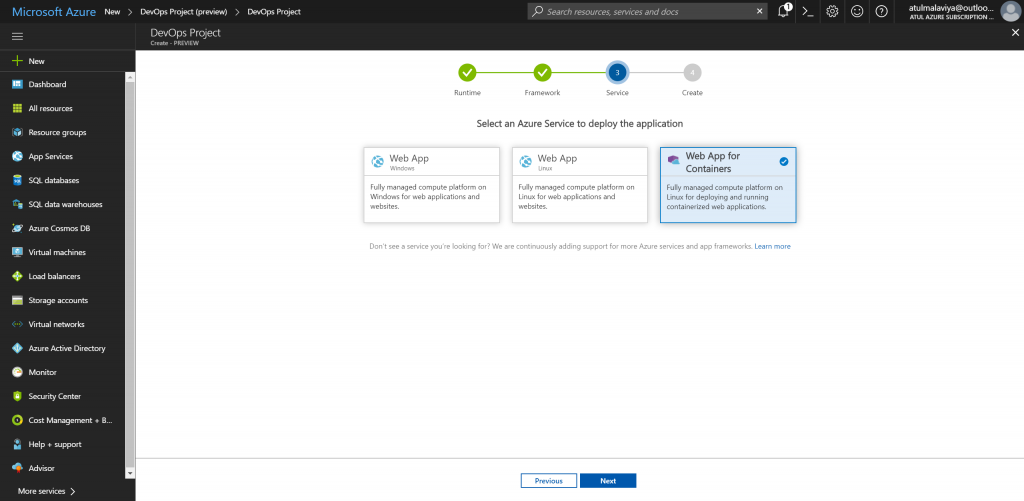
The next step is about selecting the Azure service to which you want to deploy the application. At the moment, we support Web App (both Windows and Linux) and Web App for Containers. We are continuously adding support for more Azure services and app frameworks and soon you can expect to see support for Virtual Machines and Container Service.
Once you have selected the Azure Service it is time for the last step where all a user needs to enter is the Azure DevOps Project name. All other fields are auto-filled with the right default values. If needed, you can change the defaults for both VSTS as well as Azure. For example, you can choose to use an existing VSTS account or create a new VSTS account in a region of your choice. Similarly, you can change Azure settings like subscription, pricing plan, Web App name, the location of Web App etc.

Validations are done to make sure right values are entered and failures at a later point are avoided.
Behind the scene By completing a few quick steps, now you have a DevOps Project which includes:
- Git repository with application code. You can start building your application right away by cloning the application code locally and using an IDE of your choice
- The necessary Azure resources. For example
- An Azure DevOps Project
- Web App for Containers or Web App on Windows
- Application Insights
- Azure Container Registry
- Automated CI/CD pipeline
- Application deployments will be done through continuous integration/continuous deployment (CI/CD) capabilities of Visual Studio Team Services.
- With an auto-generated and fully integrated CI/CD pipeline, your apps are updated each time your source code changes.
- The right CI definition to build an application written in the framework of your choice. For example, an Express.js application which runs tests, updates npm packages and publishes the artifact.
- CD definition which deploys to Azure service you selected.
- Complete end to end traceability from code change to deployment. For example, if a bug is fixed you can track what code change fixed the bug and when that code change got deployed to production.
- Application Insights integration for monitoring your application to:
- Help you diagnose issues and
- Understand how application is getting used by your end customers
After the setup is complete you can navigate to the DevOps Project Dashboard by using the Azure portal notification.
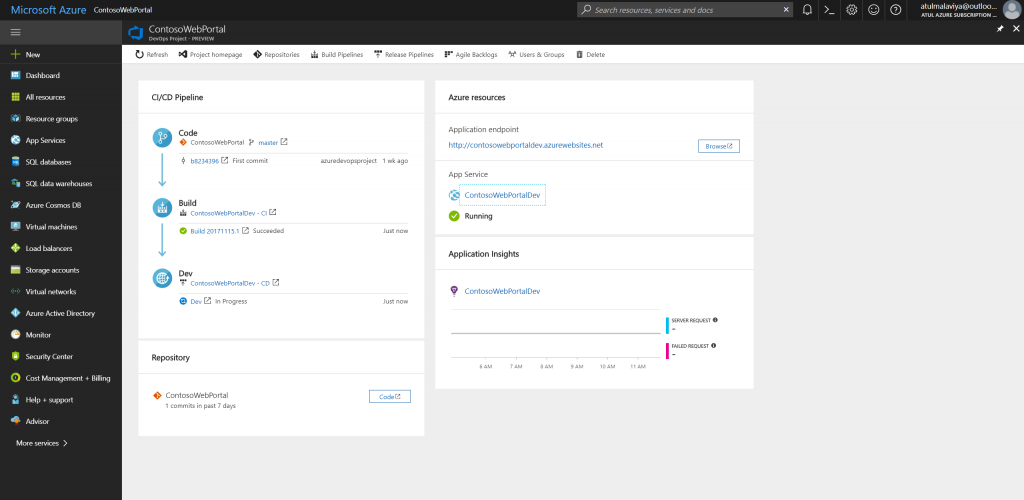 From the DevOps Project dashboard, you can monitor your CI/CD pipeline, Application Insights data and navigate to the relevant Azure or VSTS resource.
Grow-up scenarios With the creation of Azure DevOps project now you have a VSTS Project with a fully automated Continuous Delivery pipeline as well as all the required Azure resources. You can now use this VSTS account to:
- Customize your build and release pipeline – ex. add a test environment to your pipeline to validate before going to production
- Grow up with database deployment support
- Use pull requests to manage your code-flow & keep your quality high
- Track your projects backlog and issues right along with your application
The Azure DevOps Project aims to significantly lower the learning curve and make it easy to create an Azure resource with a working app deployed by using a DevOps pipeline, all in just a few minutes. In the next blog post in the Azure DevOps Project series, we will talk about the Bring your own Code feature.
Get started by creating Azure DevOps Project now. To learn more refer Azure DevOps Project documentation.
 Light
Light Dark
Dark
0 comments