
Integrating Smoke Tests into your Continuous Delivery Pipeline
We’re really glad to have Abel Wang help us out for #SpringIntoDevOps with this awesome blog contribution about verifying whether your deployment finished successfully by integrating smoke tests into your pipeline. Thank you Abel! — Ed Blankenship
Having a Continuous Integration (CI) and Continuous Delivery (CD) pipeline in Visual Studio Team Services enables us to build and release our software quickly and easily. Because of the high volume of builds and releases that can occur, there is a chance that some of the releases will fail. Finding these failures early is vital. Using integrated smoke tests in your CD pipeline is a great way to surface these deployment failures automatically after each deployment.
There are two types of smoke tests you can run. Functional tests where you write code that tests which verifies your app is deployed and working correctly, and automated UI tests that will actually exercise the user interface using automated user interface test scripts. Both these types of smoke tests can be run in your CD pipeline using the Visual Studio Test task.

The Visual Studio Test Task can run tests using multiple testing frameworks including MSTest, NUnit, xUnit, Mocha and Jasmine. The task actually uses vstest.console.exe to execute the tests. For this blog post, I’ll be using MSTest, but you can use whatever testing framework you want with the correct test adapter.
Using MSTest, it’s very simple to create smoke tests. At the end of the day, tests in MSTest (or any of the other testing frameworks) are just chunks of code that is run. Anything you can do with code can be part of your smoke tests. Some common scenarios include:
- hitting a database and making sure it has the correct schema,
- checking if certain data is in the database,
- hitting a service and making sure the response is correct,
- hitting URLs and making sure some dynamic content is returned back
Automated UI tests can also be done using MSTest (or another testing framework) with Selenium or Coded UI or whatever automation technology you want to use. Remember, if you can do it with code (in this case C#) then you can get the Visual Studio Test task to do it. For this blog, we will be looking at creating automated UI smoke tests.
The first thing we need to do is make sure your smoke test project is part of the solution that gets compiled in your automated build. In this example, I have a solution that includes a web project, a MSTest project used for my smoke tests and some other projects.

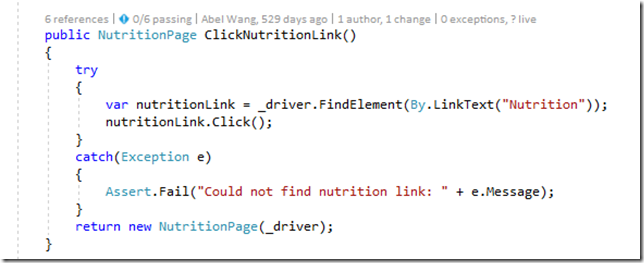
For the automation scripts, I used Selenium with the Page Object pattern where I have an object which represents each page of my app and each page object has all the actions you can do on the page as well as the asserts that you can do on the page. This creates some super clean smoke tests.

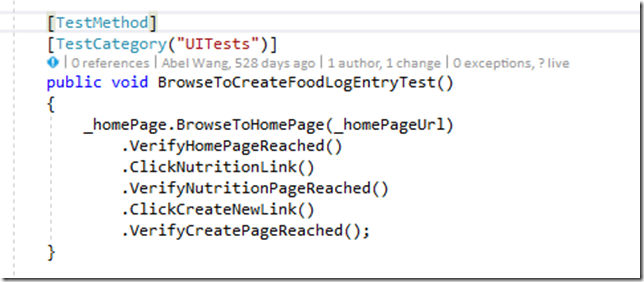
Make sure your build compiles your test project and the test project’s .dll is one of the build artifacts. For this example, I set up my release steps to do the following:
- Deploy web app
- Deploy database schema changes
- Massage my configuration files so my Selenium tests hits my Dev environment and uses Google Chrome as the browser
- Add release annotations for Application Insights
- Run Selenium Tests

Setting up the Visual Studio Test task in the CD pipeline to run my automated UI smoke tests using MSTest is straight forward. All it requires is setting some parameters.

For detailed descriptions on all the parameters you can set for the Visual Studio Test task, check out https://github.com/Microsoft/vsts-tasks/blob/releases/m109/Tasks/VsTest/README.md. In my example, I am running tests contained in any .dll that has the word test in it. I’m also filtering and only running tests that are in the TestCategory=UITests. You have lots of options for how you want to categorize and structure your tests.


Automated User Interface Smoke Tests
Automated UI tests require a private VSTS build/deploy agent running in interactive mode. If you have not ever setup an agent to run interactively, there is a great walkthrough for installing and configuring agent for interactive mode. Alternatively, you can actually run these same smoke tests using phantomjs (headless) which will work with the hosted agents in VSTS. To run my smoke tests using phantomjs, just change the environment variable Token.BrowserType from chrome to phantomjs.

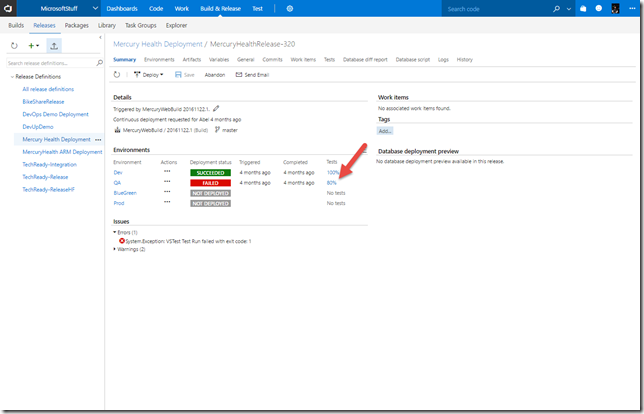
Now, when a release is triggered, after deploying my web app and database, I run my set of smoke tests using the Visual Studio Test task and all results are automatically posted back to the release summary and to VSTS.

Smoke Tests for Mobile Continuous Delivery
The Continuous Delivery system in VSTS is so flexible, we can even configure it to run smoke tests in complex mobile scenarios. In the following example, I have an app that consists of a website, multiple REST API services, a back-end database and a mobile app. My release pipeline consists of:
- Create or update my Azure Resource Group from an ARM template
- Deploy Web App and Services
- Deploy database schema changes
- Do a web performance test
- Run some Selenium Automated UI tests for smoke tests against the web site and services
- Deploy my mobile app to my Dev Testers group using HockeyApp
- Deploy and run my smoke tests against my mobile app using Xamarin.UITests in Xamarin Test Cloud using the Xamarin Test Cloud Task

Using smoke tests as part of your CD pipeline is a valuable tool to help ensure your deployment, configuration and resources are all working. Release Management in Visual Studio Team Services is fully configurable and customizable to run any type of smoke tests that you want as part of the deployment steps. The source code for the examples in this blog are in GitHub here.
Abel Wang Senior Technical Product Marketing Manager, Visual Studio Team Services
 Light
Light Dark
Dark
0 comments