
Get the most out of your PRs with Branch Policies
Pull requests have been widely accepted as a best practice for teams using Git to peer-review code changes. Peer reviews are a great practice for discussing how to improve code and for spreading knowledge about a codebase amongst team members. Contrary to popular belief, code reviews are not particularly good at finding bugs even if that’s what developers expect from their code reviews.
So then, how can you ensure you are finding bugs before they’re introduced into your codebase while still ensuring you have the right people reviewing? Branch policies can go a long way to helping.
Require peer reviews
The first step to protecting the quality of your code base is to require peer reviews. Direct contributions to the mainline that aren’t reviewed can result in costly build breaks and other bugs. You can protect your mainline with the branch policy to require a minimum number of reviewers.
Start on the Branches page, and find your mainline branch (e.g. master, develop). On the context menu, you’ll see an option to configure Branch policies.
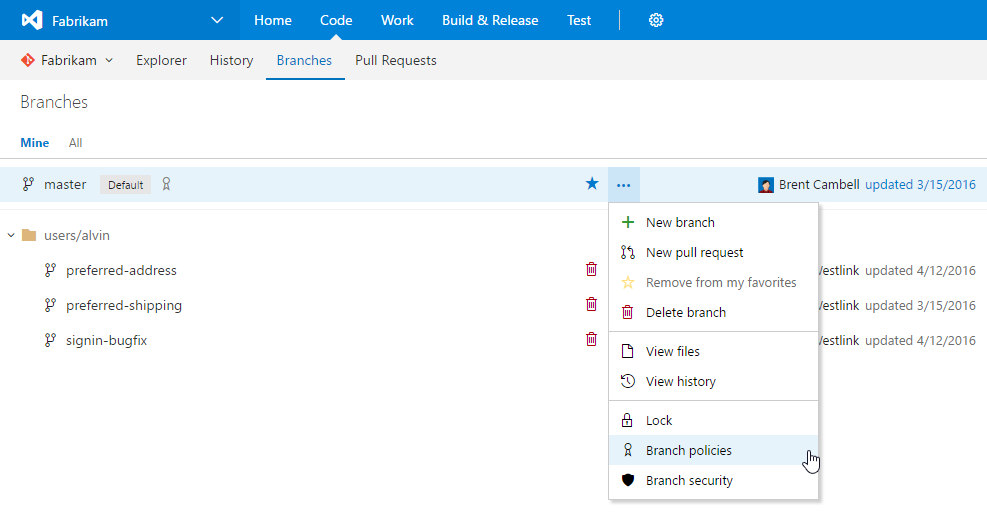
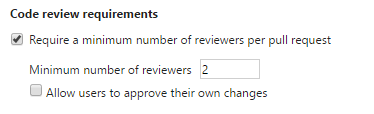
Clicking this option will take you to the policy configuration UI for the selected branch. Under the Code review requirements, check the first box to require all changes going into the branch to require a PR. You’ll be able to specify how many reviewers you want to require (2 is a good number) and whether or not developers can approve their own reviews.
Clicking save will apply the policy. Once the branch has the policy applied, you’ll see that it gets marked with a badge in the Branches page.
![]()
Anyone that tries to push directly to the branch will be blocked and will see a message informing them about the requirement to use pull requests.
! [remote rejected] master -> master (TF402455: Pushes to this branch are not permitted;
you must use a pull request to update this branch.)
error: failed to push some refs to 'https://account.visualstudio.com/DefaultCollection/_git/MyRepo'
Require specific reviewers
To go even further with the code review requirements, you can add policies to automatically include and require approval from specific reviewers when specific files change. On the policy configuration UI, click on the Add a new path link to add a reviewer requirement for a path.

Enter in the path you want to require specific reviewers. Note, you can add multiple paths delimited by a semicolon, or even file types using wildcards (i.e. *.cs). Under reviewers, you can add the users and/or groups you want to require.

When adding groups, only one member of that group will be required to approve on behalf of the group. If there are multiple users and/or groups listed, each of the listed reviewers will be required to approve. In the above example, Alvin and someone from the Fabrikam team will be required to approve any PR that modifies a file under /FabrikamWeb. In general, using groups is probably a better practice than listing specific individuals – that way, people won’t be blocked when a reviewer is out sick or on vacation.
As you probably expect, you can add as many paths as needed, and any PR that changes files that are identified in policy will require signoff from all of the required reviewers.
You might also wonder about the Required and Enabled checkboxes. Required turns the list of reviewers into a suggestion, rather than a requirement. Those reviewers are still added automatically, they just won’t block completion of the PR. In practice, this is good way to encourage the right reviewers and take the burden off of the author from needing to find the best reviewers. Enabled is just a quick way to turn on and off a policy without deleting it – very useful when testing out configurations.
Automatically build pull requests
Reviewers are great for spreading knowledge and generally improving code, but what about preventing build breaks? That’s where the build policy comes in.
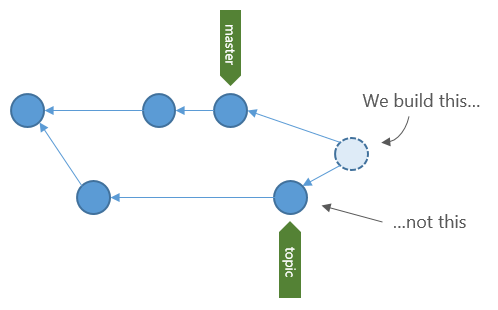
Not only does the build policy allow you to build the changes of the new code being added, it builds the result of the merge with the target before the merge is actually created. So, not only will you know that the changes build independently, you’ll know that they build on top of the latest changes in the target. I think a picture always helps explain what’s going on here.
Like the other policies, the build policy is configured from the policy page.
Check the box to enable the build policy. This will require that you choose an existing build definition for the changes. In most cases, the build definition you want to use for your PR builds is the same as the CI build for the protected branch. Optimizations can certainly be made, for example, omit steps to publish build drops, symbols, and other build artifacts. Running automated tests and code analysis in the PR build are also a good ideas, but it might be necessary to pare down the test suite to ensure high throughput. Focus on breadth of test coverage rather than depth.
Handling updates to the source and target branches
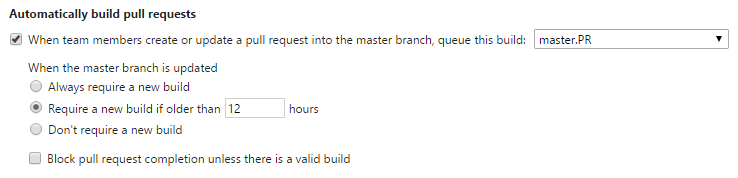
Once the build definition is chosen, the conditions for triggering builds must be set. Any PR into a branch protected with a build policy will trigger a build when the PR is created or the source branch is updated with new code. But what happens when the target branch changes? The build policy has several options for how to handle these additional PR updates.
- Always require a new build. This is the most strict policy option, requiring every update to pass the build. Using this option essentially eliminates the possibility of build breaks in the target, since every change is guaranteed to have built before being merged. In terms of developer workflow, it can also cause a lot of frustration. Consider three developers that are ready to merge their PR changes, all of which have successful builds. One of the three will merge their changes first, leaving the other two to rebuild their changes against the new changes in the target (i.e. the first developer’s changes). When those builds complete, again, one developer will merge first, leaving the second to rebuild, again.
- Require a new build if older than X hours. This option is a good for teams that want to ensure PR changes are being built, but are willing to accept some risk to minimize developer friction when merging PRs. When the target branch is updated, the build status is preserved for the specified time window (instead of failing immediately). This way, developers aren’t forced to rebuild when new changes are made to the target, but they also can’t accidentally merge in a PR that passed the build a month prior.
- Don’t require a new build. This is the most flexible option, requiring that a PR only ever builds when the source branch changes. This option also has the most risk of introducing build breaks, since a stale PR could be meeting policy despite not having been built for a long time.
If you’re not sure where to start, the second option is a good middle ground. If build breaks are a problem, decrease the time limit. If builds are expiring too soon, increase the time limit. This option also works well with the auto-complete setting.

Finally, the option to block PR completion can be used to make passing build a suggestion rather than a requirement for merging PRs. This can be a good option when initially enabling the build policy (so as not to block throughput if there is a problem with the built itself).
Learn more about build policies and how to configure them in the Team Services docs.
 Light
Light Dark
Dark
0 comments