Silverlight Splash Screen In Action
No, this is not “just another” article about implementing Splash Screens in Silverlight :)
Sure, I’ll briefly present the procedure, but what I really want to show is how easily we can assess, in our development machines, the splash screen the end user will experience.
Default Loading Experience in Silverlight
It is fairly easy to build our own splash screen in Silverlight but, surprisingly, sometimes even the best and highly polished Silverlight applications overlook this.
Without a customized splash screen the default loading experience is the well-known light-blue circle animation.

There’s nothing wrong with it but if you’re building an amazing, unique, matchless Silverlight application you’ll certainly want the loading experience to be up to it, blending nicely with your brand and design.
Custom Loading Experience in Silverlight
How to customize it then? - As promised, I’ll be concise here: A straightforward 1, 2, 3 steps.
To learn more about Silverlight Splash Screens please read this article: https://msdn.microsoft.com/en-us/library/cc838130(v=VS.95).aspx
Step 1 - Build your XAML Splash Screen and place it on your Web Site
Be as creative as you wish. Just don’t define a UserControl in your XAML - it won’t work. Use a Layout Control (as a Grid, StackPanel or Canvas) as the top element.
The XAML file must be outside the package. Otherwise, it won’t be available while the package itself is downloading.
Example: SplashScreen.xaml
Step 2 - Specify the custom Splash Screen in the Silverlight Plugin Host
Use following params options:
SplashScreenSource - URI of the XAML page that provides the visuals for the splash screen.
OnSourceDownloadProgressChanged – (Optional) Name of an event handler that is called at increments during the time that the Source is being downloaded.
OnSourceDownloadComplete – (Optional) Name of an event handler that is called once when the Source download is completed.
Example:
 <object data="data:application/x-silverlight-2," type="application/x-silverlight-2" width="100%" height="100%">
      (...)
      <param name="splashscreensource" value="SplashScreen.xaml" />
      <param name="onSourceDownloadProgressChanged" value="onSourceDownloadProgressChanged" />
      <param name="onSourceDownloadComplete" value="onSourceDownloadComplete" />
</object>
Step 3 - (Optional) Implement Javascript Event Handlers
If you want to programmatically change your Splash Screen when the source package is downloading, e.g. display the loading percentage, or act when the download is complete implement these handlers (create a .js file and reference it on your page or write the script within the HTML head tag).
Example:
 <script type="text/javascript">
        function onSourceDownloadProgressChanged(sender, eventArgs) {
            var slPlugin = sender.getHost();
            slPlugin.content.findName("LoadingText").Text =
                Math.round((eventArgs.progress * 100)) + "%";
        }

        function onSourceDownloadComplete(sender, eventArgs) {
            window.status = "Finished";
        }
</script>
Seeing it in Action
If you followed these instructions you should experience a loading sequence like this:

However, probably you won’t! That’s not because something is wrong, it just isn’t displayed because you’re most likely running it locally and your XAP package loads too fast. The XAML-based splash screen will only be showed if it exceeds a certain time threshold (approximately 0.5 seconds).
How can we test it then? How can we simulate what the end user will most certainly experience, from the other side of the world, with network latency and bandwidth constraints?
Fortunately, we won’t need fancy network tools to do it (unless we really want to simulate different network conditions – here we just want to be able to see the splash screen running). All we need is our “old pal” Fiddler (Fiddler is a freeware Web Debugging Proxy which logs all HTTP(S) traffic between your computer and the Internet).
How to Use Fiddler to Slow Down XAP Loading
To introduce some latency when the browser is downloading the package we should configure a Fiddler rule.
In Fiddler, select “Rules > Customize Rules...”
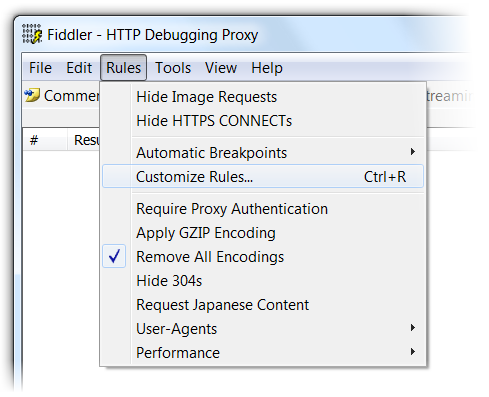
A CustomRules.js file will be opened. Here you should search for the OnBeforeRequest function and add a Session delay to your XAP file download. Don’t forget to save the file before testing.
Example:
 static function OnBeforeRequest(oSession: Session)
{
    if (oSession.uriContains("Load.xap")){
         oSession["ui-color"]="orange";
         oSession["ui-bold"]="true";
         //Delay received data by X ms per KB downloaded.
         oSession["response-trickle-delay"] = "2000";
    }
(…)
}
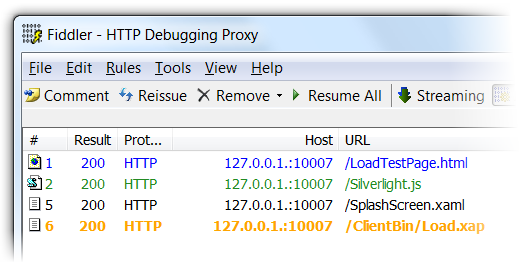
Here, for the Load.xap request, I’m setting the Fiddler request trace line to bold orange and introducing a 2000ms delay per KB downloaded.
Now, having Fiddler running, capturing traffic with this custom rule, we should be able to see our Splash Screen when browsing the Silverlight application.
Well… it depends! It will still not work if you’re using a local address or the Visual Studio Built-in Web Server, browsing https://localhost or https://127.0.1.1
The reason for this is that local addresses typically bypass any proxies and so Fiddler will not be able to monitor these requests.
Solution:
· Local addresses
Instead of using a local address use the Machine name or the local IP address.
This is, instead of https://localhost or https://127.0.1.1 use https://mymachinename or https://192.168.1.100 (your IP address).
· Visual Studio Built-in Web Server
Instead of using a local address use a hack: A dot suffixing 127.0.0.1 ! That’s right, access the application through https://127.0.0.1. ! Awkward? True, but works :)
Now Fiddler will be able to monitor these requests and the rule will do its work. You’ll see something like this:
And of course, as intended, you’ll be able to watch your custom Splash Screen in action!
Regards.