Air Draw
One of the long waited features of Silverlight was Web Camera and Microphone support.
This feature was welcomed with great enthusiasm and passion when Silverlight 4 Beta was unveiled at the Professional Developer's Conference (PDC) last November.
This is just one of the many new features SL4 comes with. A whole new world of possibilities is now available to web 2.0 enthusiasts. More than ever Silverlight is ready to receive your creative work and respond to your multifaceted business scenarios.
On this post I’ll explore some capabilities of the new Silverlight 4 WebCam and Mic device support when used together with the WriteableBitmap class, introduced with Silverlight 3.
Brief resume of usage
How to capture image/video from a WebCam with Silverlight 4 Beta
We start by instantiating a default Video Capture Device using a CaptureSource.
CaptureSource _cs = new CaptureSource();
_cs.VideoCaptureDevice = CaptureDeviceConfiguration.GetDefaultVideoCaptureDevice();
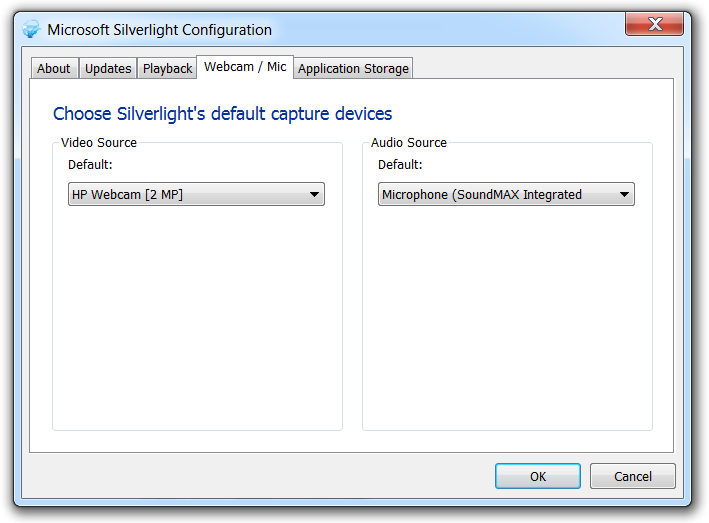
The default video and audio source is defined on Silverlight configuration screen
Before starting the capture we have to ask user permission to use his device.
if (CaptureDeviceConfiguration.AllowedDeviceAccess || CaptureDeviceConfiguration.RequestDeviceAccess())
User will receive the following prompt

Now everything’s set to start the capture.
_cs.Start();
Once we have our capture started we can
- Apply it to an object, as a VideoBrush
VideoBrush videoBrush = new VideoBrush();
videoBrush.SetSource(_cs);
rectangle.Fill = videoBrush;
- Or capture a still image, getting a WriteableBitmap
_cs.AsyncCaptureImage((WriteableBitmap bitmap) =>
{
});
We can stop the capture with
_cs.Stop();
Bitmap
Now that we have a WriteableBitmap with the live image “the sky is the limit”.
This class exposes a Pixels property which represents the 2D texture of the bitmap length in pixels.
We can reach any bitmap pixel using:
int pixel = bitmap.Pixels[y * bitmap.PixelWidth + x]
The Pixels array store pixels this way:

Each pixel on the array is represented by a 32 bit integer.
![]()
We can easily create a Silverlight Color object extracting each ARGB component from the int type using bit operations:
Color color = Color.FromArgb(
(byte)((pixel >> 24) & 0xff),
(byte)((pixel >> 16) & 0xff),
(byte)((pixel >> 8) & 0xff),
(byte)((pixel) & 0xff));
Inversely, we can define a pixel using:
int pixel = (color.A << 24) | (color.R << 16) | (color.G << 8) | color.B;
Having these principles set up I tried to build a small proof of concept: A drawing tool from a live image – AirDraw!
Since I know nothing about image recognition algorithms my attempt is very naïve but it fairly accomplish what I intended to explore.
If you wish to embrace Augmented Reality scenarios you need a real augmented reality library, not this tool, obviously :)
AirDraw Instructions
Use your mouse to select the color you wish to track from your webcam image.
To obtain good results use a pen with a small brightly colored cap, easily distinguishable from any of your background colors. You can use a small colored paper on your finger too, or on a pencil, like I did.
Double click, or click color picker on bottom right screen, to start drawing.
Click again to select a new color to track.
Selecting target color
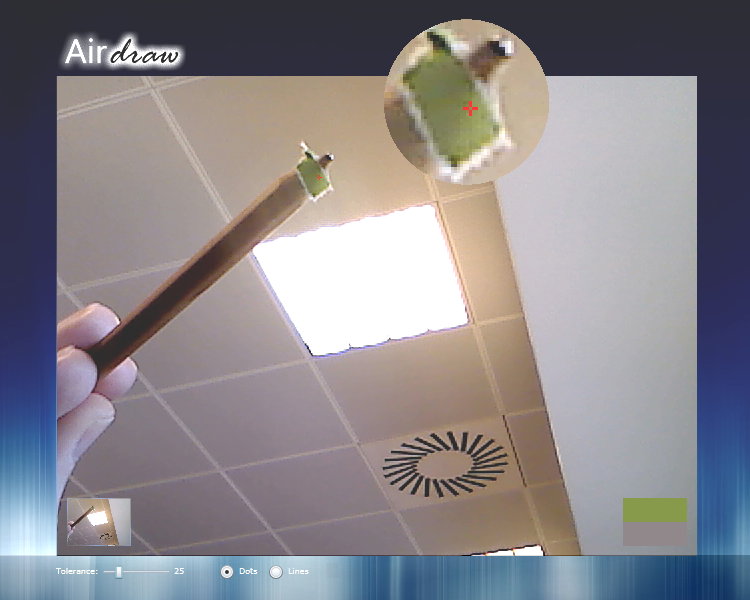
Drawing

Demo
See it running here: AirDraw. You need Silverlight 4 Beta… and a WebCam, of course ;)
Download the source code here: AirDraw SourceCode.
As I said before this is just a proof of concept. Please restrain your expectations.
Microsoft Silverlight 4 Beta Runtimes are available here: Windows Runtime ; Mac Runtime
Enjoy.