All About Listbox, Button Drop Lists, and Drop Down Lists

It seems like a trivial subject for our dedicated readers but we had a new customer who is just learning Dexterity and he was having trouble recently trying to select items out of a ListBox. And just today the issue came up about Drop Down Lists (DDL) and getting the value selected using VBA in a different case. So this seemed like a good time to put this together.
One thing to note is that while I refer to ListBox here in the example, the same rules apply to a Button Drop List (BDL), Drop Down List (DDL), or ListBox (LB).
So in this case, the customer had 2 listbox controls.
On the left one, he would fill the list with his items from wherever the data comes from.
The intended functionality is that the user would select one and push the button which would remove it from the left Listbox and insert it into the right Listbox to be processed at some point.
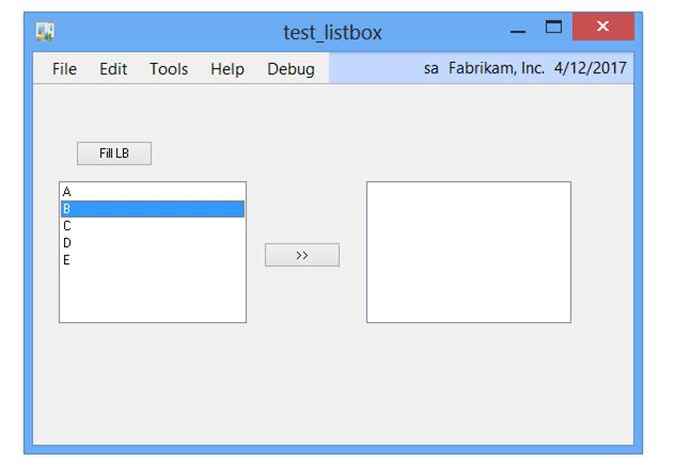
In my example, the "Fill LB button" adds 5 items in reverse order to ListBox0 but since the listbox is marked as “Sorted” in the static items they show in Sorted order. I added the items for this in reverse order so you can see that the actual “fill” order doesn’t matter.
Fill Button Code Example
{I'll add items E-A in reverse order to a sorted listbox on my window. If you go to the Static items and open it,
you'll see the Sorted Checkbox is marked by default}
clear '(L) LeftListBox,'(L) RightListBox';
add item "E",1 to '(L) LeftListBox';
add item "D",2 to '(L) LeftListBox';
add item "C",3 to '(L) LeftListBox';
add item "B",4 to '(L) LeftListBox';
add item "A",5 to '(L) LeftListBox';
redraw '(L) LeftListBox';
At the end of the code, I redraw the listbox with the redraw statement. Otherwise the data would remain in the order I added it even with the Sorted checkbox marked.
The reason for this is because if Dexterity would redraw the list after every add/remove, it would impact performance on large lists automatically redrawing every time. And so it is left for the developer to redraw the list manually when they are finished operating on the listbox.
Also notice after the letter I added, there is a number - 1,2,3,4,5. This is the “item data” that is associated to the visible item in the ListBox and isn’t displayed to the end user. It is not the “position” of the data in the listbox – it is just extra data associated with the line. I chose to use a different number than the position in the list to make it interesting.
Why would we use the item data? Isn’t position good enough? Or the letter “B”, “C” etc?
We would use the item data if we have a list of items but couldn’t count on any specific item being in any specific position. We could perhaps use the name of the item on the selected line, but then you run into the possibility of translation issues whereas the item data (the long integer) shouldn’t ever be changed and would be the same regardless of the position of the item.
A good example of this is the SOP Entry Actions Button. We fill the actions according to the document & business logic for that document. Because there could be different items in the list in different positions, we instead use the item data of the Button Drop List (BDL) as the “action” ignoring the position of the selected item or the label used in the UI.
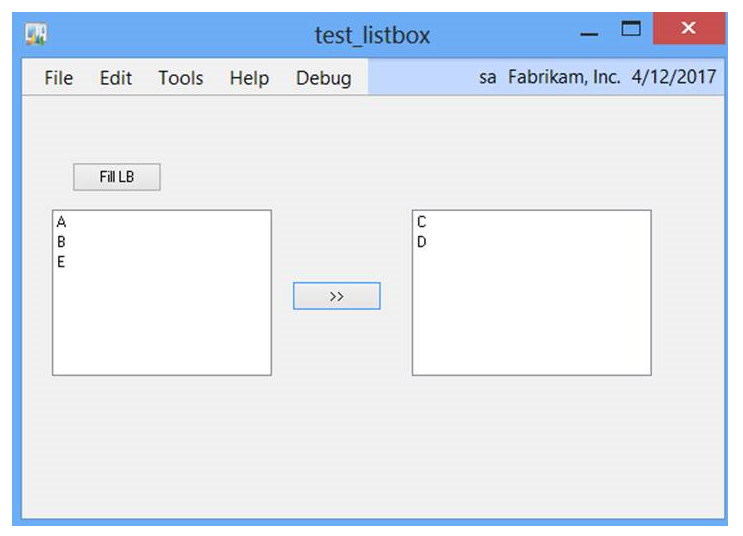
In the screenshot above, we see the results of me selecting an item on the Listbox of the left and hitting the >> button to move it to the right Listbox.
Code Example for the >> Button
local long LBSelectedVal;
local long item_data;
local string sName;
{Get the row of the selected item, this is a 1 based list in Dexterity unlike C#}
LBSelectedVal = '(L) LeftListBox';
{if nothing selected, give an error and stop.}
if LBSelectedVal = 0 then
warning "Select an item!";
abort script;
end if;
{get the data of the row}
item_data = itemdata('(L) LeftListBox','(L) LeftListBox');
{and the name of the item}
sName = itemname('(L) LeftListBox','(L) LeftListBox');
{now remove the selected row}
delete item LBSelectedVal from field '(L) LeftListBox';
{and add it to the 2nd LB along with the item_data}
add item sName, item_data to '(L) RightListBox';
{make sure that the items in the 2nd listbox draw correctly. Comment out if we want to leave
the items in the order selected}
redraw '(L) Listbox1';
It is important to note that Dexterity is the only tool to able to do all of this natively.
From a VBA or VSTools perspective, all we know is the position of the item selected. So in the first screenshot, we see I have “B” selected which is the 2nd item in the list.
From either vba or vstools, that is the only thing I can get from the list.
So given the following GP VBA code when the 2nd item in the listbox is selected (as the first screenshot shows)
VBA Code Example
Dim I as integer
I = ListBox0
Msgbox str(i)
The Message Box would show the value “2”.
The syntax of the above using C# in VSTools code would be slightly different but would also return “2”.
From VBA or VSTools we cannot:
- Add items to a listbox
- Remove items from a listbox
- Change items in a listbox
- Get the “item data” for an item in a listbox
- Get the name of an item in a listbox
In other words, we can’t do much with a list outside of Dexterity– only get the selected position of an item.
This lack of functionality makes it very difficult when using VBA or VSTools when list types are being used unless the list is “static” and doesn’t change.
I’ve attached a form you can import into your test dictionary to view the Dexterity code directly and test as you like.
As I noted previously, Dexterity is the only language that can natively do most things with our listbox. That said, from other articles in the this; our readers should be quite familiar with using the Continuum API. Since the API allows you to execute any sanScript statement - you could do all of this via Continuum as well.
Perhaps I'll make that the topic of a future article.
Patrick