How to calculate Aging Buckets based on documents shown on a Receivables Statement

I had a case a couple of weeks back, where the customer wanted to filter the transactions shown on a Receivables Management Statement. There was one type of transaction that they did not want included on the statements sent out to the customers. The transactions to be excluded could be identified by a particular value on the Description field on the transaction.
The partner had already modified the report to add a Restriction onto Report Definition window to exclude the transactions based on the Description, for example:
- RM_Statements_TRX_TEMP.Description <> "<Exclude Me>"
This worked fine to exclude the transactions, but left the report with one problem.... The totals in the aging buckets still included the now excluded transactions.
This is because the values for the aging buckets had been either read from the customer summary record or calculated when then report was generated (I could look at the code to confirm which, but that would not resolve the issue). Either way, the aging buckets would not have excluding the transactions removed by our added restriction.
The solution to our issue would be re-calculate the aging buckets from the data in the report and ignore the values from the table. To achieve this we need to use a technique that is a useful one to add to our collection.
This technique can be used to manipulate multiple single records of data (with a column identifier and amount) into a single summary record with multiple columns. I like to think of this as converting "vertical" data in "horizontal" data.
The first thing we need to to make sure we can access the required source data. For this example, we need the column identifier (Aging Bucket) and the amount (Current Trx Amount).
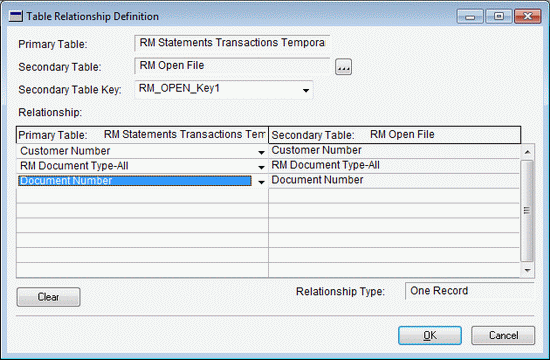
To get to these fields from the RM Open File (RM_OPEN) table we need to create a relationship from the RM Statements Transaction Temporary File (RM_Statements_TRX_TEMP). Using the Tables >> Tables selection from the Toolbar, locate the RM_Statements_TRX_Temp table and click Open. Then click Relationships and click New and add the relationship shown below. Click OK on the Table Relationship Definition and then Table Definition windows to save the change.
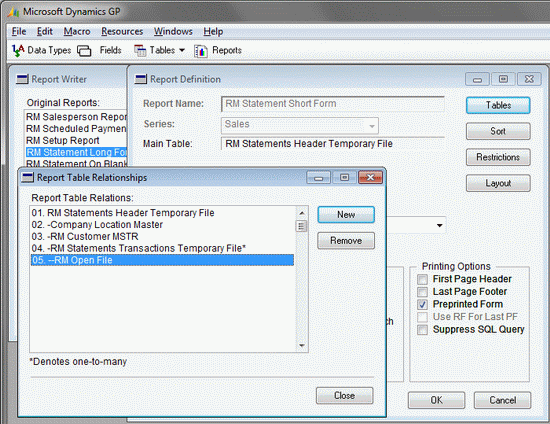
Now back on the Report Definition we can click Tables, select the RM Statements Transactions Temporary File* line and click New. Select the RM Open File and click OK. You should have the window shown below. Finally click Close. As a best practice, click OK on the Report Definition and re-open it, to make sure the changes have been saved.
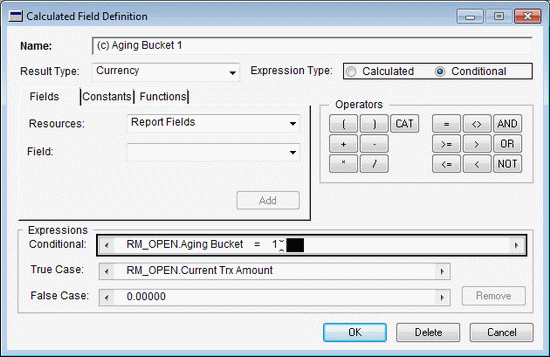
Now that we can access the data, we just need to create some conditional calculated fields. The fields return the Current Trx Amount when the Aging Bucket value matches. You will need to create a field for each aging bucket required with the last bucket using RM_OPEN.Aging Bucket >= rather than RM_OPEN.Aging Bucket =. See the example below:
Once completed, these calculated fields can be dragged onto the report layout into the footer section to replace the original fields. Double click on each one to change the Display Type from Last Occurrence to Sum.
That's all folks!!!
The calculated fields break the transaction data into columns based on the Conditional expression and then the Summed fields on the footer total up the amounts in each column.
Attached to the bottom of this post a package of a modified RM Statement Short Form set up with 4 (out of a possible 7) aging buckets.
Hope you find this method useful.
David