RW - Making a One-to-Many Table Relationship behave as One-to-One
 One of biggest issues people have with the Microsoft Dynamics GP Report Writer is not being able to create the desired table relationships from tables on the report to other tables so that the other tables can be added to the report and behave correctly.
The technique below explains how to get a one-to-many table relationship to behave as a one to one relationship. This is assuming that you can get the relationship created but have been unable to match all the fields to limit the relationship to one-to-one. We are also assuming that you are able to add the table to the report and are not limited by a pre-existing one-to-many relationship at the same level on the report.
The best method to explain the technique is with an example. I want to show the Tax Detail information added to a General Ledger Journal Entry transaction using the Tax Entry window (needs to be turned on in company options) on the General Posting Edit List report.
The Tax information is stored in the glTaxWork (GL10300) General Ledger Tax Work table. The Journal's Distribution Lists are being printed from the GL_Allocation_Register_Work (GL50101) Allocation Amounts Temporary table. So we need to create a one-to-one relationship from the GL_Allocation_Register_Work table to the glTaxWork table.
Theory: To create a one-to-one relationship you must select a key in the secondary table that does not allow duplicates AND must match all of the fields in the key. If you cannot meet both conditions, the Relationship Type with show as Multiple Records, meaning a one-to-many relationship.
Here are the steps:
- From Microsoft Dynamics GP, select Tools >> Customise >> Report Writer.
- Select Microsoft Dynamics GP and click OK.
- Click Tables and select Tables.
- Select the GL_Allocation_Register_Work and click Open.
- From the Table Definition window, click Relationships.
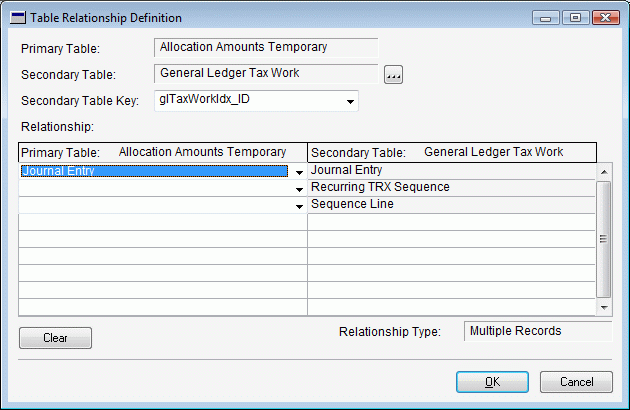
- From the Table Relationship window, click New.
- Using the Secondary Table lookup, select the General Ledger Tax Work table.
- Select the glTaxWorkIdx_ID as the Secondary Table Key.
- Match the Journal Entry field in the keys.
Note: We are unable to match any other fields, and so have to leave the relationship as one-to-many.

- Click OK. Close the Table Relationship window. Click OK.
- Click Reports to open the Report Writer window.
- Select the General Posting Edit List in the list of Original Reports and click Insert.
- Click Open to open the Report Definition Window.
- Click Tables to open the Report Table Relationship window.
- Select the Allocation Amounts Temporary table, and click New.
- Select the General Ledger Tax Work table and click OK.
- Click Close to close the window.
- Click Layout to open the Report Layout window.
- Expand the H3 section on the report.
- From the Toolbox, Layout tab, select the General Ledger Tax Work table.
- Drag the Tax Detail ID field into the expanded H3 section.
- Close and Save the Report Layout.
Note: If we printed the report at this stage it would print the H3 and body sections for each distribution multiple times duplicated by the number of tax lines for the journal entry. This is because we still have a one-to-many relationship. To limit the lines printed and restrict the behaviour to that of a one-to-one relationship we will add a report restriction.
- Click Restrictions to open the Reports Restrictions window.
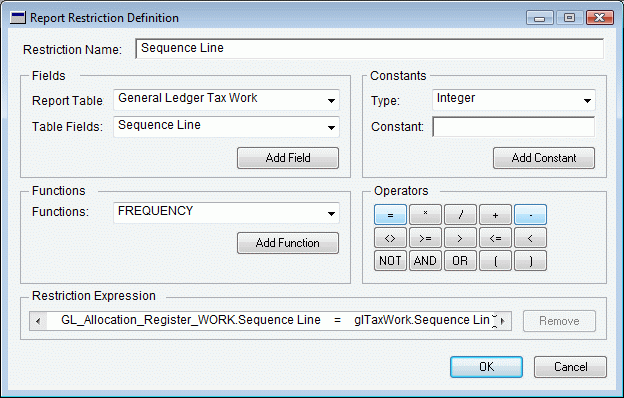
- Click New to open the Report Restriction Definition window.
- Enter "Sequence Line" as the Restriction Name.
- In the Fields section, select the Table as Allocation Amounts Temporary and the field as Sequence Line and click Add Field.
- In the Operators section, click = .
- In the Fields section, select the Table as General Ledger Tax Work and the field as Sequence Line and click Add Field.

- Click OK to close window.
- Close the Report Restrictions window.
- Click OK on the Report Definition window.
- From the menus, select File >> Microsoft Dynamics GP to return to the application.
- Adjust security settings to use the modified report.
The demonstration package of the General Posting Edit List report for v10.0 is attached to the bottom of this article.
Here are some reasons why you might not be able to create the relationship and add the table to the report. In these cases you would have to use alternative techniques:
- The tables are defined in different product dictionaries. While a third party product can see all the core Dynamics.dic tables, Microsoft Dynamics GP cannot see third party products and two third party products cannot each other.
- The Data Types for the linking fields do not match. This could be that the String fields are different keyable lengths or that one table is using a currency field and the other uses a integer field.
- The Data itself does not match. For example: Receivables Management Document Type numbers are different to Sales Order Processing Document Type numbers.
- Temporary Tables are being used which do not have the required fields to be able to create a relationship.
- You can create a one-to-many relationship, but cannot use the above method as there is already another table attached to the report at the same level using a one-to-many relationship (shown with an asterisk). As the report writer does not allow multiple one-to-many relationships from a single table, you will not be able to add the new table.
The following articles provide some other methods that might help in these situations:
Post a comment if this was helpful to you.
David