Layout Transitions - An Animatable WrapPanel
I've been playing around with RenderTransforms and decorators and such to make layout transitions, but for this WrapPanel, my goal was to introduce no additional UI elements, animations or transforms. I also wanted to use some easing equations to do some cool transitions, and separate that logic from the WrapPanel. I wanted the elements the be "live" while they were on the screen, and I wanted them to enter the screen in a nice fashion. I also wanted each element to animate individually. One of my earlier versions of this kept track of a single starting time for all animations, and it wasn't cool enough. Sometimes, it is important to be cool.
WrapPanels
A WrapPanel is a layout container that places its elements in rows. It fills up one row, then moves on to the next one. The logic isn't all that tough. What I wanted to do was to make the items move smoothly when the WrapPanel was resized, and also enter the WrapPanel from the upper left and move to their new position.
Below are some of the interesting bits of the panel.
Using a zero-duration Storyboard to simulate a per-frame callback
Not using animations was one of my requirements, since I wanted to use something other than linear interpolation. The AnimateableWrapPanel uses a zero-duration Storyboard to simulate a per-frame callback. Here's how that is done. In the constructor, an empty Storyboard is created and started.
public AnimatedWrapPanel()
{
// This sets up the per-frame callback that we use for animation.
_tick = new Storyboard();
_tick.Duration = new Duration(TimeSpan.Zero);
_tick.Completed += Tick;
_tick.Begin();
}
The Tick method does whatever I want to do each frame, and restarts the Storyboard.
/// <summary>
/// This tells the layout system to call Arrange on the Panel if there are any elements that
/// must be moved.
/// </summary>
private void Tick(object sender, EventArgs e)
{
// If there are still elements to be animated, make sure that ArrangeOverride will
// get called. Note that the InvalidateArrange may already have been called due to
// other operations, but calling it again does not hurt, and all of the work will
// be done in ArrangeOverride regardless of where the invalidation came from.
if (_animatingElements > 0)
{
InvalidateArrange();
}
// Restart the storyboard so we get called back on the next frame.
_tick.Begin();
}
This technique does not guarantee smooth animations. It is possible to overload the panel with too many elements for the framewrate to animate 100% smoothly, or maybe the rest of the app is doing so much work that the framerate slows down, but since I use the elapsed time to figure out where to put the elements, the animations will take the same amount of time on all machines. If there is too much going on in the panel and the app, on a low-end machine, the animation might be choppy, but will still finish in the specified time, or one frame longer if the timing is just off.
Using layout to "animate" the elements
I'm a little conflicted about this technique, but I have seen other people use it, so I thought I'd try it. It is a two stage process. The MeasureOverride call figures out where everything should go, and is the only place where the animations are started. This works because MeasureOverride will be called if the AnimatedWrapPanel changes size, or any of its children change size, or children are added or removed. So size changes, adding items etc. kicks off the animations. In ArrangeOverride, any element that is not where it is supposed to be is moved in that direction according to how much it should be done, and the interpolations. Here's what the ArrangeOverride looks like:
/// <summary>
/// A "normal" ArrangeOverride would just put things where they belong. What this one does
/// is to move the children towards their destinations according to the virtual animation
/// data that has been attached to each element. When they get there, the virtual animation
/// is turned off.
/// </summary>
protected override Size ArrangeOverride(Size finalSize)
{
DateTime now = DateTime.Now;
foreach (UIElement child in Children)
{
AnimatedWrapPanelAttachedData data = GetAnimatedWrapPanelAttachedData(child);
TimeSpan elapsed = data.GetElapsed(now);
if (elapsed < Duration || data.TargetPosition != data.CurrentPosition)
{
// The virtual animation is not done yet, so figure out how far along it is...
double progress = (Duration.TimeSpan != TimeSpan.Zero) ? Math.Min(elapsed.TotalMilliseconds / Duration.TimeSpan.TotalMilliseconds, 1.0) : 1;
// ...and what the next position is.
Point newPosition = BlendPoint(_interpolation, data.StartPosition, data.TargetPosition, progress);
child.Arrange(new Rect(newPosition.X, newPosition.Y, child.DesiredSize.Width, _rowHeights[data.Row]));
data.CurrentPosition = newPosition;
}
else
{
// This element is not animating, but it might have become invalid on its own, so it still
// needs to be arranged. The layout system will do as little as possible.
child.Arrange(new Rect(data.CurrentPosition.X, data.CurrentPosition.Y, child.DesiredSize.Width, _rowHeights[data.Row]));
if (data.IsAnimating)
{
--_animatingElements;
// This is the only place where IsAnimating is set to false. This turns off the virtual animation.
data.IsAnimating = false;
}
}
}
return finalSize;
}
Attached property bag
Rather than have a bunch of hash tables or something in the panel itself, I wanted to keep all of the state that I needed on the elements, which sounded like a job for attached DependencyProperties. However, I got tired of creating and modifying them as I changed my mind, and decided that it would be easier at design-time and more efficient at run-time if I had a single attached property that was actually a class that had a bunch of properties--an attached property bag. This would be efficient because I always used all of the properties for each element.
Interpolations using easing equations
Rather then hard-coding animations into the panel, or using a simple linear interpolation, I wanted to use pluggable interpolations. The interpolations take a double that indicates progress, where zero is "just starting" and one is "completed". They return a number (alpha) where zero refers to the start position, and one refers to the end position, although the number may be less than zero or greater than one. The general equation is:
alpha = fn(progress)
The linear interpolation is the simplest: it just gives returns the progress, i.e. alpha = progress.
In practice, the interpolations are used to blend the starting and target positions. Here's how the intermediate points are arrived at:
/// <summary>
/// Given an interpolation, the starting and ending positions and a number from 0-1 that represents how
/// far along the virtual animation is, calculate the new position.
/// </summary>
Point BlendPoint(Interpolation interpolation, Point from, Point to, double progress)
{
Point p = new Point();
double alpha = interpolation.GetAlpha(progress);
p.X = from.X + alpha * (to.X - from.X);
p.Y = from.Y + alpha * (to.Y - from.Y);
return p;
}
I used some standard interpolations, but it is possibly and easy to define your own, and then just plug them into the panel. I set up the interpolations with some default values that I thought looked nice, but it is possible to get quite creative.
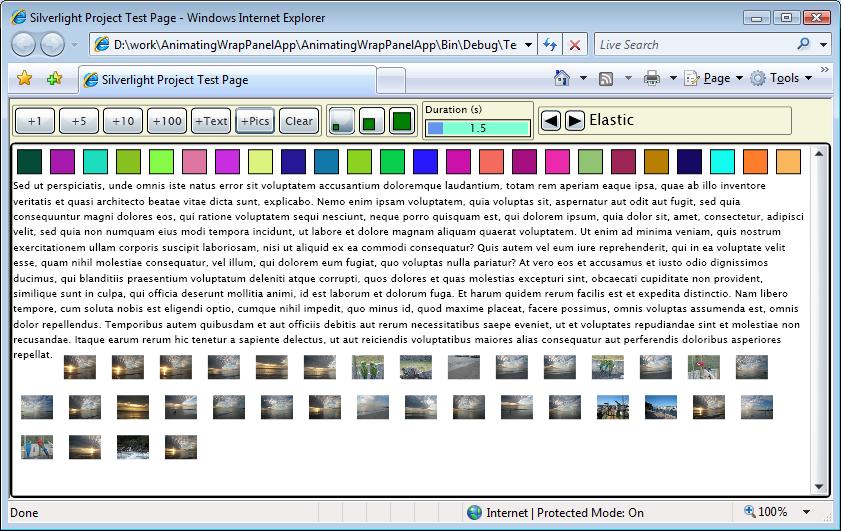
Using the demo app
This should be pretty self-explanatory, but you can add pretty, randomly-colored Rectangles, text and image thumbnails. Clicking on a Rectangle deletes it from the panel. You can also change the size of all of the children, select the duration of the animations, and the interpolation that will be used. Resize the browser to watch the UI move around. I had wanted to have UI to modify the interpolation parameters, but at some point, you have to stop polishing and move one. Shipping is the art of stopping. So that bit of UI is left as an exercise for the developer.
Update:
Karen Corby has posted a live version of my sample app, and a version of her FlickrViewr that she modified to use the AnimatingWrapPanel, here. I love how the images come in as they are downloaded.