Pixel Snapping - the Snapper Element
What is pixel snapping?
Snapping in general usually refers to allowing a property to take discrete as opposed to continuous values. In Silverlight, values such as Width, Height, Canvas.Left and Canvas.Top are of type double and not restricted to integer values, even though they refer to pixels. It is easy to consider how a 10 x 20 Rectangle, positioned at X=45,Y=100 is rendered. But how does a Rectangle with dimensions of 17.3 x 12.5 positioned at at 16.1, 20.3 get rendered? The answer, of course, is as an anti-aliased, ("fuzzy") line.
“Fuzzy” lines are caused by drawing on fractional pixels. This XAML snippet:
<Canvas>
<Rectangle Height="8" Width="8" Canvas.Left="10" Canvas.Top="10" Stroke="Black"/>
<Rectangle Height="8" Width="8" Canvas.Left="20.5" Canvas.Top="10.2" Stroke="Black"/>
</Canvas>
generates the following image (which has been zoomed in for clarity):
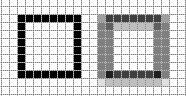
Both of the squares are 8 x 8 Rectangles. but the first one was drawn on whole pixels, and the second on fractional pixels. You can see how the rendering algorithm worked. The vertical lines of the "fuzzy" square, which were drawn at 20.5, were spread over two lines, and the color was distributed equally over both lines. The horizontal lines, which were rendered at 10.2, do not split the color evenly. The lines on top, which are closest to 10.2, are darker than the lines immediately below. I'm glossing over the details, but you get the idea.
Put the blame on layout (and text)
When you are responsible for positioning and sizing the elements on the Canvas, you are most likely to use integers for Canvas.Left, Canvas.Top, Width and Height, so you don't get fuzzy lines. My most common use of non-integers coordinates in that scenario is when I centered a TextBlock inside of a Rectangle to make a button.
Layout can make the problem of fuzzy lines worse, but in most cases it is worth it. The two big sources of fuzziness are centering elements (due to odd/even mismatches in Width and/or Height) and text layout, since text usually returns its DesiredSize in non-integer pixels. If other elements are aligned with text, e.g., a vertical StackPanel that contains a TextBlock header and then some Buttons, it is likely that the TextBlock will return something like 17.6 for the height, thus forcing all of the Buttons to start at non-integer pixels.
Sometimes, not snapping to a whole pixel doesn't really matter. Sometimes it makes a big difference. It can even make a performance difference with video. A MediaElement playing video at its natural size will use less CPU if it is aligned on a whole pixel.
The Snapper element
The Snapper element is a UserControl subclass that uses a TranslateTransform to position its Content on a whole pixel. The Snap property (which defaults to "Closest") controls how it will snap. The source code for the Snapper element is below. Let's break down it down just a little bit.
The LayoutUpdated event
We hook up to the LayoutUpdated event because, as inefficient as it is, that's the only thing that we can use. We can't use the SizeChanged event, because that does not get fired if the element moves but does not change size. The LayoutUpdated is a global event--if you remove the Snapper from the tree you will have to unhook it from the LayoutUpdated event yourself.
This means that every time any layout happens, the Snapper will snap.
TransformToVisual
The way that the pixel snapping works is to first determine exactly where the Snapper element's Content is being placed on the screen. To do this, we clear out the Snapper's TranslateTransform (technically you don't really have to--you can just keep adjusting it--but I thought it would be cleaner to zero it out to avoid any funky synergy with other transforms or accumulated precision errors or whatever. Go ahead and try it that way and see what happens.) We then call TransformToVisual, giving it the root visual of the plugin. This will create a MatrixTransform that we can then use to put 0,0 into and see what pixel the Content is being placed on. If it is not placed on a whole pixel, we adjust the TranslateTransform so that it is.
The Code
You will need to add this code to your project. There is no associated XAML file.
using System;
using System.Windows;
using System.Windows.Controls;
using System.Windows.Media;
namespace PixelSnapper
{
public class Snapper : UserControl
{
public Snapper()
{
LayoutUpdated += Snapper_LayoutUpdated;
Snap = PixelSnapType.Closest;
}
public PixelSnapType Snap { get; set; }
void Snapper_LayoutUpdated(object sender, EventArgs e)
{
if (Content == null)
return;
if (Snap == PixelSnapType.None)
{
Content.RenderTransform = null;
return;
}
// Remove existing transform so that it is not a part of the calculations
if (_transform != null)
{
_transform.X = 0;
_transform.Y = 0;
}
// Calculate actual location
MatrixTransform globalTransform = Content.TransformToVisual(Application.Current.RootVisual) as MatrixTransform;
Point p = globalTransform.Matrix.Transform(_zero);
double deltaX = Snap == PixelSnapType.Closest ? Math.Round(p.X) - p.X : (int)p.X - p.X;
double deltaY = Snap == PixelSnapType.Closest ? Math.Round(p.Y) - p.Y : (int)p.Y - p.Y;
// Set new transform
if (deltaX != 0 || deltaY != 0)
{
if (_transform == null)
{
_transform = new TranslateTransform();
Content.RenderTransform = _transform;
}
if (deltaX != 0)
{
_transform.X = deltaX;
}
if (deltaY != 0)
{
_transform.Y = deltaY;
}
}
}
TranslateTransform _transform;
private static readonly Point _zero = new Point(0, 0);
}
public enum PixelSnapType
{
None, // No snapping
Closest, // Snap to closest pixel using Math.Round
TopLeft // Snap to integral portion of pixel by casting to int
}
}
Using the Snapper
Here's an example of how to use Snapper (don't forget to make sure that the x:Class and xmlns:local values match your app):
<UserControl x:Class="PixelSnapper.Page"
xmlns="https://schemas.microsoft.com/winfx/2006/xaml/presentation"
xmlns:x="https://schemas.microsoft.com/winfx/2006/xaml"
xmlns:local="clr-namespace:PixelSnapper"
Width="399" Height="300">
<StackPanel Background="Aquamarine">
<Rectangle Height="40" Width="40" Stroke="Black" Margin="2"/>
<local:Snapper>
<Rectangle Height="40" Width="40" Stroke="Black" Margin="2"/>
</local:Snapper>
<local:Snapper Snap="TopLeft">
<Rectangle Height="40" Width="40" Stroke="Black" Margin="2"/>
</local:Snapper>
</StackPanel>
</UserControl>
The Width of the UserControl is 399, an odd number. The StackPanel will expand to fill this space, so the StackPanel will be 399 wide. The Rectangles are 40 wide, plus a Margin of 2 on the left and right, for a total of width 44. If the total width of the Rectangle was an odd number, or if the width of the UserControl (and hence the StackPanel) was an odd number, then snapping would not be necessary. In the example above, the top Rectangle is not snapped, and its vertical lines are fuzzy. The next Rectangle is snapped to the Closest, and the last is snapped to the TopLeft.
A more efficient way of doing things, if you have a StackPanel full of things to snap, is to snap the StackPanel itself, and not its content, like this:
<UserControl x:Class="PixelSnapper.Page"
xmlns="https://schemas.microsoft.com/winfx/2006/xaml/presentation"
xmlns:x="https://schemas.microsoft.com/winfx/2006/xaml"
xmlns:local="clr-namespace:PixelSnapper"
Width="399" Height="300">
<local:Snapper>
<StackPanel Width="44" Background="Aquamarine">
<Rectangle Height="40" Width="40" Stroke="Black" Margin="2"/>
<Rectangle Height="40" Width="40" Stroke="Black" Margin="2"/>
<Rectangle Height="40" Width="40" Stroke="Black" Margin="2"/>
</StackPanel>
</local:Snapper>
</UserControl>