How to publish Excel worksheets to Azure SQL Database using SSIS
Introduction
In this tutorial you will learn the fundamentals of how to upload an Excel worksheet to Azure SQL Database using SQL Server Integration Services (SSIS). This tutorial assumes prior experience with SSIS and Windows Azure SQL Database. Upon completing this tutorial, you will have a sample database on Windows Azure published from an Excel 2007 or above worksheet. This tutorial will not illustrate data retry scenarios since the example worksheet contains a small data set. However, when the amount of data becomes significant, you will need a retry strategy to compensate for network bandwidth and latency, and the amount of (shared) resources available in a physical hardware node hosting a database.
SSIS is a platform for building enterprise-level data integration and data transformations solutions. You use SSIS packages containing tasks to solve complex business data migration problems. Publishing an Excel worksheet to an Azure SQL Database is similar to an on-premise solution except an Azure SQL table must have a clustered index. For this tutorial, you will configure a Data Flow Task containing an Excel Source task and ADO NET Destination task to publish a worksheet to an Azure SQL Database.
Table of Contents
- Prerequisites
- Overview
- Step 1: Download the sample OlympicsData workbook
- Step 2: Setup the sample Olympics Azure SQL Database
- Step 3: Create an SSIS Package that Uploads Data from Excel Worksheet to Azure SQL Database
- How to configure an Excel Source task on a 64-bit machine
- Retry strategies
- Alternative data movement strategies
- References
Prerequisites
- Azure SQL Database Account. Sign up for a Windows Azure 90 day free trial which includes 1 SQL database, and follow the Windows Azure Account setup instructions.
- Excel 2007 or above.
- Example OlympicsData workbook located at https://msftdbprodsamples.codeplex.com/downloads/get/528843.
- SQL Server 2012 Developer, Standard, or Enterprise with SQL Server Data Tools installed.
Note To test this tutorial without an Azure SQL Database account, you can use an on-premise SQL Server 2012 database. Any SQL Server 2012 instance will work including SQL Server 2012 Express LocalDB.
Overview
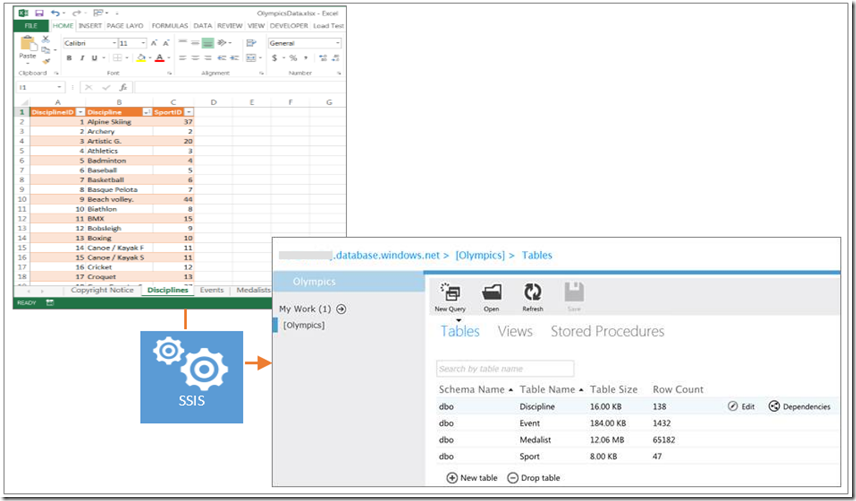
After following this tutorial, you will publish a sample Excel worksheet to an Azure SQL Database using SSIS.
Step 1: Download the sample OlympicsData workbook
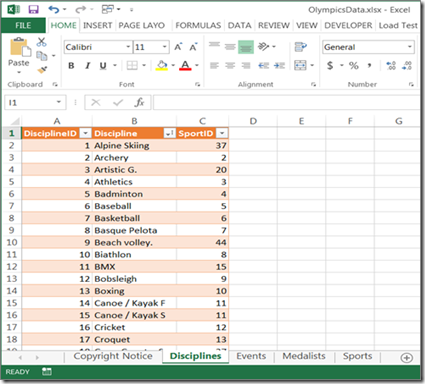
For this tutorial, you will start with an Excel 2007 or above workbook containing four worksheets: Disciplines, Events, Medalists, and Sports. Download the worksheet from our CodePlex site: https://msftdbprodsamples.codeplex.com/downloads/get/528843.
Olympics data © The Guardian, and reproduced with The Guardian permission
Step 2: Setup the sample Olympics Azure SQL Database
There are two primary methods to create an Azure SQL Database: Management Portal for SQL Database or SQL Server Management Studio on your desktop. For details on Getting Started with Windows Azure SQL Database, see Getting Started with Windows Azure SQL Database.
From SQL Server Management Studio (SSMS):
- Connect to your Azure SQL Database account, and the master database.
- Create the Olympics database:
-- NOTE: For Azure SQL Database, you must be connected to the master database to-- create a new database.USE masterGOIF EXISTS (SELECT [name] FROM [sys].[databases] WHERE [name] = N'Olympics')DROP DATABASE [Olympics]GOCREATE DATABASE [Olympics]GO
Step 3: Create an SSIS Package that Uploads Data from Excel Worksheet to Azure SQL Database
Unlike SQL Server, every table in Azure SQL Database must have a clustered index. A clustered index is usually created on the primary key column of the table.
Note The ADO NET Destination task returns the following error if your Azure SQL Database table does not have a clustered index:
[ADO NET Destination [2]] Error: An exception has occurred during data insertion, the message returned from the provider is: Tables without a clustered index are not supported in this version of SQL Server. Please create a clustered index and try again.
To create the Excel worksheet to Azure SQL Database SSIS package
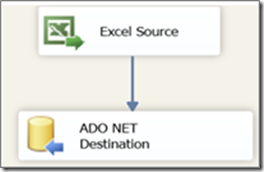
To publish an Excel worksheet to Azure SQL Database, your package will contain a Data Flow Task, Excel Source task, and ADO NET Destination.
1) Create an SSIS project.
2) Drop a Data Flow Task onto the Control Flow design surface, and double click the Data Flow Task.
3) Drop an Excel Source onto the Data Flow design surface.
Note When using the Excel Source task on a 64-bit machine, set Run64BitRuntime to False. For more information, see How to configure an Excel Source task on a 64-bit machine in this tutorial.
4) Double click the Excel Source task.
5) Click New next to the Excel connection manager drop down.
6) Browse to OlympicsData.xlsx.
7) Click OK.
8) Select “Disciplines$” from the Name of the Excel sheet drop down, and click Preview.
9) Click OK.
10) Drop an ADO NET Destination task under the Excel Source task.
11) Connect a Data Flow Path from the Excel Source to the ADO NET Destination.
12) Double click the ADO NET Destination, and click Yes on the “This component has no available input columns” dialog form.
13) Click New next to Connection manager.
14) Click New on the Configure ADO.NET Connection Manager dialog form.
15) Enter your Azure SQL Database configuration settings (or SQL Server connection settings for on-premise):
a. Enter your Azure server name as {servername}.database.windows.net.
b. Select SQL Server Authentication, and enter your SQL database user name and password.
c. Select the Olympics database from the Connect to a database drop down.
d. Click All.
e. Set Connect Timeout to 500 to increase the length of time (in seconds) to wait for a connection to Azure.
f. Set Encrpt to True to encrypt the SQL Server connection string.
g. Since the sample worksheet data is small, you can use the default packet size. For larger data sets, you should increase network packet size.
16) Click Test Connection.
17) Click OK.
18) Click OK (ADO NET Connection Manager).
19) Click New next to Use a table or view.
20) Replace the default Create Table statement with an Azure SQL Database Create Table statement:
Note The default [DisciplineID] and [SportID] column types are changed to int to optimize the database size, and [DisciplineID] is set as the clustered index.
CREATE TABLE [Discipline] ([DisciplineID] int NOT NULL IDENTITY,[Discipline] nvarchar(255),[SportID]int,CONSTRAINT [PK_Discipline_ID] PRIMARY KEY CLUSTERED([DisciplineID] ASC))
21) Click OK, and OK on the “Select a table or a view from the list” dialog form.
22) From the Use a table or view drop down, select "dbo"."Discipline", and click Preview.
23) Click Mappings and accept the default Available Input Columns from the Excel worksheet and Available Destination Columns from the ADO.NET Destination Columns.
24) Click OK.
Final Data Flow sequence of tasks
To publish the Excel worksheet to Azure SQL Database SSIS package
1) Right click the design surface, click Execute Task to publish the sample worksheet to Azure SQL Database.
Note You can repeat this process to publish multiple Excel worksheets to Azure SQL Database.
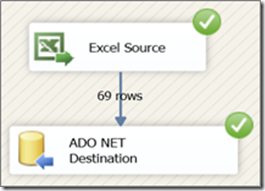
Successful Data Flow execution
To create each Olympics table that corresponds to each OlympicsData worksheet, run the following SQL script:
USE [Olympics]
GO
-- Disciplines Worksheet. This table was created in step 3
IF EXISTS (SELECT [name] FROM [sys].[tables] WHERE [name] = N'Discipline')
DROP TABLE [Discipline]
GO
CREATE TABLE [Discipline] (
[DisciplineID] int NOT NULL IDENTITY,
[Discipline] nvarchar(255),
[SportID]int,
CONSTRAINT [PK_Discipline_ID] PRIMARY KEY CLUSTERED
(
[DisciplineID] ASC
)
)
GO
-- Events Worksheet
IF EXISTS (SELECT [name] FROM [sys].[tables] WHERE [name] = N'Event')
DROP TABLE [Event]
GO
CREATE TABLE [Event] (
[EventID] int NOT NULL IDENTITY,
[DisciplineID] int,
[Event] nvarchar(255),
CONSTRAINT [PK_Event_ID] PRIMARY KEY CLUSTERED
(
[EventID] ASC
)
)
GO
-- Medalists Worksheet
IF EXISTS (SELECT [name] FROM [sys].[tables] WHERE [name] = N'Medalist')
DROP TABLE Medalist
GO
CREATE TABLE Medalist (
[MedalistID] int NOT NULL IDENTITY,
[Event] nvarchar(255),
[Edition] datetime,
[Athlete] nvarchar(255),
[NOC] nvarchar(255),
[Gender] nvarchar(255),
[Medal] nvarchar(255),
[Season] nvarchar(255),
[MedalValue] float,
[DisciplineID]int,
[SportID] int,
CONSTRAINT [PK_Medalist_ID] PRIMARY KEY CLUSTERED
(
[MedalistID] ASC
)
)
GO
-- Sports Worksheet
IF EXISTS (SELECT [name] FROM [sys].[tables] WHERE [name] = N'Sport')
DROP TABLE Sport
GO
CREATE TABLE [Sport] (
[SportID] int NOT NULL IDENTITY,
[Sport] nvarchar(255),
CONSTRAINT [PK_Sport_ID] PRIMARY KEY CLUSTERED
(
[SportID] ASC
)
)
GO
How to configure an Excel Source task on a 64-bit machine
The Excel Source task does not have a 64-bit OLE DB driver. To configure an Excel Source task on a 64-bit machine, set Run64BitRuntime to False on the Debugging node on the SSIS solution properties dialog form.
Note When Run64BitRuntime is True, SSIS will generate the follow error:
SSIS Error Code DTS_E_CANNOTACQUIRECONNECTIONFROMCONNECTIONMANAGER. The AcquireConnection method call to the connection manager "Excel Connection Manager" failed with error code 0xC0209303. There may be error messages posted before this with more information on why the AcquireConnection method call failed.
Retry strategies
This tutorial does not provide details about retry strategies when moving data to Azure SQL Database. When the amount of data becomes significant, this operation may present some critical challenges that will require a slightly different approach compared to on-premises solutions, mainly due to public network bandwidth and latency, and the amount of (shared) resources available in physical hardware nodes hosting a database in the cloud environment to execute the data loading phase.
- For cases of a single package, incorporate retry by
- Determining the maximum number of times the package should retry before failing.
- Setting up a variable to store your success status.
- Using a FOR loop to retry up to the maximum number of retries if the data flow is not successful.
- Move the worksheet into an on-premise SQL Server database. Then, use SQL Agent and specify what action SQL Server should take if a failure occurs during job execution.
- Develop custom source or destination components for SSIS and incorporate transient fault handling.
- Execute packages programmatically, and place the retry of failed packages into the programmatic execution of the package. You accomplish this by checking the execution status after package execution, and retrying if the package execution was unsuccessful.
Alternative data movement strategies
This tutorial illustrated how to use SSIS to publish an Excel worksheet to Azure SQL Database. However, there are other data movement solutions you can consider:
- Use the SqlBulkCopy class in ADO.NET.
- Run a Bulk Copy Program (BCP.EXE) import / export script. See https://msftdbprodsamples.codeplex.com/releases/view/37304 for an AdventureWorks2012 on Azure SQL Database sample.
Note When running the AdventureWorks2012 on Azure SQL Database sample, change the batch size to 10000 from the default 1000 and the packet size to 16000 from the default 4000.
- Azure Storage Blobs and Queues can be used to implement complex solutions that require intermediate storage between on premise and cloud processes, and the ability to orchestrate phases and operations between the two environments.


