Installing and Configure DirSync with OU level filtering for Office365
Recently I had worked with one of our customer, who was looking for OU level filtering to import selected users from On-Premises active directory to Office365.
Thought of writing the step-by-step process, which might be helpful for some of you.
Note: -
a. You can install ADFS and DirSync on the same box, IT IS NOT RECOMMENDED BY MICROSOFT
b. You can’t install DirSync on a Domain Controller.
Installing and activating DirSync for your Office365 Portal.
1. Login to your Office365 Portal with Tenant admin credentials. (The username and password which you provided while provisioned your Office365 Portal)
2. On the Admin page, in the left pane, under Management, click Users, and then click setup next to Active Directory® synchronization.
3. Scroll down to step 3 and 4, as shown below in the screen capture.
i. Activate DirSync for your Office365 Portal from step 3 (This might take a while to get activated)
ii. Download DirSync 64 Bit from step 4

4. Run the downloaded DirSync.exe
5. Click on Next button in welcome screen
6. Accept the License Terms and Click Next
7. Click next on the “Select Installation Folder” if you don’t want change the location.
8. This Installs DirSync in your local machine
9. Click Next to start the DirSync Configuration wizard.
a. Ensure the “Start Configuration Wizard now” is checked.
10. Click Next on the “Welcome Configuration wizard”
11. Enter your Office365 Tenant admin account and password and click next.
12. Enter your local Active Directory account who is part of enterprise admin group.
13. If you have Exchange Server on-Premise and planning to implement a hybrid configuration, then select “Enable rich coexistence” and click next.
i. Nothing to worry if it is greyed out for you, which means you don’t have on Exchange On-Premises deployed.
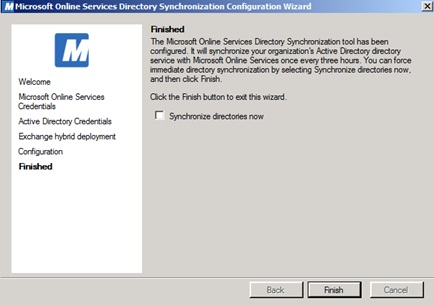
14. Uncheck the Synchronize directories now from the DirSync Finish window and click Next.
Configure OU level filtering for Office365 directory synchronization.
1. Logged in to your Domain controller
2. Created an OU (Organisational Unit) from your AD (Active Directory)
a. In my case I named it “DirSync”
3. Move all those users you want to sync, to that DirSync OU.
4. From your DirSync Server navigate to <Drive>\Program Files\Microsoft Online Directory Sync\SYNCBUS\Synchronization Service\UIShell
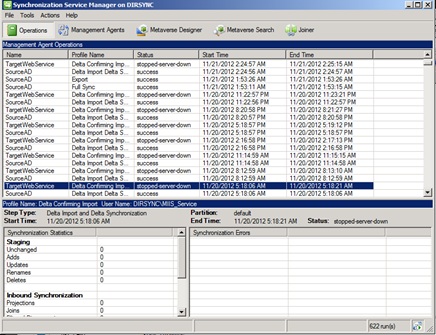
5. Double click on miisclient.exe
6. This opens a console something similar to the below screen capture
7. In Identity Manager, click Management Agents, and then double-click SourceAD.
8. Click Configure Directory Partitions, and then click Containers, as shown in the below screen capture.
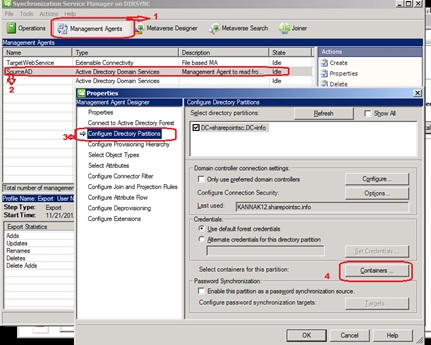
9. When prompted, enter your domain credentials for the on-premises Active Directory forest.
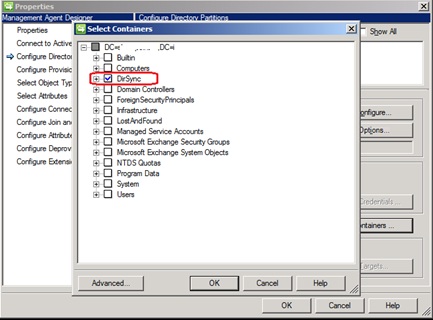
10. In the Select Containers dialog box, clear the OUs that you want skip from syncing to Office365, and then click OK. Something similar to below screen capture.
11. Click OK on the SourceAD Properties page.
12. Perform a full sync: on the Management Agent tab, right-click SourceAD, click Run, click Full Import Full Sync, and then click OK.
If you would like to know more about DirSync filtering refer the TechNet article here
13. You can also force run DirSync using the following PowerShell command.
i. From your dirsync server open PowerShell console as Administrator
ii. Navigate to “C:\Program Files\Microsoft Online Directory Sync”
iii. Run .\DirSyncConfigShell.psc1
iv . Now execute Start-OnlineCoexistenceSync commendlet.
14. To confirm the sync job, open your event log and look for Event ID’s 1 & 2.
v. Event ID 1 says If configuration Import started
vi. Event ID 2 says if configuration Import has completed.
15. To verify from Office365 Portal
vii. Login to your Office365 Portal with Tenant admin credentials. (The username and password which you provided while provisioned your Office365 Portal)
viii . On the Admin page, in the left pane, navigate to Users.
ix . And you can verify the Last Synced status next to Active Directory® synchronization as shown below

16. Verify only the Filtered users are populated to Office365 from office365 user management.
Note:-
Filtering configurations applied to your directory synchronization instance aren’t saved when you install or upgrade to a newer version. If you are upgrading to a newer version of directory synchronization, you must re-apply filtering configurations after you upgrade, but before you run the first synchronization cycle.