Phone + Cloud Series: Configuring SQL Azure
Understanding the Data Model
In most learning scenarios it is helpful to understand and define the data you are working with before anything else. To get to this step, we’ll lay out a few features of the mini-product we’ll build.
- The system is intended to monitor a user’s stock selections and occasionally send a push notification to their device when one of the stocks changes by a certain threshold.
Now, in order to accomplish this, there is really not that much that needs to be stored. You would probably need a username and password (you could easily just store a user ID, though, and foreign-key it into the ASP.NET membership services, but it’s easier just to store a username and password). You’d also need a list of stock ticker symbols that the user wishes to track. You need to have a setting to opt-out of push notifications; not only is this a good design principle but it’s also required for the Windows Phone app to pass certification testing. And you’d need a primary key.
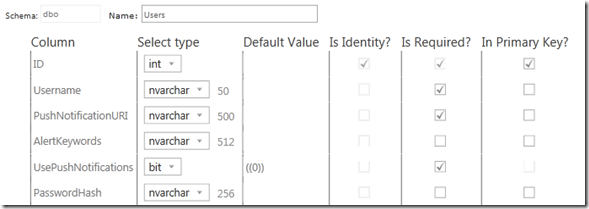
Each one of these rows in this table represents a user and their preferences. Simple data model, simple app, easy to learn. So, here are our fields:
What the heck did I just show you?
This is from the fancy new SQL Azure management interface at windows.azure.com, based off of Project Houston, a Silverlight app built that allows you to create and modify database schemas for SQL Azure. Why not just do this in SSMS? Well, SQL Azure is architected a little differently than SQL Server to allow for high availability, concurrency, and the ability to run in the datacenter in the Windows Azure fabric.
Creating the Database
I’ll preface this by saying you don’t have to use SQL Azure to get this to work. This is just a great opportunity to learn how to use it. If you choose to use your own hosted SQL Server somewhere, you can just create LINQ to SQL bindings to that server when we get to that step.
Get Azure Access.
This can be a little easier said than done, but there are more ways than ever to get up and running with SQL Azure. You can use a MSDN Premium subscription.If you are a student or faculty , please contact me via this blog on how you can get free, extendable 30 day passes.
Create your database
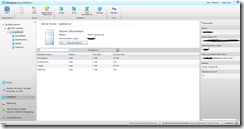
Log on to the Windows Azure management portal (https://windows.azure.com) to be greeted with a new Silverlight-based interface:

Click on the Database link in the lower left (just below Home and Hosted Services, Storage Accounts & CDN).
Click on the Subscriptions folder and expand your subscription. If you don’t have any servers listed, you can create a new one by clicking Create on the ribbon. You can only have one server per subscription.
Once you have created your server, you can select it and see the existing databases on that server. Create a new one by clicking Create on the ribbon. Here you can give it a name (I called mine AzureAlerts). I would accept the other defaults (Web, 1GB).

Set up firewall rules
One of the security aspects of SQL Azure is that it only allows connections to and from certain places. The Windows Azure service is one of those places. If you are debugging locally you need to add the IP address range that your IP usually falls in as a firewall rule. Expand the Firewall Rules button, then click Add. Use a command prompt and /ipconfig to figure out what your current IP is.

Build the Users table we showed above
When you are ready, select your table and click the Manage button in the ribbon. This will launch a separate Silverlight-based management tool.

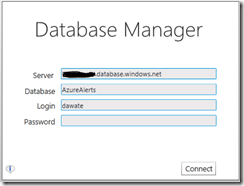
Log in to the management tool using your credentials and server name.

On the Database tab at the very top, you can create a new table. This takes you into the design view for the table immediately.

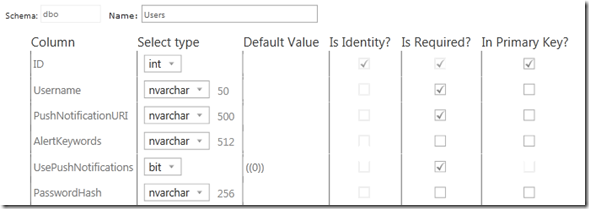
At this point, you can create the design of the table to match what I have built.

Your SQL Azure table is ready to rock. In the next post we’ll expose a couple of services to allow a phone to register to receive push notifications.
