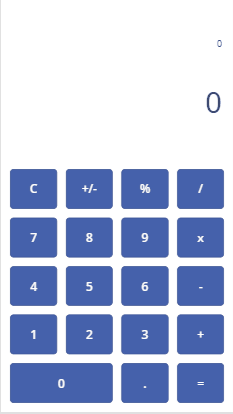
Building a calculator in PowerApps (that can do 1 + 2 + 3)
Given the recent news coverage of a remarkable bug in a very popular calculator app on a very popular mobile device ([1], [2], [3]), the question came up of how hard would it be to build a simple calculator using PowerApps.
This article presents what I came up with. Obviously this is a gimmick more than anything else. But perhaps you can learn a thing or two from it. This calculator can behave in funny (but explainable) ways for numbers that are too large or too close to zero, and I am deliberately not attempting to handle such cases in order to keep things simple. This is not meant to replace a proper calculator, and as-is it can compute 1 + 2 + 3 = 6, so there you have it :)
 Download sample app (make sure to save with .msapp extension)
How it works
The operation of the calculator is defined by 4 context variables (to learn more about context variables, go here).
- _val: result of the latest computation
- _operator: what mathematical operation are we currently performing. Can be "+", "-", "*", "/" representing the four basic mathematical operations. It can also be "#", representing number entry when no operations have been applied yet.
- _operand: the number to the right of the current operation. For example, when computing 1 + 2 = ?, _operand corresponds to the number "2".
- _decimal: current number of decimal places. Helps take care of entering numbers with decimal points
The initial state
We start by setting all variables to their initial values. We do this on the screen OnVisible, and also on the Clear button's OnSelect:
UpdateContext({_val:0,_operator:"",_operand:0,_decimal:0})
Number entry
Each time a digit 0-9 is pressed, we update the value of _operand to include the new digit. Forgetting about decimal points for a moment, the logic for integers is quite simple: we multiply the number we already have by 10, and then add the new digit. A little care is needed when a user is entering a negative number (which they can by using the "+/-" button. In that case, we need to subtract the digit that was pressed instead of adding it.
Taking care of decimal points is slitghly more challenging, but not too much. We keep track of the number of decimal places already entered with the variable _decimal. When the "." button is pressed, we set _decimal to 1. After every key press of 0-9 after this, we update _operand by adding (or subtrating if the number is negative, as mentioned above) 10^(-_decimal)*DIGIT_PRESSED, where DIGIT_PRESSED is just the number of the button that was pressed (0 - 9).
Here is the formula for button 5's OnSelect:
UpdateContext({
  _operand: If(_decimal>0,_operand+If(_operand<0,-1,1)*10^-_decimal*5, _operand*10+If(_operand<0,-1,1)*5),
  _decimal: If(_decimal>0, _decimal+1, 0),
  _operator: If(IsBlank(_operator), "#", _operator)
})
The four mathematical operations
The logic for each of the mathematical operations can be described as a sequence of two steps:
- Update _val with the result of the previous mathematical operation
- Prepare for the next mathematical operation
The first part is taken care of as follows:
UpdateContext({_val:If(_operator="#", _operand,
                       _operator="+", _val+_operand,
                       _operator="-", _val-_operand,
                       _operator="*", _val*_operand,
                       _operator="/", _val/_operand,
                       _val)})
The way to read that is like this:
- If _operator is "#", we set _val to the current value of _operand (i.e. we store the initial number entered by the user).
- If _operator is "+", "-", "*", "/", we apply the corresponding operation between _val and _operand, and store the result in _val.
- Otherwise, we leave _val untouched. This can happen if a user pressed any of the mathematical operations or the equals sign before entering any numbers.
The second step, preparing for the next mathematical operation, is simply a matter of clearing the variables _operand and _decimal, and setting the new _operator as appropriate:
UpdateContext({_operand:0,
               _decimal:0,
               _operator:"+"})
The "Equals" button follows a similar logic, but sets _operator to "" (empty string, so that the next time a number is entered, it will replace _val).
The Percentage button
The percentage button works by updating _operand to be a percentage of the current _val. Nice and easy:
UpdateContext({_operand:_val*_operand/100})
Number display
Perhaps the most challenging aspect of the implementation was the logic to display the right thing as the large numbers. In some cases, we want to show the result _val. In others, we want to show the _operand as it is being entered. Thanks to the use of the pseudo-operator "#", this is what I ended up with.
The big numbers:
lblDisplay.Text = Round(If(IsBlank(_operator) || _operand=0, _val, _operand),6)
And the smaller text above the large numbers, that indicates the current operation:
lblOperation.Text =
If(_operator = "#", Round(_operand,3) & "",
   !IsBlank(_operator), Round(_val,3) & " " & _operator & " " & Round(_operand,3),
   Round(_val,3))
Wrapping up
That's it for the calculator. Another aspect worth mentioning is the use of dynamic layout for the buttons. I configured the buttons so that the spacings between each button and the screen borders are all the same, and the buttons resize themselves to fill up the space available.
There are many ways to achieve this. Here's what I used:
- The X position of the top-left button ("Clear") defines all the spacings. If I drag it all the way to the left, there will be zero spacing between the buttons. If I make X = 5,
there will be 5 units of spacing between all elements. - The Y position of the top-left button ("Clear") dictates the vertical positioning of all elements.
Formulas on the X, Y, Width and Height of all other buttons are used to adjust to the X and Y where I place the top-left button.
This choice allows we to very easily manipulate the calculator layout by simply moving the "Clear" button, and everything else falls into place. Comping up with the right expressions to make this work can be tricky, and drawing things out on a piece of paper first can help. An example of the freedom this provides is shown below, where I am simply moving the "Clear" button and everything else follows from it.

And that's the end of this post. Let me know if you have questions or suggestions for future posts, and I'll see you next time.