Windows Azure Storage - Exploring Blobs!
So I've been working through the storage services for Windows Azure (well, I've only just begun) and thought I'd walk through the basic steps to storing something in Blob Storage, first by using the local development storage service.
Now, to get started, let's quickly review Windows Azure Storage Services (and do not even dare creating a Windows TLA for this!).
Storage Services provides 3 main services:
- Blob: Best for blobs like binary files and text files, so think picture storage, rich media storage, documents, etc.
- Queue: Reliable and persistent messaging between services, so think about this in terms of having a worker role communicate with a web role.
- Table: Structured storage, so think more along the lines of storing entities
Now, let me explain my approach first, as this post will be one of many along this vein. I'm purposely not using the StorageClient sample, as I want to understand the atomic steps required to work with the REST API for the Storage service.
Also, to start, I'm exploring the Blob service, and using the SDK documentation and StorageClient as a guide.
We also need to be cognizant of the whether we are using the local development storage or the live environment, as this will affect which endpoint you will use. Because it's difficult to manage the local DNS on a developer machine (without playing with your HOSTS file), the endpoint format for the local development storage is different from the live service.
My first task is to create a container, as I need a container before I can store blobs.
At a high level, the code plan for creating a container is:
- Create A Web Request
- Set the method, as in, PUT, GET (for creating a container, we need PUT)
- Set the mandatory request properties (such as content length, etc.)
- Add the storage specific headers to the request (such as x-ms-date, etc.)
- Create your request signature (this must follow the canonical form detailed in the SDK documentation)
- Hash your signature using the HMAC-SHA256 algorithm
- Add the Authorization header to the request using your hashed signature and using the appropriate header format (again, detailed in the SDK)
- Submit request and inspect response for errors/success
Also, there are some hints to using the SDK documentation:
- Before you do anything with the storage services, read the About Development Storage section in the SDK documentation
- Note the Account name and key required when using the local development storage environment. You cannot use your account details as you would against the live environment
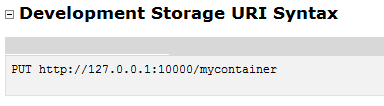
- Under the section on Creating a Container, there is a slight omission. Where it details the Development Storage URI Syntax as:
It actually is meant to be PUT https://127.0.0.1:10000/devstoreaccount1/mycontainer (or whatever container name you want)
My next task is to start adding blobs (I'm going to store small and big blobs, as this will change the approach we use).
The program.cs code for the console project is here. :)
Technorati Tags: Windows Azure,Storage Services,Blob,Local Development Storage