Setting up Raspian and .NET Core 2.0 on a Raspberry Pi
Here's a little something I wrote for a customer who wants to use .Net Core on a Raspberry Pi. You might find it useful as well.
 |
Raspbian Linux is the Raspberry Pi Foundation's officially supported operating system for running the Raspberry Pi. | |
 |
.NET Core is Microsoft's new modular open source implementation of .NET for creating web applications and services that run on Windows, Linux and Mac. |
Don't worry if you've never used either of these technologies before, this post will take you though the steps to get Raspian and .NET Core installed and working on a Raspberry Pi device.
Both these technologies are well maintained and supported by their creators and each has excellent documentation which is always up to date. To keep this post as small as possible it will act as a guide, describing each task to be carried out in brief but providing references to external documentation when more details are required.
Step 1 - Prepare a Raspian Linux SD card.
In order to start-up a Raspberry Pi, it must have an operating system installed onto an SD card which has been inserted into the device. Raspian Linux is one of the officially supported operating systems along with 3rd party options such as Windows 10 IoT Core.
The process of installing an operating system onto an SD card is known as flashing the card. Flashing is carried out using a tool or utility which is capable of reading an image file which has been downloaded from an O/S vendor. The image file is typically a binary file and the utility is capable of reading the image and writing it to the SD card.
Task: Install Raspian Linux onto an SD card.
Reference: https://www.raspberrypi.org/documentation/installation/installing-images/README.md
- Download the latest Raspbian Jessie with desktop Linux image to your local machine. Other download options are available at Download Raspian.
- Download the Etcher image writing utility and install it.
- Insert the SD card into your computer.
- Open Etcher and select from your hard drive the .zip file you downloaded in step 1.
- Select the SD card you wish to write your image to.
- Review your selections and click 'Flash!' to begin writing data to the SD card.
- Once flashing is complete, create a new empty file named ssh (with no extension) in the root of the drive that holds the SD card. This will ensure that the SSH daemon is enabled once the Raspberry Pi has started and you can logon over the network.
Step 2 - Boot the Raspberry Pi and connect over the network.
Ensure your Raspberry Pi has the following cables connected:
- HDMI - so you can watch the boot process from a screen.
- Ethernet cable - avoid connecting to corporate networks as firewalls and proxies/proxy authentication problems can waste setup time.
- Keyboard and mouse.
Task: Power up the Raspberry Pi and obtain its IP address.
- Insert the SD card into the base of the Raspberry Pi. Ensure the electric contacts are facing upwards.
- Power-up the RPi by plugging in the micro-USB power supply. Wait until it reaches the desktop.
![]()
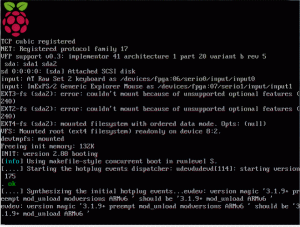
- Click on the Terminal icon on the top menu to open a prompt and type ifconfig to obtain the IP address which has been assigned by your DHCP server to the Raspberry Pi.

- Download the PuTTY SSH and Telnet client and launch it.
- Enter the IP address of the Raspberry Pi and click Open. Accept the message about keys.

- Enter pi as the logon name, and raspberry as the password.
- Once you have reached the command line, change the default password for the pi user.
Step 3 - Install the .NET Core Runtime.
Three components are typically required to create and run a .NET Core application:-
- .NET Core Runtime. Needs to be installed on any machine where a .NET Core application will run.
- .NET Core SDK. Needs to be installed on any machine used to develop .NET Core applications.
- IDE Tools. Adds-on for your chosen IDE to automate the development process.
The .NET Core Runtime is available for Windows, MacOS and various flavours of Linux however only the most recent version; .NET Core Runtime 2.0 is supported for running on Raspian Linux on the ARM32 processor architecture. This means it is possible to run .NET Core applications on the Raspberry Pi.
However there is currently no .NET Core SDK available for Raspian Linux running on the Raspberry Pi (i.e. ARM32).
The end result? It is not as yet possible to develop a .NET Core application *directly* on the RPi itself. Instead an application must be developed on a supported platform (i.e. another machine running Windows, MacOS or one of the various flavours of Linux running on x86 or x64) then deployed to the Raspberry Pi.
See the dotnet/Core repository for an official statement.
Task: Install the .NET Core Runtime on the Raspberry Pi.
The following commands need to be run on the Raspberry Pi whilst connected over an SSH session or via a terminal in the PIXEL desktop environment.
- Run sudo apt-get install curl libunwind8 gettext. This will use the apt-get package manager to install three prerequiste packages.
- Run **curl -sSL -o dotnet.tar.gz https://dotnetcli.blob.core.windows.net/dotnet/Runtime/release/2.0.0/dotnet-runtime-latest-linux-arm.tar.gz** to download the latest .NET Core Runtime for ARM32. This is refereed to as armhf on the Daily Builds page.
- Run sudo mkdir -p /opt/dotnet && sudo tar zxf dotnet.tar.gz -C /opt/dotnet to create a destination folder and extract the downloaded package into it.
- Run sudo ln -s /opt/dotnet/dotnet /usr/local/bin` to set up a symbolic link...a shortcut to you Windows folks ;) to the dotnet executable.
- Test the installation by typing dotnet --help.

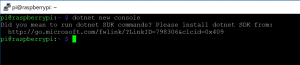
- Try to create a new .NET Core project by typing dotnet new console. Note this will prompt you to install the .NET Core SDK however this link won't work for Raspian on ARM32. This is expected behaviour.
- Optional: Follow the steps outlined in the .NET Core on Raspberry Pi guide to create a test console application on your local development machine then run it on the RPi. The key action here is that you will create an application then publish the it using the dotnet publish -r linux-arm command.