Windows 8 Introduction to XAML - Part 4
Hi All,
I can't believe it is here, the fourth and final part of this series. After completing this part, you will be not only competent and functional at doing Animations, but you will have completed all 4 parts and be well on your way to being a great developer utilizing XAML.
Easier in Blend
So I am an advocate of designing your animations in Blend. It is just far easier and more intuitive. That being said, we are going to do it in XAML, because you need to develop the ability to deal with the XAML and know what is going on. I completely recommend trying the same thing again in Blend after this.
Animations
So there are many animations that you have access to, and there is even an animation sample kit for Windows 8, which can be found here: https://code.msdn.microsoft.com/windowsapps/Animations-f758de70 . The popular animations are Color Animations, Double Animations, Point Animations, and variations with Key Frames. We will be doing Double Animations with Key Frames.
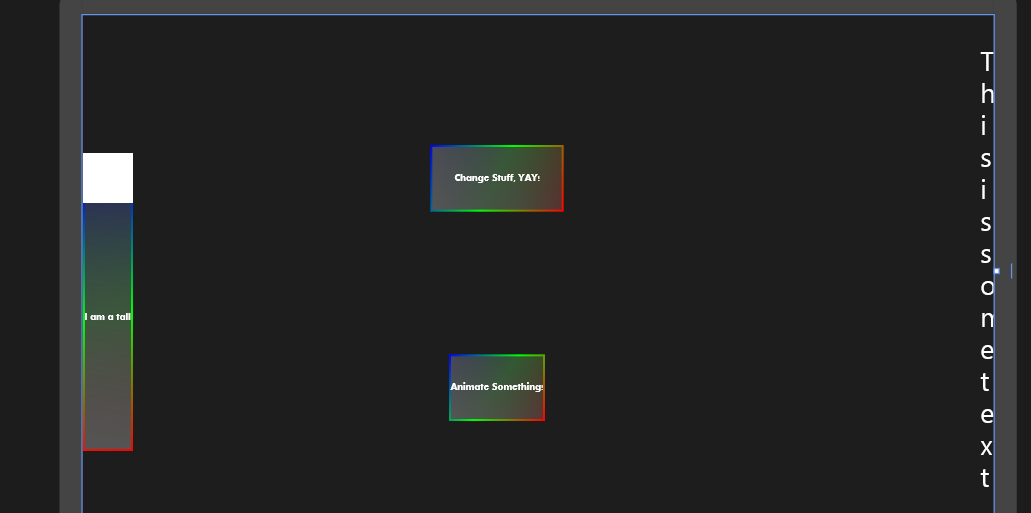
Add a Button & Rectangle
So the first thing we need to do is load up the same app we have been working on this entire series and add a button and a rectangle to animate. So go ahead and add your button to the second column second row and define a click handler to it, I named mine "AnimateButton_Click_1". Add the Rectangle, you can define it anywhere in your app that you like, I just left the row and column definitions empty so it ended up in the top left. You can have your rectangle be any colors you want.
Your app should look like below
The code will look like below
  <Button Style="{StaticResource MyButton}" x:Name="AnimateButton" Click="AnimateButton_Click_1" Grid.Column="1" Grid.Row="1" Content="Animate Something!" VerticalAlignment="Center" HorizontalAlignment="Center" Height="100" />
 <Rectangle x:Name="MyRectangle" Fill="White" Width="75" Height="75"/>
Remember that this goes inside the Content Region Grid.
The Story Board
This is the part that is easier built in Blend. A storyboard is the container element for your animations. You can being, pause, stop and resume storyboards. You can also define multiple animations within a single storyboard. Since we are animating a Rectangle's position, we will need to define two animations that start at the same time, one for the x and one for the y position. I will copy the code below and then explain in a bit more detail.
  <Storyboard x:Name="MoveRectangle">
 <DoubleAnimationUsingKeyFrames Storyboard.TargetName="MyRectangle" Storyboard.TargetProperty="(UIElement.RenderTransform).(CompositeTransform.TranslateX)">
 <EasingDoubleKeyFrame KeyTime="0:0:1" Value="0.0"/>
 <EasingDoubleKeyFrame KeyTime="0:0:2" Value="200.0"/>
 <EasingDoubleKeyFrame KeyTime="0:0:3" Value="800.0"/>
 <EasingDoubleKeyFrame KeyTime="0:0:7" Value="0.0" />
 </DoubleAnimationUsingKeyFrames>
 <DoubleAnimationUsingKeyFrames Storyboard.TargetName="MyRectangle" Storyboard.TargetProperty="(UIElement.RenderTransform).(CompositeTransform.TranslateY)">
 <EasingDoubleKeyFrame KeyTime="0:0:1" Value="0.0"/>
 <EasingDoubleKeyFrame KeyTime="0:0:2" Value="600.0"/>
 <EasingDoubleKeyFrame KeyTime="0:0:3" Value="300.0"/>
 <EasingDoubleKeyFrame KeyTime="0:0:7" Value="0.0" />
 </DoubleAnimationUsingKeyFrames>
 </Storyboard>
Firstly, the Storyboard must go inside a resources tag in this file in a scope that it has access to the Rectangle as your target is the rectangle explicitly for both animations. All Storyboard elements should have a name associated with them, so that it can be accessed easily, this one is "MoveRectangle". Next is two Animations, essentially the same animation, one affecting the x co-ordinate and the other affecting the y co-ordinate of the rectangle. Each Animation can target objects and properties independently of each other, so you can have one storyboard animate 6 rectangles at the same time if you wish. The Property we are actually manipulating is the X portion of the translate transformation matrix that is applied to the rectangle (if defined) before rendering. We will define that matrix a little further down. You access this matrix by first accessing the RenderTransform collection of the Element, and then accessing the Composite Transform Matrix, and then the Translate portion of that. This is done as you can see in the Storyboard.TargetProperty="..." section. You can access other properties of objects in a similar fashion.
A DoubleAnimationUsingKeyFrames, or any animation using key frames will have a form of Key Frame. This particular object uses some form of DoubleKeyFrame, of which there are multiple stock out of the box including spline, linear and Easing. Easing is the easiest to understand, and thus we will use it here. Easing simply takes the current value of the property to change, the time into the animation it is and the end time of that frame and splits the value into even intervals and applies it evenly across that time span, creating a smooth transition. The end time of each key frame is defined inside that keyframe. The property will ease to the value defined in that keyframe by the end of that keyframe. So looking at our example above, the first second our rectangle does not move. As soon as the first time-second is done, it begins to ease the x portion of the translate matrix to 200, finally reaching 200 at the end of the second time-second.
So as you can see, our animation takes an entire 7 seconds to complete.
Matrices!
So lets start by defining our Matrix for the rectangle. It is simply just some extra xaml that is put inside the tags to say "I have a composite transform that may be something other than Identity at some point". So Change your Rectangle code to be like below:
  <Rectangle x:Name="MyRectangle" Fill="White" Width="75" Height="75" >
 <Rectangle.RenderTransform>
 <CompositeTransform/>
 </Rectangle.RenderTransform>
 </Rectangle>
You do not need to define anything for the Composite Transform, though you may. Here is some documentation on that particular transform: https://msdn.microsoft.com/en-us/library/system.windows.media.compositetransform(v=VS.95).aspx
Using these transforms, you can create very interesting affects, including the illusion of 3D space if utilize these transforms in certain manners. Skew and Scale are probably your best options for a simple approach, or you can get really creative and start pulling out your Linear Algebra books and try this on for size: https://msdn.microsoft.com/en-us/library/system.windows.media.matrixtransform(v=vs.95).aspx
Ok, but it still doesn't move!
Well this is because we need to trigger the start action of the storyboard. hence our button :). Go into your click handler you created earlier for your button and add the code "MoveRectangle.Begin();" and it should come to life when you click your button! Just in case you forgot how to do this, here is the code.
  private void AnimateButton_Click_1(object sender, RoutedEventArgs e)
 {
 MoveRectangle.Begin();
 }
Challenge
Ok, so I have to end the series with a challenge. Create an animation that when you click the button, it makes the rectangle spin in place like the rings from the game Sonic the Hedgehog. https://www.gamespot.com/sonic-the-hedgehog-2/videos/sonic-the-hedgehog-2-gameplay-movie-1-6172907/ (notice how the rings continually spins in place repeatedly)
Part 4 Summary
So in this final part we covered how to create a storyboard, multiple animations can be executed during a storyboard, keyframes, easing and a little bit about Matrices. You should be able to click your button and the rectangle move in a triangular pattern a single time. For those of you who are having difficulty getting it to work, I have pasted the xaml and the code behind below.
Series Summary
So for the entire series we have covered the different types of elements, resources, merging, scope, animations, code behind, styling, layouts and more. This should get you started on your way to being a great developer. Some next steps to continue your learning would be to explore MVVM, particularly ICommand and Command of T. I would also explore localization, custom controls, and dealing with the Windows 8 specific UI considerations, such as snapped, filled view, the app bar, the charms, customizing the different pickers and more. I hope you found this useful, and I will start another series once I figure out what to write it on.
Thank you,
~Dave
Note in the codes below that if you are running into some sort of issues, it could be due to missing resources from an earlier part, which you can copy from the bottom of Part 3.
The Xaml from Part 4
 <Page
 x:Class="IntroductionToXaml.MainPage"
 xmlns="https://schemas.microsoft.com/winfx/2006/xaml/presentation"
 xmlns:x="https://schemas.microsoft.com/winfx/2006/xaml"
 xmlns:local="using:IntroductionToXaml"
 xmlns:d="https://schemas.microsoft.com/expression/blend/2008"
 xmlns:mc="https://schemas.openxmlformats.org/markup-compatibility/2006"
 mc:Ignorable="d">
 <Page.Resources>

 <Storyboard x:Name="MoveRectangle">
 <DoubleAnimationUsingKeyFrames Storyboard.TargetName="MyRectangle" Storyboard.TargetProperty="(UIElement.RenderTransform).(CompositeTransform.TranslateX)">
 <EasingDoubleKeyFrame KeyTime="0:0:1" Value="300.0"/>
 <EasingDoubleKeyFrame KeyTime="0:0:2" Value="200.0"/>
 <EasingDoubleKeyFrame KeyTime="0:0:7" Value="400.0"/>
 <EasingDoubleKeyFrame KeyTime="0:0:22" Value="600.0" />
 </DoubleAnimationUsingKeyFrames>
 </Storyboard>

 </Page.Resources>

 <Grid x:Name="Silhouette" Background="{StaticResource ApplicationPageBackgroundThemeBrush}">
 <Grid.RowDefinitions>
 <RowDefinition Height="140"/>
 <RowDefinition Height="*"/>
 </Grid.RowDefinitions>
 <RichTextBlock x:Name="TitleText" VerticalAlignment="Bottom" HorizontalAlignment="Right" Grid.RowSpan="2" Width="20">
 <Paragraph FontSize="40" FontWeight="Bold" FontStyle="Italic" FontFamily="algerian">
 This is some text.
 </Paragraph>
 </RichTextBlock>
 <Grid Grid.Row="1" x:Name="ContentRegion">
 <Grid.ColumnDefinitions>
 <ColumnDefinition Width="auto" />
 <ColumnDefinition Width="*" />
 <ColumnDefinition Width="200"/>
 </Grid.ColumnDefinitions>
 <Grid.RowDefinitions>
 <RowDefinition Height="*"/>
 <RowDefinition Height="2*"/>
 </Grid.RowDefinitions>
 <Button Style="{StaticResource MyButton}" x:Name="FirstButton" Grid.Column="0" Grid.RowSpan="2" Content="I am a tall button!" VerticalAlignment="Center" Height="400" Click="Button_Click_1" Width="75"/>
 <Button Style="{StaticResource MyButton}" Grid.Column="1" Grid.Row="0" Grid.RowSpan="1" Content="Change Stuff, YAY!" VerticalAlignment="Center" HorizontalAlignment="Center" Click="ChangeStuff" Width="200" Height="100" />
 <Button Style="{StaticResource MyButton}" x:Name="AnimateButton" Grid.Column="1" Grid.Row="1" Content="Animate Something!" VerticalAlignment="Center" HorizontalAlignment="Center" Height="100" Click="AnimateButton_Click_1"/>
 <Rectangle x:Name="MyRectangle" Fill="White" Width="75" Height="75" >
 <Rectangle.RenderTransform>
 <CompositeTransform/>
 </Rectangle.RenderTransform>
 </Rectangle>
 </Grid>
 </Grid>
 </Page>
The Code Behind from Part 4
 using System;
 using System.Collections.Generic;
 using System.IO;
 using System.Linq;
 using Windows.Foundation;
 using Windows.Foundation.Collections;
 using Windows.UI.Xaml;
 using Windows.UI.Xaml.Controls;
 using Windows.UI.Xaml.Controls.Primitives;
 using Windows.UI.Xaml.Data;
 using Windows.UI.Xaml.Input;
 using Windows.UI.Xaml.Media;
 using Windows.UI.Xaml.Navigation;

 // The Blank Page item template is documented at https://go.microsoft.com/fwlink/?LinkId=234238

 namespace IntroductionToXaml
 {
 /// <summary>
 /// An empty page that can be used on its own or navigated to within a Frame.
 /// </summary>
 public sealed partial class MainPage : Page
 {
 public MainPage()
 {
 this.InitializeComponent();
 }

 /// <summary>
 /// Invoked when this page is about to be displayed in a Frame.
 /// </summary>
 /// <param name="e">Event data that describes how this page was reached. The Parameter
 /// property is typically used to configure the page.</param>
 protected override void OnNavigatedTo(NavigationEventArgs e)
 {
 }

 private void Button_Click_1(object sender, RoutedEventArgs e)
 {
 this.Silhouette.Background = new SolidColorBrush(Windows.UI.Color.FromArgb(255, 0, 255, 0));
 }

 bool toggle = true;
 bool firstTime = true;
 StackPanel sPanel;
 ScrollViewer sViewer;
 int counter = 1;
 private void ChangeStuff(object sender, RoutedEventArgs e)
 {
 if (toggle)
 {
 //first challenge part 1
 FirstButton.Width = double.NaN;

 if (firstTime)
 {
 secondChallenge();

 thirdChallenge();//part 1

 addNumber(); //third challenge part 2

 firstTime = false;
 toggle = !toggle;
 return;
 }
 }
 else
 {
 //first challenge part 2
 FirstButton.Width = 75;
 }
 addNumber();//third challenge part 2
 toggle = !toggle;

 }

 //this is part 1
 private void thirdChallenge()
 {
 //Third Challenge, Add StackPanel inside of ScrollViewer to the Grid
 sPanel = new StackPanel();
 sPanel.VerticalAlignment = Windows.UI.Xaml.VerticalAlignment.Stretch;
 sPanel.HorizontalAlignment = Windows.UI.Xaml.HorizontalAlignment.Stretch;
 sViewer = new ScrollViewer();
 sViewer.VerticalScrollBarVisibility = ScrollBarVisibility.Auto;
 sViewer.HorizontalAlignment = Windows.UI.Xaml.HorizontalAlignment.Center;
 sViewer.VerticalAlignment = Windows.UI.Xaml.VerticalAlignment.Center;
 sViewer.Width = 150;
 sViewer.Height = 200;
 sViewer.Content = sPanel;
 Grid.SetColumn(sViewer, 1);
 Grid.SetRow(sViewer, 1);
 this.ContentRegion.Children.Add(sViewer);
 }

 private void secondChallenge()
 {
 //First Challenge with RichTextBlock
 TitleText.Width = double.NaN;
 TitleText.VerticalAlignment = Windows.UI.Xaml.VerticalAlignment.Center;
 TitleText.HorizontalAlignment = Windows.UI.Xaml.HorizontalAlignment.Center;
 Grid.SetRowSpan(TitleText, 1);
 }

 private void addNumber()
 {
 TextBlock nBlock = new TextBlock();
 nBlock.Width = 20;
 nBlock.Height = 20;
 nBlock.FontSize = 20;
 nBlock.Text = counter.ToString();
 sPanel.Children.Add(nBlock);
 counter++;
 }

 private void AnimateButton_Click_1(object sender, RoutedEventArgs e)
 {
 MoveRectangle.Begin();
 }

 }
 }