Hadoop for .NET Developers: Implementing a (Slightly) More Complex MapReduce Job
NOTE This post is one in a series on Hadoop for .NET Developers.
In our first MapReduce exercise, we implemented a purposefully simple MapReduce job using the .NET SDK against our local development cluster. In this exercise, we’ll implement a slightly more complex MapReduce job using the same SDK but against our remote Azure-based cluster.
For this exercise, we’ll make use of the UFO Sightings database as presented in the ufo_awesome.tsv data file. This file consists of tab-delimited lines of data containing the following fields:
- DateObserved (in YYYYMMDD format)
- DateReported (in YYYYMMDD format)
- Location
- UFO Type
- Duration
- Description
In our job, we will count the number of sightings by year and shape of the UFO. In the map function, we will do a simple parse of the input line, extracting the year and shape. The year will serve as the key and in the reduce function we will count the number of sightings by shape using LINQ as LINQ is available to us through the .NET framework. The output of the reduce function will be the year as the key and the shape and count (delimited by a tab character) as the value.
To get started, we will perform the following steps much like before. However, please note the addition of the Windows Azure Storage package in the second step. This package enables us to work with HDInsight in Azure:
1. Launch Visual Studio and open a new C# console application project.
2. Add the following packages to the project using NuGet:
-
- Microsoft .NET Map Reduce API for Hadoop
- Microsoft ASP.NET Web API
- Windows Azure Storage
3. Open the Program.cs file if it is not already open.
4. Add the following directives to the program:
using Microsoft.Hadoop;
using Microsoft.Hadoop.MapReduce;
using Microsoft.Hadoop.WebClient.WebHCatClient;
With everything in place, write a Mapper class as follows:
public class MyUfoMapper : MapperBase
{
public override void Map(string inputLine, MapperContext context)
{
//split line on tabs
string[] inputValues = inputLine.Split('t');
string dateObserved = inputValues[0].Trim();
string ufoType = inputValues[3].Trim();
//get year observed
string yearObserved = "unknown";
if (dateObserved.Length >= 4)
yearObserved = dateObserved.Substring(0, 4);
//get ufo type
if (String.IsNullOrEmpty(ufoType.Trim())) ufoType = "uknown";
//send output
context.EmitKeyValue(yearObserved, ufoType);
}
}
The logic of the map function is pretty self-explanatory. The tab-delimited input line is parsed on the tabs. The DateObserved and UFO Type (shape) fields are accessed, parsed, and cleansed. The year from the DateObserved field is emitted as the key and the UFO type is emitted as the value.
Now we will write a Reducer class:
public class MyUfoReducer : ReducerCombinerBase
{
public override void Reduce(string key, IEnumerable<string> values, ReducerCombinerContext context)
{
//count sightings by type
var query = from v in values
group v by v into g
select new {
ufoType = g.Key,
sightings = g.Count()
};
//send results to output
foreach(var item in query)
{
context.EmitKeyValue(
key, item.ufoType + "t" + item.sightings
);
}
}
}
The logic of the reduce function is a bit more involved in that it employs LINQ. Using this capability, we query the incoming collection of UFO Type values, grouping them by like values, and extracting a count by UFO type. (We could have done this a variety of ways but as LINQ is available to us through the .NET framework, we might as well leverage it to make coding the function as simple as possible for us.) The reducer function then emits the year key and UFO type and count for the value.
With the Mapper and Reducer classes defined, we can create a MapReduce job. To do this, we will define a configuration, connect to Hadoop, and execute our job with our configuration much as we did before. That said, our connection to Hadoop looks much different:
static void Main(string[] args)
{
//connect to the cluster
Uri myUri = new Uri(https://brysmi.azurehdinsight.net);
string userName = "brysmi";
string hadoopUser = "hadoop";
string passWord = "my password";
string storageAccount = "brysmi.blob.core.windows.net";
string storageKey = "my storage key";
string container = "mycontainer";
IHadoop myCluster = Hadoop.Connect(
myUri, userName, hadoopUser, passWord,
storageAccount, storageKey, container, false
);
//configure job
HadoopJobConfiguration myConfig = new HadoopJobConfiguration();
myConfig.InputPath = "/demo/ufo/in";
myConfig.OutputFolder = "/demo/ufo/out";
//execute job
MapReduceResult jobResult =
myCluster.MapReduceJob.Execute<MyUfoMapper, MyUfoReducer>(myConfig);
//write job result to console
int exitCode = jobResult.Info.ExitCode;
string exitStatus = "Failure";
if (exitCode == 0) exitStatus = "Success";
exitStatus = exitCode + " (" + exitStatus + ")";
Console.WriteLine();
Console.Write("Exit Code = " + exitStatus);
Console.Read();
}
If you are unclear of where to obtain the values required to connect to the Azure cluster, please refer to the setup and data loading exercises covered in earlier posts.
*** IMPORTANT ***
Before we execute our job in Visual Studio, we need to do one last thing: set the project’s target (CPU) platform to x64. Be default, Visual Studio will attempt to run programs against an x86 architecture and this will result in an error when executed against an HDInsight in Azure cluster:
1. From the Project menu, select the <project name> Properties item.
2. Click on the Build item on the left-hand side of the Properties page.
3. In the Platform drop-down at the top-right of the page, change the value to x64
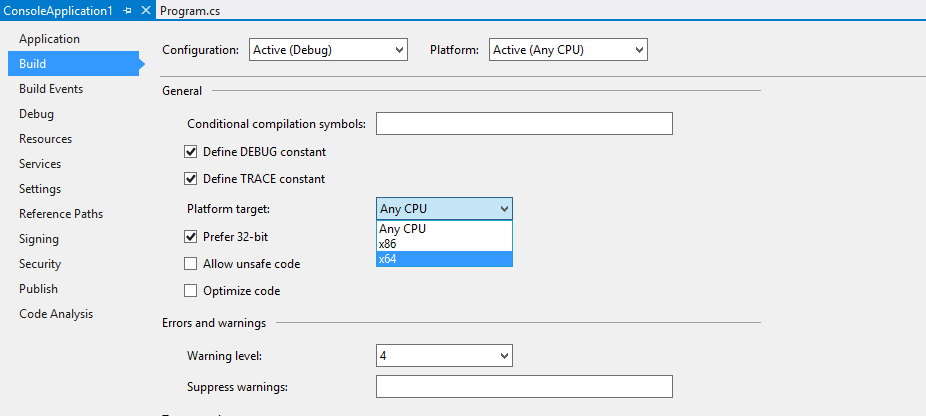
4. Close the Properties page or simply navigate to the Program.cs page.
Now that the target platform is set, run the application. Once the job successfully completes, you can connect to either the name node of your Azure cluster or to the underlying storage to view the contents of the output file /demo/ufo/out/part-00000. How to do this is covered in the earlier post on loading data to Azure.
