Hacking Web Service Parameters for R Modules in Azure Machine Learning
By Bob Savard, Senior Consultant
Purpose
The purpose of this blog post is to use a particular use-case to explain how web service parameters are used in Azure ML, and how you can enhance their existing capabilities.
Introduction to URIs in Azure ML
Using Azure ML Studio, users publish REST web services. Interaction with those published web services is via URIs. If you're new to REST web services, there are a plethora of online resources that can bring you up to speed. Here's what Wikipedia has to say.
There are two modes in which to execute an AML web service endpoint: Request Response and Batch Execution. The URI structure will have a common base between the two, but with additional segments in BE mode.
A typical Azure ML web service URI has this base structure:
https://europewest.services.azureml.net/workspaces/\<workspace ID>/services/<service ID>/<action>?api-version-2.0
The workspace ID is attached to your Azure Machine Learning workspace, so this value will not change for the web services that are within your workspace.
The service ID identifies a specific web service within your workspace. So each experiment's web service will have a unique service ID.
The value of action will depend whether you're executing the API in Request Response or Batch Execution mode. In RR mode, action will be "execute". Actionin BE mode can be blank with a request body for submitting a job, blank with no request body for getting the status of a job, "start" and "delete". The HTTP Method header used varies between POST, GET and DELETE.
For BE mode, there is a "jobs" segment, followed by the Job ID and then action:
https://europewest.services.azureml.net/workspaces/\<workspace ID>/services/<service ID>/jobs/<Job ID>/<action>?api-version-2.0
There are several ways to pass data with an HTTP request. You could add data to the URI as query parameters, you could build it into the URI structure itself, or you could pass it in the body of the request. Azure ML has you pass data in the request body, as JSON.
Next, I'll explain how you work with Azure ML to pass that data, as web service parameters, to an ML API endpoint.
Web Service Parameters in Azure ML
As of the writing of this post, Azure ML supports web service parameters for several types of modules.
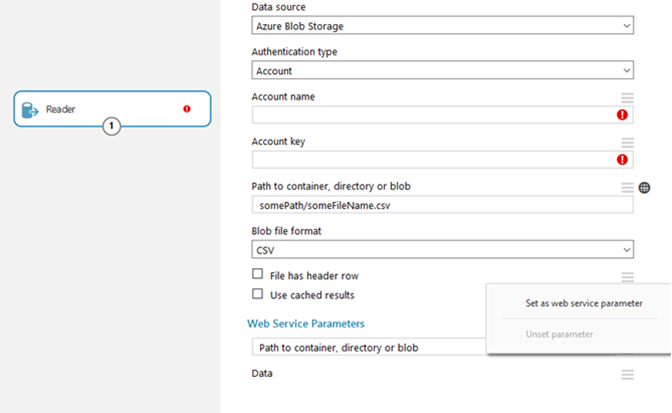
If you add a Reader module to your experiment, you can see that several of its parameters have a grey striped box icon. In the image below, I've clicked the icon for "File has header row", and a pop-up appeared. Clicking "Set as web service parameter" tells AML to expect a parameter with that name as part of a web service request, and the grey icon turns into a black globe icon (see "Path to container, directory or blob" in the screen-grab). Internally, the Reader module gathers that parameter from a submitted request, and uses the value of that parameter to read data from a data source. One reason you may elect to expose the Reader module's parameter "Path to container, directory or blob" as a web service parameter is to provide flexibility to the API caller so it can choose which blob object to load, rather than having that value hard-coded within the experiment itself.
Depending on the kind of "Data source" you've chosen for the Reader module, you'll get different options of parameters to expose to the web service. For example, if you chose "Web URL via HTTP" as the "Data source" type, you'd have the option of exposing the URL as a web service parameter. That gives the API caller tremendous flexibility.
Let's say you've chosen to make "Path to container, directory or blob" a web service parameter and you've hard-coded the values for other parameters like "Account Name", "Account Key", etc. What you then have is an Azure ML web service that reads in whatever blob you specify in the web service call, then exits. No problem, easy day. But that's not very useful by itself, so let's say your experiment needs to use R to do some calculations on data read from two blobs in Blob Storage, and return a result. Let's also stipulate that the R code needs other information passed in via a web service parameter. Ah, we now have a problem because neither the Reader nor Execute R Script modules allow us to add a user defined web service parameter. What options do we have? We could build a custom R module that would handle that. But what if we didn't know how to do that and didn't have time to learn before our project deadline?
Enter the Hack
What I'm about to describe is likely to be called a hack, and rightly so, because there is a more proper way of doing it. While, in general, hacks are a no-no, they are sometimes necessary for varying reasons. For our purpose of better understanding AML, this one is OK.
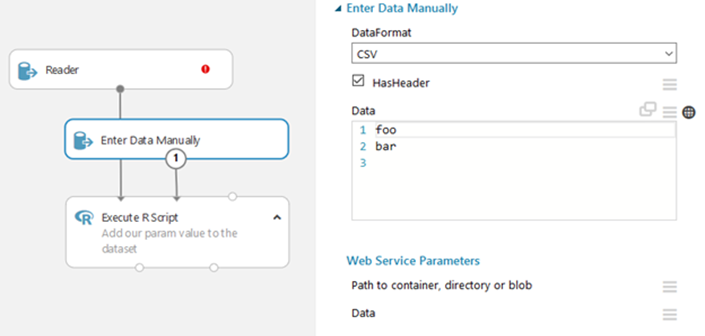
For this exercise, we need to find a way to get our special parameter included in the web service using existing R modules. One way to do that is using the "Enter Data Manually" module. Documentation for the module can be found here. Basically, that module lets you specify small datasets, so we'll take advantage of that. We'll say that the dataset's column name will be our parameter name, and the first value in the column will be our parameter's value.
Here's what we have so far (see the image below): a Reader module, and a new "Enter Data Manually" module, each providing inputs to the Dataset1 and Dataset2 ports respectively of an "Execute R Script" module. The "Enter Data Manually" module has "Data" specified as "foo" and "bar". Since we've checked the "HasHeader" checkbox, "foo" is considered the column title and "bar" is then treated as the first (and only, in our case) value in the column. Notice that there's a carriage return after "bar", that's very important. So, we're using a data structure (column title and a column value) as a container with which to transport our custom web service parameter name ("foo") and value ("bar"). Also notice that "Data" has the black globe icon, indicating AML is expecting it to be part of the web service call.
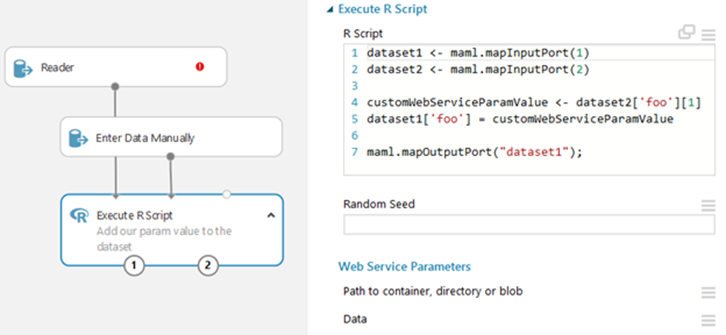
Next, let's discuss the "Execute R Script" module. Its purpose will be to extract the value of our custom web service parameter from the request and add it to the dataset read in by the Reader module. In the image below, line 4 extracts the value of our "foo" parameter and assigns it to a variable. Line 5 then appends a column, with title "foo", to the dataset read in from Blob Storage and sets the column values to the value we read in line 4. In line 7, we're just sending that newly appended dataset to the output port.
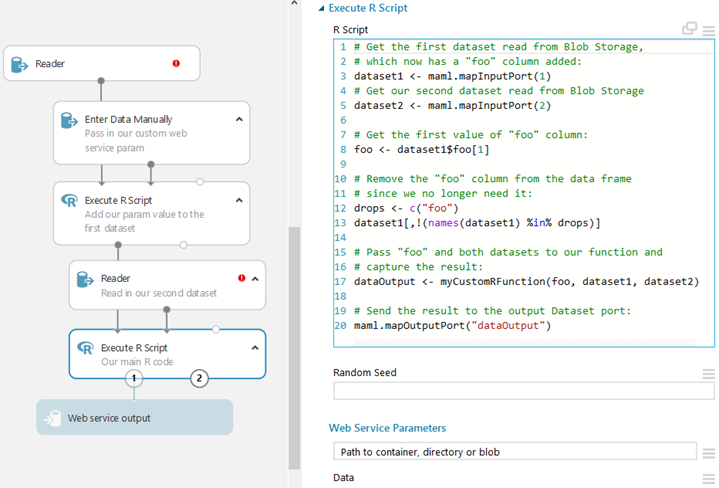
In the following image, you can see that we've added another Execute R Script module. This module does a couple things: in line 8, it grabs the value of our web service parameter from the first value of column "foo". In lines 12 and 13, it removes the "foo" column from the first dataset because we've already extracted its value, so that column no longer serves a purpose. In line 17, we call a custom R function (not defined in this article), passing our custom parameter and the two datasets read from Blob Storage. Note that if we only had to read one dataset from Blob Storage, we could've used just one "Execute R Script" module, but since R modules only have two input data ports, and we have three things we need to read in (two datasets from Blob Storage and our web service parameter's table structure), we have to do it in two stages.
Here's what the raw HTTP request would look like to call this API in Request Response mode. Note that the body is a JSON structure containing our web service request parameters. Also note the inclusion of "\n" in the value for the "Data" parameter. Remember, that's there to tell AML where our header value ends and data value starts.
POST https://europewest.services.azureml.net/workspaces/\< your workspace ID >/services/<your service ID>/execute?api-version=2.0&details=true
Accept: application/json
Authorization: Bearer <your bearer value, which is the API key>
Content-Type: application/json
{
"GlobalParameters": {
"Path to container, directory or blob": "somePath/someFilename.csv",
"Data":"foo\nbar"
}
}