POC - Part 1: Search - Mapping the Content Folder
Ready to start indexing some files? So am I!
But we are not doing that this post. Sorry. Life can be full of disappointment. But not to worry.
At this point in the journey we need to tell the VM where to find the files we want to index (we are indexed files for this first iteration). Eventually we will tell the connector, but one step at a time. Let's copy some content into a folder on our local machine, make it accessible by the VM and index it. Sounds simple? It is...but we'll index the content in the next post.
Pre-prep
- Go get some documents. In my case I pulled some documents from the web using Bing for keyword neurobiology (98 all told in various formats).
- Copy the files into a local folder (I created a folder named neurobiology-files under fast-technet-files). You will map the folder onto the VM in a later step.
The Short Version
- Start VirtualBox. Do not start the VM.
- If you took a snapshot of your VM at the end of the last post then restore it just to be on the safe side.
- Start the VM.
- Map the content folder.
- VirtualBox Manager --> Settings --> Shared Folders --> Machine Folders --> (right click) Add Shared Folders
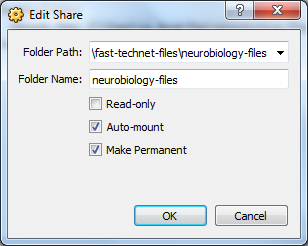
- Folder Path: [the path to the files you downloaded]
- Folder Name: [fills in automatically]
- Auto-mount [checked]
- Make Permanent [checked]
- Click OK and then OK again to close the Settings dialog.
- From within the VM open a Windows Explorer and in the Location field type \\VBOXSVR. You should see your folder listed (mine is listed below, but I don't know what you decided to call yours).
- Right-click on shared folder and select Map Network Drive…
- Drive: X:
- Folder: [should already have \\VBOXSVR\your-folder-name]
- Click Finish. Explorer should now list any files and folders in your shared folder.
- VirtualBox Manager --> Settings --> Shared Folders --> Machine Folders --> (right click) Add Shared Folders
The Long Version
Start VirtualBox. Do not start the VM.
If you took a snapshot of your VM at the end of the last post then restore it just to be on the safe side.
- Click Snapshots (upper right-hand button)
- Right click on TechNetVM-clean-install and select Restore Snapshot.
- Uncheck Create a Snapshot of the Current Machine State and click Restore.

Start the VM. The VM will display a dialog stating that the VM is being restored. It will complete in a few seconds.
Map the content folder.
VirtualBox Manager --> Settings --> Shared Folders --> Machine Folders --> (right click) Add Shared Folders
- Folder Path: [the path to the files you downloaded]
- Folder Name: [fills in automatically]
- Auto-mount [checked]
- Make Permanent [checked]
Click OK and then OK again to close the Settings dialog.
From within the VM open a Windows Explorer and in the Location field type \\VBOXSVR. You should see your folder listed (mine is listed below, but I don't know what you decided to call yours).

Right-click on shared folder and select Map Network Drive…
Drive: X:
Folder: [should already have \\VBOXSVR\your-folder-name]

Click Finish. Explorer should now list any files and folders in your shared folder.

It is good to see a folder with content...in my case one file and folders with files.
Once again, high-fives all around. I recommend taking a snapshot (I called my new snapshot TechNetVM-mapping-content-folder-complete).
So far, 4 posts and we still haven't indexed anything. Time to do something about that. Let's configure the connector and see what all the hubbub is about.